Ubuntu 24.04 버전에서 APM 을 설치하는 방법
APACHE : 2.4.58 ( prefork 모드 , HTTP2 동작안됨)
PHP : 8.3
MARIADB : 10.11.x
추가적으로 OPENSSL 이용해서 보안 인증서까지 등록하는 방법 안내
(추가 certbot 이용 무료 인증서 등록방법도 포함)
1. os버전 확인
|
1 2 |
root@jin-ubuntu:~# cat /etc/issue Ubuntu 24.04.1 LTS \n |
2. 필수 패키지 설치
|
1 |
root@jin-ubuntu:~# sudo apt install dirmngr ca-certificates software-properties-common apt-transport-https curl -y |
3. Mariadb 공식 GPG키 추가
|
1 |
root@jin-ubuntu:~#curl -fsSL https://mariadb.org/mariadb_release_signing_key.asc | sudo gpg --dearmor -o /usr/share/keyrings/mariadb-archive-keyring.gpg |
4. mariadb 저장소 추가
|
1 |
root@jin-ubuntu:~# echo "deb [signed-by=/usr/share/keyrings/mariadb-archive-keyring.gpg] http://mirror.mariadb.org/repo/10.11/ubuntu $(lsb_release -cs) main" | sudo tee /etc/apt/sources.list.d/mariadb.list |
5. 패키지 목록 업데이트
|
1 |
root@jin-ubuntu:~# sudo apt update |
6. mariadb 설치
|
1 |
root@jin-ubuntu:~# sudo apt install mariadb-server |
7. mariadb 서비스 시작 및 서비스 등록
|
1 2 3 |
root@jin-ubuntu:~# sudo systemctl start mariadb root@jin-ubuntu:~# sudo systemctl enable mariadb |
8. mariadb 접속
|
1 2 3 4 5 6 7 8 9 10 11 12 13 14 15 16 17 18 19 20 21 22 23 24 25 26 27 28 29 30 31 32 33 34 |
root@jin-ubuntu:~# mysql -u root -p mysql Enter password: Reading table information for completion of table and column names You can turn off this feature to get a quicker startup with -A Welcome to the MariaDB monitor. Commands end with ; or \g. Your MariaDB connection id is 31 Server version: 10.11.11-MariaDB-ubu2404 mariadb.org binary distribution Copyright (c) 2000, 2018, Oracle, MariaDB Corporation Ab and others. Type 'help;' or '\h' for help. Type '\c' to clear the current input statement. MariaDB [mysql]> \s -------------- mysql Ver 15.1 Distrib 10.11.11-MariaDB, for debian-linux-gnu (x86_64) using EditLine wrapper Connection id: 31 Current database: mysql Current user: root@localhost SSL: Not in use Current pager: stdout Using outfile: '' Using delimiter: ; Server: MariaDB Server version: 10.11.11-MariaDB-ubu2404 mariadb.org binary distribution Protocol version: 10 Connection: Localhost via UNIX socket Server characterset: utf8mb4 Db characterset: utf8mb4 Client characterset: utf8mb3 Conn. characterset: utf8mb3 UNIX socket: /run/mysqld/mysqld.sock Uptime: 42 sec |
기본 engine 확인
|
1 2 3 4 5 6 7 8 9 10 11 12 13 14 15 16 17 18 19 20 21 22 23 24 25 |
MariaDB [mysql]> SELECT engine, support FROM information_schema.engines; +--------------------+---------+ | engine | support | +--------------------+---------+ | CSV | YES | | MRG_MyISAM | YES | | MEMORY | YES | | Aria | YES | | MyISAM | YES | | SEQUENCE | YES | | InnoDB | DEFAULT | | PERFORMANCE_SCHEMA | YES | +--------------------+---------+ 8 rows in set (0.001 sec) MariaDB [mysql]> SHOW VARIABLES LIKE '%engine'; +----------------------------+--------+ | Variable_name | Value | +----------------------------+--------+ | default_storage_engine | InnoDB | | default_tmp_storage_engine | | | enforce_storage_engine | | | storage_engine | InnoDB | +----------------------------+--------+ 4 rows in set (0.002 sec) |
9. root 패스워드 변경
|
1 2 3 4 5 |
MariaDB [mysql]> ALTER USER 'root'@'localhost' IDENTIFIED BY 'qqVCdasd33'; Query OK, 0 rows affected (0.003 sec) MariaDB [mysql]> flush privileges; Query OK, 0 rows affected (0.001 sec) |
10. apache2 설치
|
1 |
root@jin-ubuntu:~# sudo apt install apache2 -y |
11. mod_ssl 활성화 (기본 활성화가 되어 있지 않기 때문에 명령어 입력
|
1 |
root@jin-ubuntu:~# sudo a2enmod ssl |
12. 서비스 시작 및 등록
|
1 2 3 |
root@jin-ubuntu:~# systemctl start apache2 root@jin-ubuntu:~# systemctl enable apache2 |
13. 서비스 포트 확인
|
1 2 3 |
root@jin-ubuntu:~# netstat -anp | grep "apache" tcp6 0 0 :::80 :::* LISTEN 3853/apache2 tcp6 0 0 :::443 :::* LISTEN 3853/apache2 |
14. php 8.3 install
|
1 2 3 4 5 6 7 8 9 10 11 12 13 14 15 |
root@jin-ubuntu:~# sudo apt install php8.3 -y root@jin-ubuntu:~# sudo apt install php8.3-gd -y root@jin-ubuntu:~# sudo apt install php8.3-curl -y root@jin-ubuntu:~# sudo apt install php8.3-mysql -y root@jin-ubuntu:~# sudo apt install php8.3-bz2 -y root@jin-ubuntu:~# sudo apt install php8.3-mbstring -y root@jin-ubuntu:~# sudo apt install php8.3-mcrypt -y root@jin-ubuntu:~# sudo apt install php8.3-xml -y |
15. php.ini 설정
|
1 2 3 4 5 6 |
root@jin-ubuntu:~# vi /etc/php/8.3/apache2/php.ini short_open_tag = On date.timezone = "Asia/Seoul" error_reporting = "E_ALL & ~E_NOTICE & ~E_DEPRECATED & ~E_USER_DEPRECATED" upload_max_filesize = 12M |
16. 기본 아파치 환경설정 수정
|
1 2 3 4 5 6 7 8 9 10 11 12 13 14 15 16 17 18 19 20 21 22 23 24 25 26 27 28 29 30 31 32 33 34 35 36 37 38 39 40 41 42 43 44 45 46 47 48 49 50 51 52 53 54 55 56 57 |
root@jin-ubuntu:~# vi /etc/apache2/apache2.conf #ServerRoot "/etc/apache2" DefaultRuntimeDir ${APACHE_RUN_DIR} PidFile ${APACHE_PID_FILE} Timeout 300 KeepAlive On MaxKeepAliveRequests 100 KeepAliveTimeout 5 User ${APACHE_RUN_USER} Group ${APACHE_RUN_GROUP} HostnameLookups Off ErrorLog ${APACHE_LOG_DIR}/error.log LogLevel warn # Include module configuration: IncludeOptional mods-enabled/*.load IncludeOptional mods-enabled/*.conf # Include list of ports to listen on Include ports.conf ServerName www.example.com <Directory /> AllowOverride None Require all granted </Directory> AccessFileName .htaccess <FilesMatch "^\.ht"> Require all denied </FilesMatch> LogFormat "%v:%p %h %l %u %t \"%r\" %>s %O \"%{Referer}i\" \"%{User-Agent}i\"" vhost_combined LogFormat "%h %l %u %t \"%r\" %>s %O \"%{Referer}i\" \"%{User-Agent}i\"" combined LogFormat "%h %l %u %t \"%r\" %>s %O" common LogFormat "%{Referer}i -> %U" referer LogFormat "%{User-agent}i" agent # Include of directories ignores editors' and dpkg's backup files, # see README.Debian for details. # Include generic snippets of statements IncludeOptional conf-enabled/*.conf # Include the virtual host configurations: IncludeOptional sites-enabled/*.conf |
16-1 apache 버전 숨기기
|
1 2 3 4 5 |
root@jin-ubuntu:~# vi /etc/apache2/conf-enabled/security.conf #내용 수정 ServerTokens Prod ServerSignature Off |
17. html 파일 내에서 php 인식할 수 있게 수정
|
1 2 3 |
root@jin-ubuntu:~# vi /etc/apache2/mods-available/mime.conf ### 추가 AddType application/x-httpd-php .php .html |
|
1 2 3 4 |
root@jin-ubuntu:~# vi /etc/apache2/mods-enabled/php8.3.conf ### 3번째줄 아래 내용으로 수정 즉 끝에 html 추가 <FilesMatch ".+\.ph(?:ar|p|tml|html)$"> |
가상호스트를 구성하기 위해서 디렉토리 생성 및 index 파일 생성
|
1 2 3 4 5 6 7 8 9 10 11 12 13 |
root@jin-ubuntu:~# mkdir -p /home/xinet/html ### index.html 파일 생성 root@jin-ubuntu:~# vi /home/xinet/html/index.html <html> <body> <h1>www.xinet.kr ssl 테스트</h1> <?php echo "ssl 이 페이지는 PHP를 실행합니다!"; ?> </body> </html> ~ |
가상호스트 www.xinet.kr 생성하기 위해서 기본 default 삭제 후 파일 생성
여기에서 sites-available 폴더와 sites-enable 폴더가 존재하는데 실제 동작되는 폴더는 enable 폴더이다
오타 및 기타 방지를 위해서 sites-available에 먼저 기입하고 적용하는 방식인데 여기에선 바로 사용
|
1 2 3 4 5 6 7 8 9 10 11 12 |
root@jin-ubuntu:~# rm -f /etc/apache2/sites-enabled/000-default.conf root@jin-ubuntu:~# vi /etc/apache2/sites-enabled/www.xinet.kr.conf <VirtualHost *:80> DocumentRoot /home/xinet/html ServerName xinet.kr ServerAlias www.xinet.kr ErrorLog ${APACHE_LOG_DIR}/error.log CustomLog ${APACHE_LOG_DIR}/access.log combined </VirtualHost> |
구분에러 확인
|
1 2 |
root@jin-ubuntu:~# apachectl -t Syntax OK |
웹서버 재시작
|
1 |
root@jin-ubuntu:~# systemctl restart apache2 |
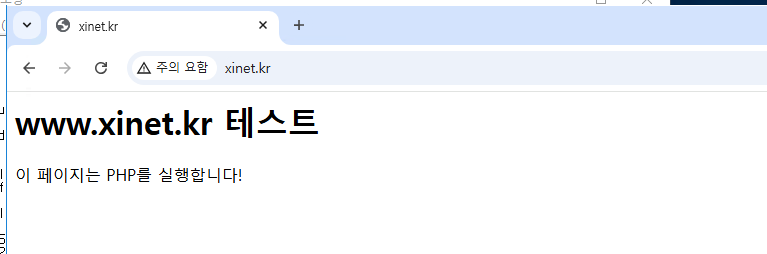
웹페이지 확인 html 내에서 php도 정상 작동
이제 openssl를 이용하여 ssl 페이지를 구성해보자
1. key 파일 생성
|
1 2 3 4 5 6 7 8 9 |
### SSL 폴더 생성 및 경로 이동 root@jin-ubuntu:~# mkdir /etc/apache2/ssl root@jin-ubuntu:~# cd /etc/apache2/ssl/ ### KEY 파일 생성 root@jin-ubuntu:/etc/apache2/ssl# openssl genrsa -des3 -out www.xinet.kr.key 2048 Enter PEM pass phrase: Verifying - Enter PEM pass phrase: |
2. CSR 파일 생성
|
1 2 3 4 5 6 7 8 9 10 11 12 13 14 15 16 17 18 19 20 21 |
root@jin-ubuntu:/etc/apache2/ssl# openssl req -new -key www.xinet.kr.key -out www.xinet.kr.csr Enter pass phrase for www.xinet.kr.key: You are about to be asked to enter information that will be incorporated into your certificate request. What you are about to enter is what is called a Distinguished Name or a DN. There are quite a few fields but you can leave some blank For some fields there will be a default value, If you enter '.', the field will be left blank. ----- Country Name (2 letter code) [AU]:KR State or Province Name (full name) [Some-State]:Gyeonggi-do Locality Name (eg, city) []:Gwangmyeong-si Organization Name (eg, company) [Internet Widgits Pty Ltd]:xinet Organizational Unit Name (eg, section) []:se Common Name (e.g. server FQDN or YOUR name) []:www.xinet.kr Email Address []: Please enter the following 'extra' attributes to be sent with your certificate request A challenge password []: An optional company name []: |
3. 인증서 구매 업체에서 받은 파일을 해당 폴더에 압축 해제하면 다음과 같이 파일이 존재한다
|
1 2 3 4 5 6 7 |
root@jin-ubuntu:/etc/apache2/ssl# ls -l -rw-r--r-- 1 root root 1248 Oct 11 01:30 CA_GLOBALSIGN.crt -rw-r--r-- 1 root root 3938 Oct 11 01:30 ChainFile_ChainBundle.crt -rw-r--r-- 1 root root 2286 Oct 11 01:30 File_www.xinet.kr_apache.crt -rw-r--r-- 1 root root 1017 Mar 14 01:49 www.xinet.kr.csr -rw-r--r-- 1 root root 1679 Oct 11 09:54 www.xinet.kr.key |
4. TLS 버전을 구성하기 위해서 파일 생성
|
1 2 3 4 5 6 7 8 9 10 11 12 13 14 15 |
root@jin-ubuntu:/etc/apache2/ssl# vi /etc/apache2/ssl.conf SSLEngine on # Intermediate configuration, tweak to your needs SSLProtocol all -SSLv2 -SSLv3 -TLSv1 -TLSv1.1 SSLCipherSuite ECDHE-ECDSA-AES128-GCM-SHA256:ECDHE-RSA-AES128-GCM-SHA256:ECDHE-ECDSA-AES256-GCM-SHA384:ECDHE-RSA-AES256-GCM-SHA384:ECDHE-ECDSA-CHACHA20-POLY1305:ECDHE-RSA-CHACHA20-POLY1305:DHE-RSA-AES128-GCM-SHA256:DHE-RSA-AES256-GCM-SHA384 SSLHonorCipherOrder off SSLSessionTickets off SSLOptions +StrictRequire # Add vhost name to log entries: LogFormat "%h %l %u %t \"%r\" %>s %b \"%{Referer}i\" \"%{User-agent}i\"" vhost_combined LogFormat "%v %h %l %u %t \"%r\" %>s %b" vhost_common |
5. SSL 가상호스트 파일 생성
|
1 2 3 4 5 6 7 8 9 10 11 12 13 14 15 |
root@jin-ubuntu:/etc/apache2/ssl# vi /etc/apache2/sites-enabled/www.xinet.kr-ssl.conf <VirtualHost *:443> DocumentRoot /home/xinet/html ServerName xinet.kr ServerAlias www.xinet.kr ErrorLog ${APACHE_LOG_DIR}/error.log CustomLog ${APACHE_LOG_DIR}/access.log combined SSLCertificateFile /etc/apache2/ssl/File_www.xinet.kr_apache.crt SSLCertificateKeyFile /etc/apache2/ssl/www.xinet.kr.key SSLCertificateChainFile /etc/apache2/ssl/ChainFile_ChainBundle.crt SSLCACertificateFile /etc/apache2/ssl/CA_GLOBALSIGN.crt Include /etc/apache2/ssl.conf </VirtualHost> |
6. 구문 오류 확인 후 이상이 없다면 Apache 재시작
|
1 2 3 4 |
root@jin-ubuntu:/etc/apache2/ssl# apachectl -t Syntax OK root@jin-ubuntu: systemctl restart apache2 |
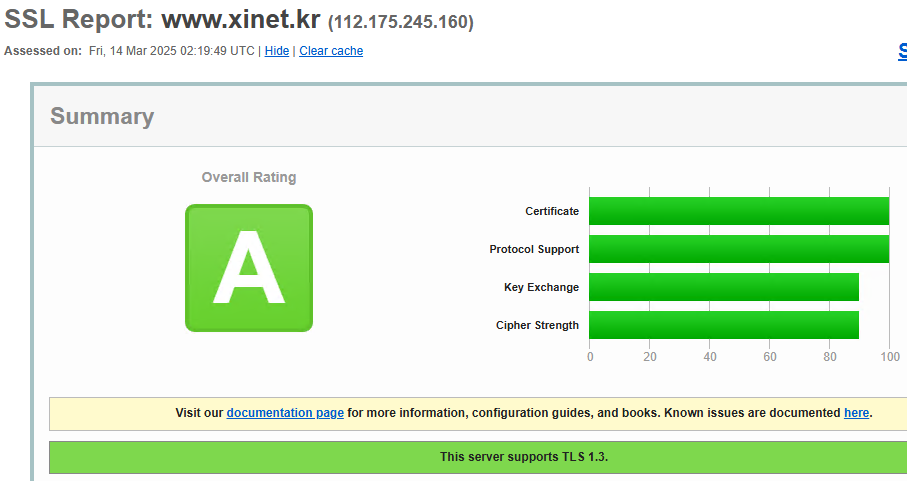
7. 웹페이지에서 확인 TLS 1.3 으로 동작되는것을 확인 할 수 있다

8. SSL 검증 사이트에서도 A등급
무료 인증서를 이용해서 SSL을 이용하는 방법
1. Certbot 설치 진행
|
1 |
root@jin-ubuntu:~# sudo apt install certbot python3-certbot-apache -y |
2. cert 명령어를 이용해서 자동으로 파일 생성되게 구성
|
1 |
root@jin-ubuntu:~# sudo certbot --apache -d apache2.xinet.kr |
자동으로 파일 생성이 된다 ( /etc/apache2/sites-enabled/www.xinet.kr-le-ssl.conf 파일 생성)
|
1 2 3 4 5 6 7 8 9 10 11 12 13 14 15 16 17 18 19 20 21 22 23 24 25 26 27 28 29 30 31 32 |
Saving debug log to /var/log/letsencrypt/letsencrypt.log Enter email address (used for urgent renewal and security notices) (Enter 'c' to cancel): abc@abc.com - - - - - - - - - - - - - - - - - - - - - - - - - - - - - - - - - - - - - - - - Please read the Terms of Service at https://letsencrypt.org/documents/LE-SA-v1.5-February-24-2025.pdf. You must agree in order to register with the ACME server. Do you agree? - - - - - - - - - - - - - - - - - - - - - - - - - - - - - - - - - - - - - - - - (Y)es/(N)o: y - - - - - - - - - - - - - - - - - - - - - - - - - - - - - - - - - - - - - - - - Would you be willing, once your first certificate is successfully issued, to share your email address with the Electronic Frontier Foundation, a founding partner of the Let's Encrypt project and the non-profit organization that develops Certbot? We'd like to send you email about our work encrypting the web, EFF news, campaigns, and ways to support digital freedom. - - - - - - - - - - - - - - - - - - - - - - - - - - - - - - - - - - - - - - - - (Y)es/(N)o: y Account registered. Requesting a certificate for apache2.xinet.kr Successfully received certificate. Certificate is saved at: /etc/letsencrypt/live/apache2.xinet.kr/fullchain.pem Key is saved at: /etc/letsencrypt/live/apache2.xinet.kr/privkey.pem This certificate expires on 2025-06-11. These files will be updated when the certificate renews. Certbot has set up a scheduled task to automatically renew this certificate in the background. Deploying certificate Successfully deployed certificate for apache2.xinet.kr to /etc/apache2/sites-enabled/www.xinet.kr-le-ssl.conf Congratulations! You have successfully enabled HTTPS on https://apache2.xinet.kr |
해당 파일이 자동으로 생성이 된다
|
1 2 |
root@jin-ubuntu:~# ls -l /etc/apache2/sites-enabled/apache2.xinet.kr-ssl.conf -rw-r--r-- 1 root root 354 Mar 14 02:17 /etc/apache2/sites-enabled/apache2.xinet.kr-ssl.conf |
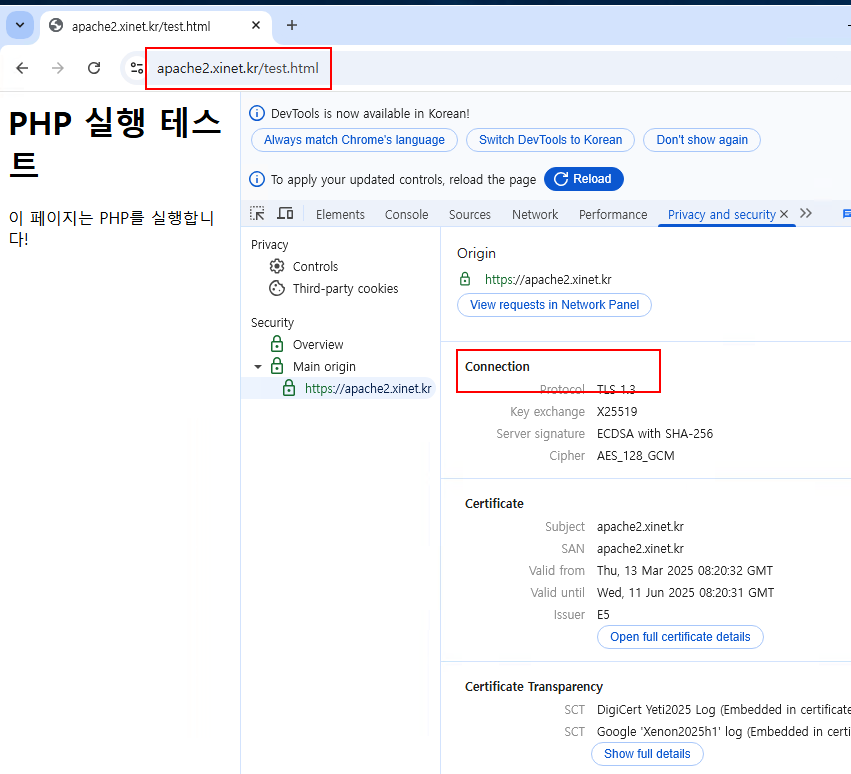
아파치 재시작 후 웹페이지에서 확인
|
1 2 3 4 5 6 |
### 구분오류 확인 root@jin-ubuntu:/etc/apache2/ssl# apachectl -t Syntax OK ### apache 재시작 root@jin-ubuntu: systemctl restart apache2 |
만약 cert 봇을 이용해서 수동으로 경로 지정을 하려면 다음과 같이 지정하면 된다
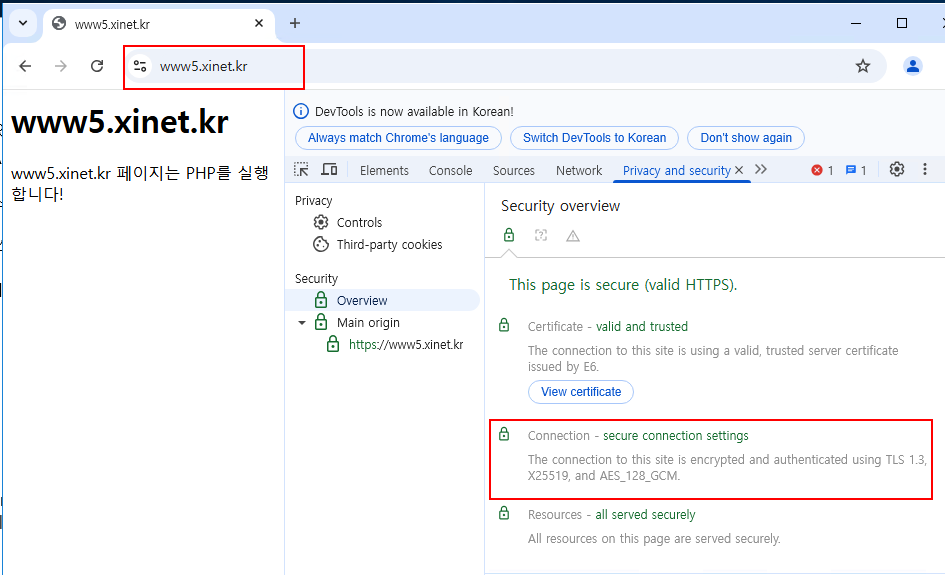
수동으로 진행시 www5.xinet.kr의 가상호스트 도메인이 존재하고 페이지가 출력되어야 한다
|
1 2 3 4 5 6 7 8 |
root@jin-ubuntu:~# vi /etc/apache2/sites-enabled/www5.xinet.kr.conf <VirtualHost *:80> DocumentRoot /home/www5/html ServerName www5.xinet.kr ErrorLog ${APACHE_LOG_DIR}/error.log CustomLog ${APACHE_LOG_DIR}/access.log combined </VirtualHost> |
|
1 |
root@jin-ubuntu:~# certbot certonly --agree-tos -m abc@abc.com --webroot -w /home/www5/html/ -d www5.xinet.kr |
–agree-tos : 약관 모두 동의
-m : 메일주소 입력 / 인증서 만료시 메일 회신주소
–webroot : webroot 방식으로 인증 진행
-w : 도메인 홈 경로 주소
-d : 도메인 주소 , 도메인을 여려거 발급하려면 계속
|
1 2 3 4 5 6 7 8 9 10 11 12 13 14 |
Requesting a certificate for www5.xinet.kr Successfully received certificate. Certificate is saved at: /etc/letsencrypt/live/www5.xinet.kr/fullchain.pem Key is saved at: /etc/letsencrypt/live/www5.xinet.kr/privkey.pem This certificate expires on 2025-06-12. These files will be updated when the certificate renews. Certbot has set up a scheduled task to automatically renew this certificate in the background. - - - - - - - - - - - - - - - - - - - - - - - - - - - - - - - - - - - - - - - - If you like Certbot, please consider supporting our work by: * Donating to ISRG / Let's Encrypt: https://letsencrypt.org/donate * Donating to EFF: https://eff.org/donate-le - - - - - - - - - - - - - - - - - - - - - - - - - - - - - - - - - - - - - - - - |
해당 파일은 자동으로 파일이 생성되지 않으므로 vi로 경로를 지정해서 파일 생성
|
1 2 3 4 5 6 7 8 9 10 11 |
root@jin-ubuntu:~# vi /etc/apache2/sites-enabled/www5.xinet.kr-ssl.conf <VirtualHost *:443> DocumentRoot /home/www5/html ServerName www5.xinet.kr ErrorLog ${APACHE_LOG_DIR}/error.log CustomLog ${APACHE_LOG_DIR}/access.log combined SSLCertificateFile /etc/letsencrypt/live/www5.xinet.kr/fullchain.pem SSLCertificateKeyFile /etc/letsencrypt/live/www5.xinet.kr/privkey.pem Include /etc/letsencrypt/options-ssl-apache.conf </VirtualHost> |
웹페이지 확인