apache의 server-status 파일을 가지고 모니터링 할수 있는 방법 연동은 promethues 로 연동
1. 웹서버의 server-status 의 활성화 ( apache 2.4.x)
|
1 2 3 4 5 6 7 |
[root@www ~]# vi /usr/local/apache/conf/httpd.conf <Location /server-status> SetHandler server-status Require local Require all denied </Location> |
2. 웹서버 재시작
|
1 |
[root@www ~]# systemctl restart httpd |
3. curl 상태 확인 정상적으로 확인이 되었다면 아래와 같이 표시가 된다
|
1 2 3 4 5 6 7 8 9 10 11 12 13 14 15 16 17 18 19 20 21 22 23 |
[root@www ~]# curl localhost/server-status % Total % Received % Xferd Average Speed Time Time Time Current Dload Upload Total Spent Left Speed 100 8655 <!DOCTYPE HTML PUBLIC "-//W3C//DTD HTML 3.2 Final//EN">-:-- 0 0<html><head> <title>Apache Status</title> </head><body> 8<h1>Apache Server Status for www.xinet.kr (via 127.0.0.1)</h1> 655 <dt>Server MPM: event</dt> <dt>Server Built: Sep 19 2019 14:49:06 </dt></dl><hr /><dl> 0<dt>Current Time: Friday, 27-Oct-2023 09:47:34 KST</dt> <dt>Restart Time: Friday, 27-Oct-2023 09:47:02 KST</dt> 78<dt>Parent Server Config. Generation: 1</dt> 72<dt>Parent Server MPM Generation: 0</dt> 1<dt>Server uptime: 32 seconds</dt> <dt>Server load: 0.00 0.03 0.05</dt> 0 <dt>Total accesses: 8 - Total Traffic: 19 kB - Total Duration: 576</dt> --<dt>CPU Usage: u.03 s.03 cu0 cs0 - .187% CPU load</dt> :--<dt>.25 requests/sec - 608 B/second - 2432 B/request - 72 ms/request</dt> :--<dt>1 requests currently being processed, 399 idle workers</dt> </dl> |
4. apache_exporter 다운로드 및 경로 이동
|
1 2 3 4 5 6 7 |
[root@www ~]# wget https://github.com/Lusitaniae/apache_exporter/releases/download/v1.0.3/apache_exporter-1.0.3.linux-amd64.tar.gz [root@www ~]# tar xvfz apache_exporter-1.0.3.linux-amd64.tar.gz [root@www ~]# mv apache_exporter-1.0.3.linux-amd64/apache_exporter /usr/local/bin/ [root@www ~]# chown root:root /usr/local/bin/apache_exporter |
5. 서비스 시작 파일 생성 ( 만약 server-status가 https로 통신하는 url주소이라면 –scrape_uri=”https://xinet.kr/server-status/?auto” 명시하면 된다)
|
1 2 3 4 5 6 7 8 9 10 11 12 13 14 15 16 17 18 19 |
[root@www ~]# vi /etc/systemd/system/apache_exporter.service [Unit] Description=Apache Exporter Wants=network-online.target After=network-online.target [Service] User=root Group=root Type=simple ExecStart=/usr/local/bin/apache_exporter \ --scrape_uri="localhost/?auto" ### scrape_uri https #--scrape_uri="https://xinet.kr/server-status/?auto" [Install] WantedBy=multi-user.target |
6. 서비스 등록 및 시작
|
1 2 3 4 5 6 7 8 9 10 11 12 13 |
### 서비스 등록 [root@www ~]# systemctl daemon-reload ### 서비스 시작 [root@www ~]# systemctl start apache_exporter ### 서비스 상태확인 [root@www ~]# systemctl status apache_exporter ● apache_exporter.service - Apache Exporter Loaded: loaded (/etc/systemd/system/apache_exporter.service; disabled; vendor preset: disabled) Active: active (running) since 금 2023-10-27 09:58:59 KST; 17s ago Main PID: 109516 (apache_exporter) CGroup: /system.slice/apache_exporter.service |
7. 정상적으로 실행이 되었다면 9117번 포트가 실행이 되어야 함
|
1 2 3 |
[root@www ~]# netstat -anp | grep apache_expor tcp6 0 0 :::9117 :::* LISTEN 109516/apache_expor unix 3 [ ] STREAM CONNECTED 1307409000 109516/apache_expor |
8. promethues 에 등록해서 사용
|
1 2 3 4 5 6 7 |
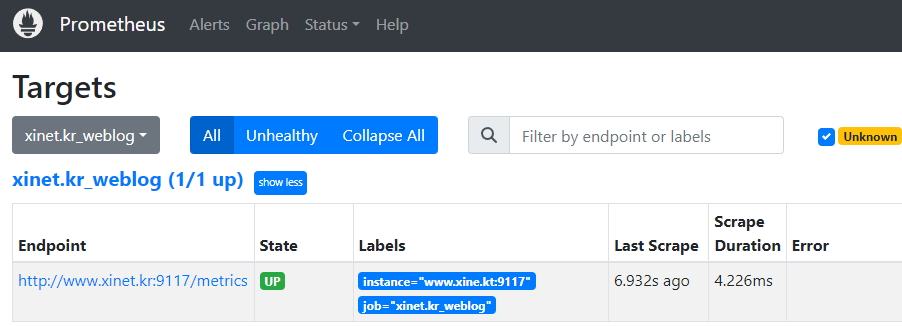
[root@www /usr/local/prometheus]# vi prometheus.yml - job_name: "xinet.kr_weblog" scrape_interval: 5s static_configs: - targets: ["www.xinet.kr:9117"] |
9. prometheus 재시작
|
1 |
[root@www /usr/local/prometheus]# systemctl restart prometheus.service |
10. prometheus target 에서 확인

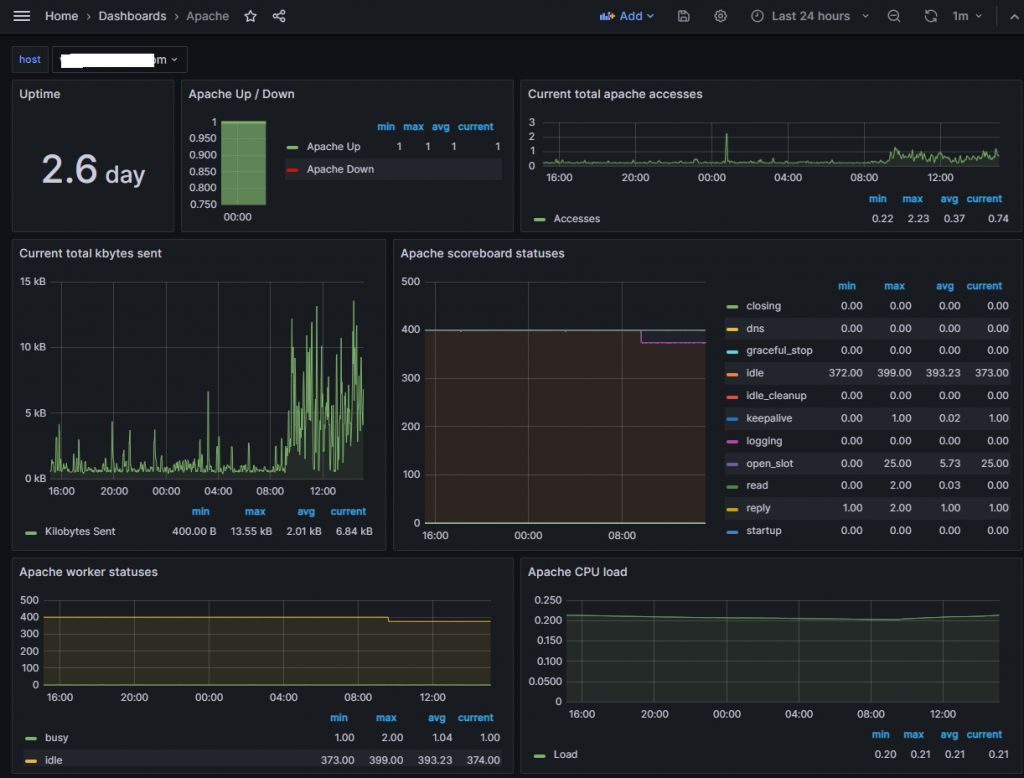
11. grafana에서 연동해서 사용
대시보드 : https://grafana.com/grafana/dashboards/3894-apache/
json 파일 다운로드 해서 대시보드에서 import 진행
