OS : Centos 7
nginx : 1.21.7 ( nginx-quic ) / http3 지원
php : 8.1.5
mariadb : mariadb 10.7.3
oepnssl : 1.1.1n
tls 1.3 enable , log geoip , php-fpm 구동
HTTP3는 요즘 구글 및 유튜브에서 사용을 한다 차세대 프로토콜이며 기존 HTTP2 보다 속도향상이 있으며 무엇보다 UDP 프로토콜을 사용한다
GOOGLE에서 설계한 QUIC 전송 계층 네트워크 프로토콜 기반
기본 NGINX 에서 버전을 지원하지 않고 별도 버전으로 지원을 하니 참고
1. mariadb 설치 yum repo에 추가 후 설치 진행
|
1 2 3 4 5 6 7 8 |
[root@localhost ~]# vi /etc/yum.repos.d/MariaDB.repo #추가 [mariadb] name = MariaDB baseurl = http://yum.mariadb.org/10.7/centos7-amd64 gpgkey = https://yum.mariadb.org/RPM-GPG-KEY-MariaDB gpgcheck = 1 |
2. yum으로 mariadb 10.7.3 install
|
1 |
[root@localhost ~]# yum -y install MariaDB |
3. mariadb는 설치가 완료되었으며 이제 시작만 하면 되지만 사용자마다 mysql 을 설치하는 디렉토리가 모두 다르므로 해당 경로를 지정해서 설치해주자
기본 바로 시작을 하게 되면 경로는 /var/lib/mysql 이 기본경로이다
설치는 기본경로
|
1 2 3 4 5 6 7 8 9 10 11 12 13 |
[root@localhost ~]# mysql_install_db [root@localhost ~]# ls -l /var/lib/mysql -rw-rw---- 1 root root 24576 8??14 16:03 aria_log.00000001 -rw-rw---- 1 root root 52 8??14 16:03 aria_log_control -rw-rw---- 1 root root 972 8??14 16:03 ib_buffer_pool -rw-rw---- 1 root root 134217728 8??14 16:03 ib_logfile0 -rw-rw---- 1 root root 134217728 8??14 16:03 ib_logfile1 -rw-rw---- 1 root root 134217728 8??14 16:03 ib_logfile2 -rw-rw---- 1 root root 77594624 8??14 16:03 ibdata1 drwx------ 2 root root 4096 8??14 16:03 mysql drwx------ 2 root root 20 8??14 16:03 performance_schema drwx------ 2 root root 20 8??14 16:03 test |
4. 해당 데이터베이스의 USER 권한이 root 이므로 이것을 mysql로 변경해주자
|
1 |
[root@localhost ~]# chown -R mysql /var/lib/mysql |
5. 기본 여러지 환경설정값을 변경해서 사용하므로 /etc/my.cnf.d/server.cnf 해당 파일을 아래와 같이 수정해준다
기본 엔진 myisam / 만약 innodb를 사용하려면 6번의 server.cnf 파일을 참고한다
|
1 2 3 4 5 6 7 8 9 10 11 12 13 14 15 16 17 18 19 20 21 22 23 24 25 26 27 28 29 30 31 32 33 34 35 36 37 38 39 40 41 42 43 44 45 46 47 48 49 50 51 52 53 54 55 56 57 58 59 60 61 62 63 64 65 66 67 68 69 70 71 72 73 74 75 76 77 78 79 80 81 82 83 84 85 86 87 88 89 90 |
[server] [mysqld] bind-address=0.0.0.0 skip-external-locking key_buffer_size = 384M max_allowed_packet = 512M table_open_cache = 2048 sort_buffer_size = 2M read_buffer_size = 2M read_rnd_buffer_size = 8M myisam_sort_buffer_size = 64M thread_cache_size = 8 #dns query skip-name-resolve <span class="crayon-i">sql_mode</span>=<span class="crayon-i">NO_AUTO_CREATE_USER</span><span class="crayon-sy">,</span><span class="crayon-i">NO_ENGINE_SUBSTITUTION</span> #connection max_connections = 1000 max_connect_errors = 1000 wait_timeout= 60 #slow-queries #slow_query_log = /var/lib//mysql/slow-queries.log #long_query_time = 3 #log-slow-queries = /var/lib/mysql/mysql-slow-queries.log ##timestamp explicit_defaults_for_timestamp symbolic-links=0 <span class="crayon-i">sql_mode</span>=<span class="crayon-i">NO_AUTO_CREATE_USER</span><span class="crayon-sy">,</span><span class="crayon-i">NO_ENGINE_SUBSTITUTION</span> ###chracter character-set-client-handshake=FALSE init_connect = SET collation_connection = utf8_general_ci init_connect = SET NAMES utf8 character-set-server = utf8 collation-server = utf8_general_ci ### MyISAM Spectific options default-storage-engine = myisam key_buffer_size = 32M bulk_insert_buffer_size = 64M myisam_sort_buffer_size = 128M myisam_max_sort_file_size = 10G myisam_repair_threads = 1 ### INNODB Spectific options #default-storage-engine = InnoDB skip-innodb #innodb_additional_mem_pool_size = 16M #innodb_buffer_pool_size = 1024MB #innodb_data_file_path = ibdata1:10M:autoextend #innodb_write_io_threads = 8 #innodb_read_io_threads = 8 #innodb_thread_concurrency = 16 #innodb_flush_log_at_trx_commit = 1 #innodb_log_buffer_size = 8M #innodb_log_file_size = 128M #innodb_log_files_in_group = 3 #innodb_max_dirty_pages_pct = 90 #innodb_lock_wait_timeout = 120 [mysqldump] #default-character-set = utf8 max_allowed_packet = 512M [myisamchk] key_buffer_size = 512M sort_buffer_size = 512M read_buffer = 8M write_buffer = 8M # # * Galera-related settings # [galera] # Mandatory settings #wsrep_on=ON #wsrep_provider= #wsrep_cluster_address= #binlog_format=row #default_storage_engine=InnoDB #innodb_autoinc_lock_mode=2 # Optional setting #wsrep_slave_threads=1 |
6. 기본 여러지 환경설정값을 변경해서 사용하므로 /etc/my.cnf.d/server.cnf 해당 파일을 아래와 같이 수정해준다
기본 엔진 innodb
|
1 2 3 4 5 6 7 8 9 10 11 12 13 14 15 16 17 18 19 20 21 22 23 24 25 26 27 28 29 30 31 32 33 34 35 36 37 38 39 40 41 42 43 44 45 46 47 48 49 50 51 52 53 54 55 56 57 58 59 60 61 62 63 64 65 66 67 68 69 70 71 72 73 74 75 76 77 78 79 80 81 82 83 84 85 86 87 88 |
[server] [mysqld] bind-address=0.0.0.0 skip-external-locking key_buffer_size = 384M max_allowed_packet = 512M table_open_cache = 2048 sort_buffer_size = 2M read_buffer_size = 2M read_rnd_buffer_size = 8M myisam_sort_buffer_size = 64M thread_cache_size = 8 #dns query skip-name-resolve <span class="crayon-i">sql_mode</span>=<span class="crayon-i">NO_AUTO_CREATE_USER</span><span class="crayon-sy">,</span><span class="crayon-i">NO_ENGINE_SUBSTITUTION</span> #connection max_connections = 1000 max_connect_errors = 1000 wait_timeout= 60 #slow-queries #slow_query_log = /var/lib//mysql/slow-queries.log #long_query_time = 3 #log-slow-queries = /var/lib/mysql/mysql-slow-queries.log ##timestamp explicit_defaults_for_timestamp <span class="crayon-i">sql_mode</span>=<span class="crayon-i">NO_AUTO_CREATE_USER</span><span class="crayon-sy">,</span><span class="crayon-i">NO_ENGINE_SUBSTITUTION</span> symbolic-links=0 ###chracter character-set-client-handshake=FALSE init_connect = SET collation_connection = utf8_general_ci init_connect = SET NAMES utf8 character-set-server = utf8 collation-server = utf8_general_ci ### MyISAM Spectific options #default-storage-engine = myisam key_buffer_size = 32M bulk_insert_buffer_size = 64M myisam_sort_buffer_size = 128M myisam_max_sort_file_size = 10G myisam_repair_threads = 1 ### INNODB Spectific options default-storage-engine = InnoDB #skip-innodb #innodb_additional_mem_pool_size = 16M innodb_buffer_pool_size = 1024MB innodb_data_file_path = ibdata1:10M:autoextend innodb_write_io_threads = 8 innodb_read_io_threads = 8 innodb_thread_concurrency = 16 innodb_flush_log_at_trx_commit = 1 innodb_log_buffer_size = 8M innodb_log_file_size = 128M innodb_log_files_in_group = 3 innodb_max_dirty_pages_pct = 90 innodb_lock_wait_timeout = 120 [mysqldump] #default-character-set = utf8 max_allowed_packet = 512M [myisamchk] key_buffer_size = 512M sort_buffer_size = 512M read_buffer = 8M write_buffer = 8M # * Galera-related settings # [galera] # Mandatory settings #wsrep_on=ON #wsrep_provider= #wsrep_cluster_address= #binlog_format=row #default_storage_engine=InnoDB #innodb_autoinc_lock_mode=2 # Optional setting #wsrep_slave_threads=1 |
7. 이제 mysql ( mariadb)를 시작해보자
|
1 |
[root@localhost ~]# systemctl start mysql |
8. mysql을 접속해서 환경를 확인해보자
|
1 2 3 4 5 6 7 8 9 10 11 12 13 14 15 16 17 18 19 20 21 22 23 24 25 26 27 28 29 30 31 32 33 34 35 36 37 38 39 40 41 42 43 44 45 46 47 48 49 50 |
[root@localhost html]# mysql Welcome to the MariaDB monitor. Commands end with ; or \g. Your MariaDB connection id is 66 Server version: 10.7.3-MariaDB MariaDB Server Copyright (c) 2000, 2018, Oracle, MariaDB Corporation Ab and others. Type 'help;' or '\h' for help. Type '\c' to clear the current input statement. MariaDB [(none)]> \s -------------- mysql Ver 15.1 Distrib 10.7.3-MariaDB, for Linux (x86_64) using readline 5.1 Connection id: 66 Current database: Current user: root@localhost SSL: Not in use Current pager: stdout Using outfile: '' Using delimiter: ; Server: MariaDB Server version: 10.7.3-MariaDB MariaDB Server Protocol version: 10 Connection: Localhost via UNIX socket Server characterset: utf8mb3 Db characterset: utf8mb3 Client characterset: utf8mb3 Conn. characterset: utf8mb3 UNIX socket: /var/lib/mysql/mysql.sock Uptime: 17 hours 31 min 32 sec Threads: 1 Questions: 2821 Slow queries: 0 Opens: 50 Open tables: 43 Queries per second avg: 0.044 -------------- MariaDB [(none)]> SELECT engine, support FROM information_schema.engines; +--------------------+---------+ | engine | support | +--------------------+---------+ | CSV | YES | | MRG_MyISAM | YES | | MEMORY | YES | | Aria | YES | | MyISAM | YES | | SEQUENCE | YES | | InnoDB | DEFAULT | | PERFORMANCE_SCHEMA | YES | +--------------------+---------+ 8 rows in set (0.000 sec) MariaDB [(none)]> |
9. 리부팅 또는 서버가 시작될 경우 자동으로 해당 데몬을 서비스하게 구성
|
1 2 3 4 5 |
[root@localhost ~]# systemctl enable mysql Created symlink from /etc/systemd/system/multi-user.target.wants/mariadb.service to /usr/lib/systemd/system/mariadb.service. ### 또는 [root@localost ~]# systemctl enable mariadb |
nginx. php, tls 설치하기 앞서 필요한 라이브러리 설치
|
1 2 3 4 5 6 7 8 9 |
[root@localhost ~]# yum -y install epel-release [root@localhost ~]# yum -y install wget perl bison re2c gcc gcc-c++ cmake git automake autoconf \ libcurl-devel bzip2-devel gd-devel curl-devel gmp gmp-devel libunwind libunwind-devel \ libc-client-devel libicu-devel libtidy-devel libxslt-devel zlib-devel libwebp-devel golang \ e2fsprogs-devel krb5-devel libidn-devel libtermcap libtermcap-devel gdbm-devel zlib* \ libxml* freetype* libpng* libjpeg* gd gd-devel mhash mhash-devel enchant enchant-devel \ netpbm* l systemd-devel readline readline-devel sqlite-devel oniguruma-devel openldap-devel \ perl-core zlib-devel libtool pcre-devel libxml2-devel openssl-devel expat-devel oniguruma-* |
10. TLS 1.3 지원하기 위해서 openssl install
|
1 2 3 4 5 6 7 8 9 10 11 12 13 14 15 16 17 18 19 |
[root@localhost ~]# wget https://www.openssl.org/source/openssl-1.1.1n.tar.gz [root@localhost ~]# tar xvfz openssl-1.1.1n.tar.gz [root@localhost ~]# cd openssl-1.1.1n [root@localhost openssl-1.1.1n]# ./config --prefix=/usr/local/openssl shared zlib-dynamic [root@localhost openssl-1.1.1n]# make -j `grep processor /proc/cpuinfo | wc -l` [root@localhost openssl-1.1.1n]# make install [root@localhost openssl-1.1.1n]# echo "/usr/local/openssl/lib" >> /etc/ld.so.conf.d/openssl.conf [root@localhost openssl-1.1.1n]# ldconfig [root@localhost openssl-1.1.1n]# mv /usr/bin/openssl /usr/bin/openssl.old [root@localhost openssl-1.1.1n]# ln -s /usr/local/openssl/bin/openssl /usr/bin/ |
11. tls 1.3 지원여부 명령어로 확인
|
1 2 3 4 |
[root@localhost openssl-1.1.1n]# openssl ciphers -v | grep TLSv1.3 TLS_AES_256_GCM_SHA384 TLSv1.3 Kx=any Au=any Enc=AESGCM(256) Mac=AEAD TLS_CHACHA20_POLY1305_SHA256 TLSv1.3 Kx=any Au=any Enc=CHACHA20/POLY1305(256) Mac=AEAD TLS_AES_128_GCM_SHA256 TLSv1.3 Kx=any Au=any Enc=AESGCM(128) Mac=AEAD |
12. nginx 에 geoip 모듈을 설치하기 위해서 geoip 설치
|
1 |
[root@xinet nginx-1.17.8]# yum -y install GeoIP-* |
13. nginc-quic 설치를 위해서는 cmake3 설치
|
1 2 3 4 5 6 7 8 9 10 |
[root@localhost ~]# yum -y --enablerepo=epel install cmake3 [root@localhost ~]# mv /usr/bin/cmake /usr/bin/cmake.old [root@localhost ~]# ln -s /usr/bin/cmake3 /usr/bin/cmake [root@localhost ~]# cmake --version cmake3 version 3.17.5 CMake suite maintained and supported by Kitware (kitware.com/cmake). |
14. gcc 버전도 8.3 이상이여야 설치 가능
|
1 2 3 4 5 6 7 8 9 10 11 |
[root@localhost ~]# yum -y install centos-release-scl [root@localhost ~]# yum -y --enablerepo=centos-sclo-rh install devtoolset-8 [root@localhost ~]# scl enable devtoolset-8 bash [root@localhost ~]# gcc --version gcc (GCC) 8.3.1 20190311 (Red Hat 8.3.1-3) Copyright (C) 2018 Free Software Foundation, Inc. This is free software; see the source for copying conditions. There is NO warranty; not even for MERCHANTABILITY or FITNESS FOR A PARTICULAR PURPOSE |
15. 필요한 ninja 다운로드 및 설치
|
1 2 3 4 5 6 7 8 9 10 |
[root@localhost ~]# cd /usr/local/src [root@localhost src]# wget https://github.com/ninja-build/ninja/releases/download/v1.10.2/ninja-linux.zip [root@localhost src]# unzip ninja-linux.zip [root@localhost src]# mv ninja /usr/bin/ [root@localhost src]# which ninja /usr/bin/ninja |
16. boringssl 설치 ( http3 지원하기 위한 라이브러리)
|
1 2 3 4 5 6 7 8 9 10 11 |
[root@localhost src]# git clone https://boringssl.googlesource.com/boringssl [root@localhost src]# cd boringssl/ [root@localhost boringssl]# mkdir build [root@localhost boringssl]# cd build/ [root@localhost build]# cmake -GNinja .. [root@localhost build]# ninja |
17. libbrotil install
|
1 2 3 4 5 6 7 8 9 10 11 |
[root@localhost build]# cd ../ [root@localhost src]# git clone https://github.com/bagder/libbrotli [root@localhost src]# cd libbrotli/ [root@localhost libbrotli]# ./autogen.sh [root@localhost libbrotli]# ./configure [root@localhost libbrotli]# make -j$(nproc) && make -j$(nproc) install |
18. nginx-quic 다운로드 및 comfile 진행 및 유저 추가
|
1 2 3 4 5 6 7 8 9 10 11 12 13 14 15 16 17 18 19 20 21 22 23 24 25 26 27 28 29 30 31 32 33 34 35 36 37 38 39 40 41 42 43 44 45 46 47 48 49 |
[root@localhost libbrotli]# cd ../../ [root@localhost src]# wget https://hg.nginx.org/nginx-quic/archive/tip.zip [root@localhost src]# unzip tip.zip [root@localhost src]# cd nginx-quic-c2f5d79cde64/ [root@localhost nginx-quic-c2f5d79cde64]# ./auto/configure \ --prefix=/usr/local/nginx \ --conf-path=/usr/local/nginx/conf/nginx.conf \ --http-log-path=/usr/local/nginx/logs/access.log \ --error-log-path=/usr/local/nginx/logs/error.log \ --pid-path=/var/run/nginx.pid \ --lock-path=/var/run/nginx.lock \ --modules-path=/usr/local/nginx/modules \ --http-client-body-temp-path=/var/cache/nginx/client_temp \ --http-proxy-temp-path=/var/cache/nginx/proxy_temp \ --http-fastcgi-temp-path=/var/cache/nginx/fastcgi_temp \ --http-uwsgi-temp-path=/var/cache/nginx/uwsgi_temp \ --http-scgi-temp-path=/var/cache/nginx/scgi_temp \ --user=nginx \ --group=nginx \ --with-file-aio \ --with-compat \ --with-threads \ --with-http_v2_module \ --with-http_geoip_module \ --with-http_ssl_module \ --with-http_gunzip_module \ --with-http_gzip_static_module \ --with-http_realip_module \ --with-http_auth_request_module \ --with-http_stub_status_module \ --with-http_addition_module \ --with-http_dav_module \ --with-http_slice_module \ --with-http_sub_module \ --with-http_mp4_module \ --with-stream \ --with-stream_realip_module \ --with-pcre \ --with-debug \ --with-http_v3_module \ --with-cc-opt="-I../boringssl/include" --with-ld-opt="-L../boringssl/build/ssl -L../boringssl/build/crypto" \ --with-stream_quic_module \ --with-ld-opt="-L../boringssl/build/ssl -L../boringssl/build/crypto" |
14. make / make install
|
1 2 3 |
[root@localhost nginx-quic-c2f5d79cde64]# make -j$(nproc) [root@localhost nginx-quic-c2f5d79cde64]# make install |
15. systemctl 등록
|
1 2 3 4 5 6 7 8 9 10 11 12 13 14 15 16 17 18 |
[root@localhost nginx-quic-c2f5d79cde64]# vi /etc/systemd/system/nginx.service [Unit] Description=The NGINX HTTP and reverse proxy server After=syslog.target network.target remote-fs.target nss-lookup.target [Service] Type=forking PIDFile=/var/run/nginx.pid ExecStartPre=/usr/sbin/nginx -t ExecStart=/usr/sbin/nginx ExecReload=/usr/sbin/nginx -s reload ExecStop=/bin/kill -s QUIT $MAINPID PrivateTmp=true [Install] WantedBy=multi-user.target |
16. systemctl daemon-reload / enable
|
1 2 3 4 |
[root@localhost nginx-quic-c2f5d79cde64]# systemctl daemon-reload [root@localhost nginx-quic-c2f5d79cde64]# systemctl enable nginx.service Created symlink from /etc/systemd/system/multi-user.target.wants/nginx.service to /etc/systemd/system/nginx.service. |
17. nginx 파일 복사 및 디렉토리 생성
|
1 2 3 |
[root@localhost nginx-quic-c2f5d79cde64]# ln -s /usr/local/nginx/sbin/nginx /usr/sbin/ [root@localhost src]# mkdir -p /var/cache/nginx/ |
nginx.conf 는 최종 php 설치를 완료하고 한번에 conf를 수정
18.php 다운로드 및 install
|
1 2 3 4 5 6 7 8 9 10 11 12 13 14 15 16 17 18 19 20 21 22 23 24 25 26 27 28 29 30 31 32 33 34 35 36 37 38 39 40 41 42 43 44 45 46 47 48 49 50 51 52 53 54 55 56 57 58 59 60 |
[root@localhost nginx-quic-c2f5d79cde64]# cd ../ [root@localhost src]# wget https://www.php.net/distributions/php-8.1.5.tar.gz [root@localhost src]# tar xvfz php-8.1.5.tar.gz [root@localhost src]# cd php-8.1.5 ./configure --prefix=/usr/local/php-fpm \ --with-config-file-path=/usr/local/php-fpm/etc \ --with-mysql-sock=/var/lib/mysql/mysql.sock \ --with-mysqli \ --with-openssl=/usr/local/openssl \ --with-pdo-mysql \ --with-libdir=lib64 \ --with-enchant \ --with-gettext \ --with-jpeg \ --with-freetype \ --with-zlib \ --with-gmp \ --with-iconv \ --with-gdbm \ --with-bz2 \ --with-mhash \ --with-xsl \ --with-zip \ --with-readline \ --with-curl \ --with-pear \ --with-gettext \ --with-ldap \ --enable-mysqlnd \ --enable-bcmath \ --enable-gd \ --enable-sockets \ --enable-pcntl \ --enable-ftp \ --enable-bcmath \ --enable-mbstring \ --enable-calendar \ --enable-simplexml \ --enable-session \ --enable-soap \ --enable-xml \ --enable-opcache \ --enable-intl \ --enable-cli \ --enable-debug \ --enable-mbregex \ --enable-dba \ --enable-shmop \ --enable-sysvsem \ --enable-sysvshm \ --enable-sysvmsg \ --enable-exif \ --with-fpm-systemd \ --with-fpm-user=nobody \ --with-fpm-group=nobody \ --enable-fpm |
19. make , make install
|
1 2 3 |
[root@localhost php-8.1.5]# make -j$(nproc) [root@localhost php-8.1.5]# make install |
20. php.ini 환경 설정 파일 복사 및 수정
|
1 2 3 4 5 6 7 8 9 10 |
[root@localhost php-8.1.5]# cp -a php.ini-development /usr/local/php-fpm/etc/php.ini [root@localhost php-8.1.5]# vi /usr/local/php-fpm/etc/php.ini short_open_tag = On date.timezone = "Asia/Seoul" error_reporting = "E_ALL & ~E_NOTICE & ~E_DEPRECATED & ~E_USER_DEPRECATED" upload_max_filesize = 12M expose_php = Off |
19. php-fpm 파일 복사 및 수정
|
1 2 3 4 5 6 7 |
[root@localhost php-8.1.5]# cp -a /usr/local/php-fpm/etc/php-fpm.conf.default /usr/local/php-fpm/etc/php-fpm.conf [root@localhost php-8.1.5]# vi /usr/local/php-fpm/etc/php-fpm.conf pid = /var/run/php-fpm.pid error_log = /var/log/php-fpm.log daemonize = yes |
20. php www.conf 파일 수정
|
1 2 3 4 5 6 7 8 9 10 11 12 13 14 |
[root@localhost php-8.1.5]# cp -a /usr/local/php-fpm/etc/php-fpm.d/www.conf.default /usr/local/php-fpm/etc/php-fpm.d/www.conf [root@localhost php-8.1.5]# vi /usr/local/php-fpm/etc/php-fpm.d/www.conf user = nginx group = nginx ;listen = 127.0.0.1:9000 ;socket listen = /var/run/php-fpm.sock listen.owner = nginx listen.group = nginx |
21. systemctl 등록
|
1 2 3 4 5 6 7 8 |
[root@localhost php-8.1.5]# cp -a sapi/fpm/php-fpm.service /usr/lib/systemd/system/ [root@localhost php-8.1.5]# systemctl daemon-reload [root@localhost php-8.1.5]# systemctl list-unit-files | grep php php-fpm.service enabled [root@localhost php-8.1.5]# systemctl enable php-fpm |
22. php 가동 ( php-fpm)
|
1 2 3 4 5 6 7 |
[root@localhost php-8.1.5]# systemctl start php-fpm [root@localhost php-8.1.5]# ps -ef | grep php-fpm root 37955 1 0 18:32 ? 00:00:00 php-fpm: master process (/usr/local/php-fpm/etc/php-fpm.conf) nginx 37956 37955 0 18:32 ? 00:00:00 php-fpm: pool www nginx 37957 37955 0 18:32 ? 00:00:00 php-fpm: pool www root 37959 19579 0 18:32 pts/0 00:00:00 grep --color=auto php-fpm |
23. nginx.conf 파일 수정
|
1 2 3 4 5 6 7 8 9 10 11 12 13 14 15 16 17 18 19 20 21 22 23 24 25 26 27 28 29 30 31 32 33 34 35 36 37 38 39 40 41 42 43 44 45 46 47 48 49 50 51 |
[root@localhost php-8.1.5]# vi /usr/local/nginx/conf/nginx.conf #user nobody; worker_processes 8; ### cpu count 수량보다 적게 구성 worker_rlimit_nofile 8192; ### 기본값은 1024 error_log logs/error.log; #error_log logs/error.log notice; #error_log logs/error.log info; #pid logs/nginx.pid; events { worker_connections 1024; ### default 1024 } http { include mime.types; default_type application/octet-stream; index index.html index.htm index.php; ###GEOIP geoip_country /usr/share/GeoIP/GeoIP.dat; log_format main '$remote_addr - $remote_user [$time_local] "$request" ' '$status $body_bytes_sent "$http_referer" ' '"$http_user_agent" "$http_x_forwarded_for" $geoip_country_code'; access_log logs/access.log main; sendfile on; tcp_nopush on; ### version hide server_tokens off; ### vhost site count up server_names_hash_bucket_size 128; #keepalive_timeout 0; keepalive_timeout 65; #gzip on; # include vhosts/*.conf; } |
24. 가상호스트 도메인 설정 http3test.xinet.kr / 홈경로 : /home/http3test/html
|
1 |
[root@xinet ~]# mkdir -p /usr/local/nginx/conf/vhosts/ |
25. tlstest3.xinet.kr 가상호스트 파일 생성 ( HTTP )
|
1 2 3 4 5 6 7 8 9 10 11 12 13 14 15 16 17 18 19 20 21 22 23 24 25 |
[root@localhost src]# vi /usr/local/nginx/conf/vhosts/http3test.xinet.kr.conf server { root /home/http3test/html/; listen 80; server_name http3test.xinet.kr; access_log logs/http3test.xinet.kr_access.log main; location / { root /home/http3test/html/; } #error_page 404 /404.html; error_page 500 502 503 504 /50x.html; location = /50x.html { root html; } ###PHP-FPM location ~ \.php$ { root /home/http3test/html/; fastcgi_pass unix:/var/run/php-fpm.sock; fastcgi_param SCRIPT_FILENAME $document_root$fastcgi_script_name; include fastcgi_params; } } |
26. nginx.conf 에 에러가 없는지 확인 ( nginx -t )
|
1 2 3 |
[root@localhost conf]# nginx -t nginx: the configuration file /usr/local/nginx/etc/nginx.conf syntax is ok nginx: configuration file /usr/local/nginx/etc/nginx.conf test is successful |
28. 이제 아무런 문제가 없으니 nginx 시작해 보자
|
1 2 3 4 5 6 7 8 9 10 11 12 13 14 15 |
[root@localhost conf]# systemctl start nginx [root@localhost conf]# ps -ef | grep nginx nginx 16356 15916 0 2월11 ? 00:02:02 php-fpm: pool www nginx 16415 15916 0 2월11 ? 00:01:58 php-fpm: pool www nginx 47670 15916 0 10:56 ? 00:00:06 php-fpm: pool www root 64819 1 0 16:11 ? 00:00:00 nginx: master process /usr/sbin/nginx nginx 64820 64819 0 16:11 ? 00:00:00 nginx: worker process nginx 64821 64819 0 16:11 ? 00:00:00 nginx: worker process nginx 64822 64819 0 16:11 ? 00:00:00 nginx: worker process nginx 64823 64819 0 16:11 ? 00:00:00 nginx: worker process nginx 64824 64819 0 16:11 ? 00:00:00 nginx: worker process nginx 64825 64819 0 16:11 ? 00:00:00 nginx: worker process nginx 64826 64819 0 16:11 ? 00:00:00 nginx: worker process nginx 64827 64819 0 16:11 ? 00:00:00 nginx: worker process |
29. 가상호스트에 phpinfo 를 실행해서 페이지가 정상적으로 출력되는지 체크
|
1 2 3 4 5 6 |
[root@localhost conf]# vi /home/http3test/html/info.php <? phpinfo(); ?> |
30. 웹페이지 확인 http 페이지 확인
 31. wordpress 설치 작업 db 생성 및 권한
|
1 2 3 4 5 6 7 8 9 10 11 12 13 |
[root@localhost html]# mysql -u root -p mysql Enter password: Type 'help;' or '\h' for help. Type '\c' to clear the current input statement. MariaDB [mysql]> create database xinet; Query OK, 1 row affected (0.000 sec) MariaDB [mysql]> grant all on xinet.* to xinet@localhost identified by 'qwer1234#$'; Query OK, 0 rows affected (0.007 sec) MariaDB [mysql]> flush privileges; Query OK, 0 rows affected (0.001 sec) |
32 홈경로 가서 word press 다운로드 및 환경설정
|
1 2 3 4 5 6 7 8 9 |
[root@localhost php-8.1.5]# cd /home/http3test/html/ [root@localhost html]# wget https://ko.wordpress.org/latest-ko_KR.tar.gz [root@localhost html]# tar xvfz latest-ko_KR.tar.gz [root@localhost html]# cd wordpress/ [root@localhost wordpress]# cp -a wp-config-sample.php wp-config.php |
33. wp-config 파일 내용 수정
|
1 2 3 4 5 6 7 8 9 10 11 12 13 14 15 16 17 |
[root@localhost wordpress]# vi wp-config.php define( 'DB_NAME', 'xinet' ); /** Database username */ define( 'DB_USER', 'xinet' ); /** Database password */ define( 'DB_PASSWORD', 'qwer1234#$' ); /** Database hostname */ define( 'DB_HOST', 'localhost' ); /** Database charset to use in creating database tables. */ define( 'DB_CHARSET', 'utf8' ); |
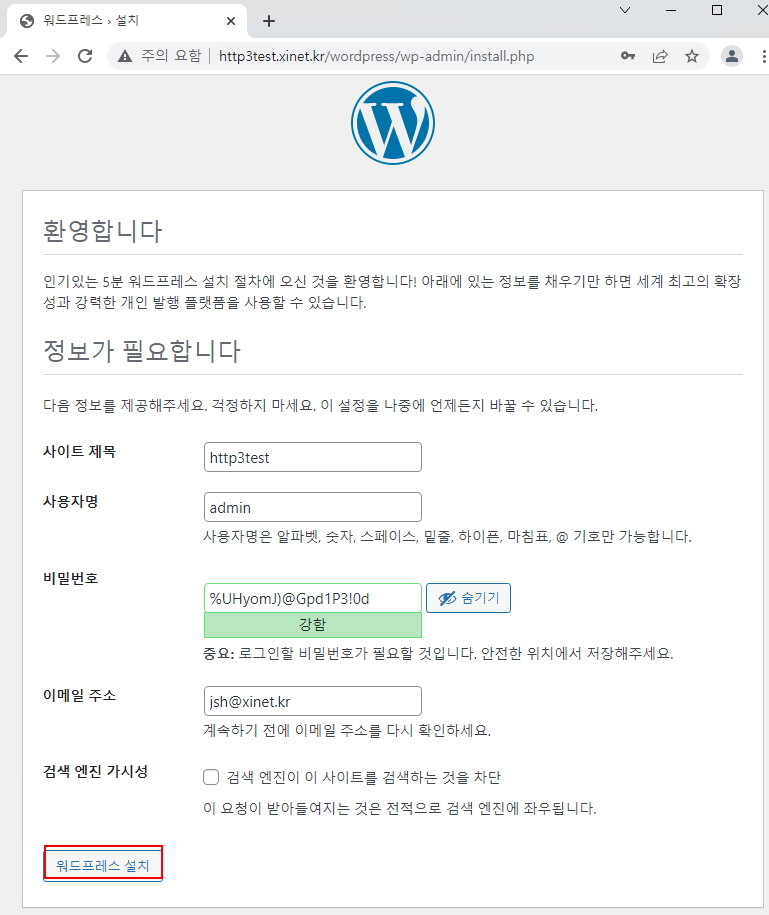
34. 웹페이지 설치 진행
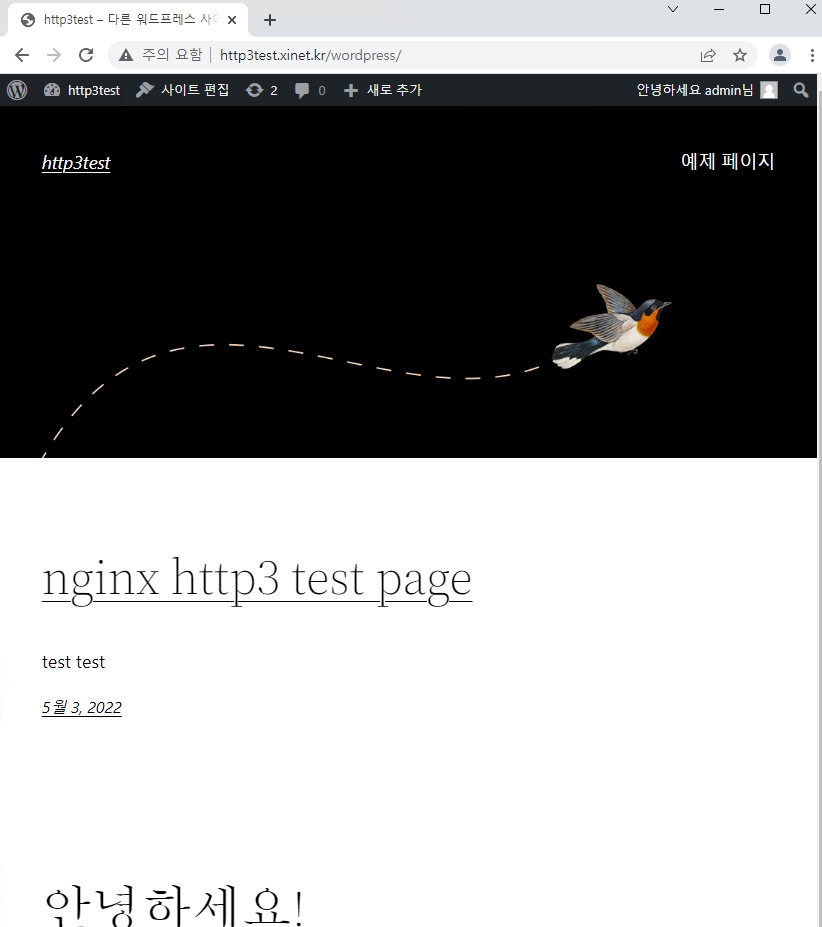
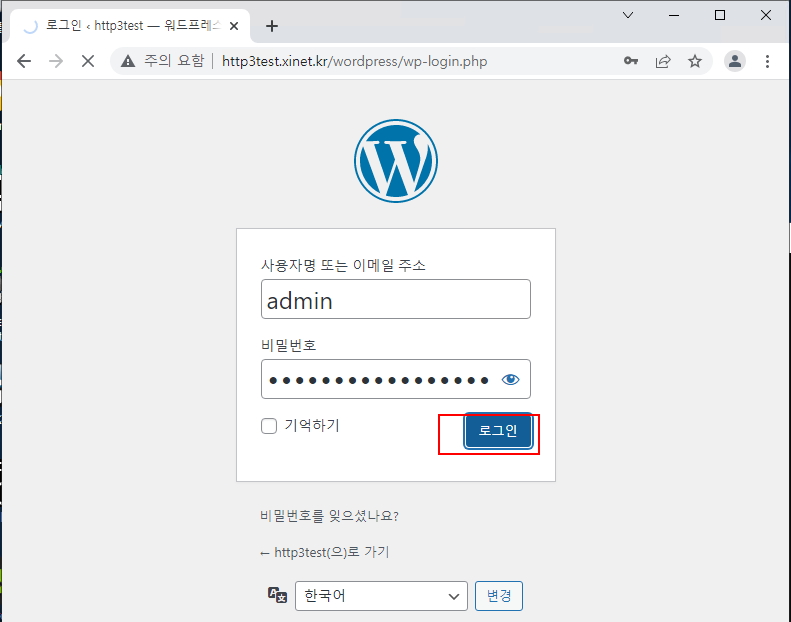 설치완료
설치완료
35. ssl 작업 및 https3 설정 / 기본 openssl 이용해도 되고 certbot을 이용해서 만들어도 된다 여기에서는 certbot 무료인증서 사용
|
1 2 3 4 5 6 7 8 9 10 11 12 13 14 15 |
[root@localhost wordpress]# cd /root [root@localhost ~]# yum -y install certbot [root@localhost ~]# certbot certonly --webroot -w /home/http3test/html/ -d http3test.xinet.kr --email jsh@xinet.kr y 엔터 y 엔터 [root@localhost ~]# ls -l /etc/letsencrypt/live/http3test.xinet.kr/ -rw-r--r-- 1 root root 692 5월 3 10:29 README lrwxrwxrwx 1 root root 42 5월 3 10:29 cert.pem -> ../../archive/http3test.xinet.kr/cert1.pem lrwxrwxrwx 1 root root 43 5월 3 10:29 chain.pem -> ../../archive/http3test.xinet.kr/chain1.pem lrwxrwxrwx 1 root root 47 5월 3 10:29 fullchain.pem -> ../../archive/http3test.xinet.kr/fullchain1.pem lrwxrwxrwx 1 root root 45 5월 3 10:29 privkey.pem -> ../../archive/http3test.xinet.kr/privkey1.pem |
36. nginx 가상호스트에 ssl 및 http3 적용
|
1 2 3 4 5 6 7 8 9 10 11 12 13 14 15 16 17 18 19 20 21 22 23 24 25 26 27 28 29 30 31 32 33 34 35 36 37 38 39 40 41 42 43 44 45 46 47 48 49 50 51 52 53 54 55 56 57 58 59 60 61 62 63 64 65 66 67 68 69 |
[root@localhost ~]# vi /usr/local/nginx/conf/vhosts/http3test.xinet.kr.conf server { root /home/http3test/html/; listen 80; server_name http3test.xinet.kr; access_log logs/http3test.xinet.kr_access.log main; location / { root /home/http3test/html/; } #error_page 404 /404.html; error_page 500 502 503 504 /50x.html; location = /50x.html { root html; } ###PHP-FPM location ~ \.php$ { root /home/http3test/html/; fastcgi_pass unix:/var/run/php-fpm.sock; fastcgi_param SCRIPT_FILENAME $document_root$fastcgi_script_name; include fastcgi_params; } } ### HTTPS server { listen 443 http3 reuseport; # HTTP/3(QUIC listen 443 ssl http2; server_name http3test.xinet.kr; access_log logs/http3test.xinet.kr_access.log main; ssl_certificate /etc/letsencrypt/live/http3test.xinet.kr/fullchain.pem; ssl_certificate_key /etc/letsencrypt/live/http3test.xinet.kr/privkey.pem; ssl_prefer_server_ciphers on; keepalive_timeout 60; ssl_session_cache shared:SSL:10m; ssl_session_timeout 10m; ssl_early_data on; ssl_protocols TLSv1.3 TLSv1.2; ssl_ecdh_curve X25519:P-256:P-384; ssl_ciphers ECDHE-ECDSA-CHACHA20-POLY1305:ECDHE-ECDSA-AES128-GCM-SHA256:ECDHE-ECDSA-AES128-SHA256:ECDHE-RSA-CHACHA20-POLY130 5:ECDHE-RSA-AES128-GCM-SHA256:ECDHE-RSA-AES128-SHA256; proxy_set_header Early-Data $ssl_early_data; add_header Alt-Svc 'h3=":443"; ma=2592000,h3-29=":443"; ma=2592000,h3-Q050=":443"; ma=2592000,h3-Q046=":443"; ma=2592000,h3- Q043=":443"; ma=2592000,quic=":443"; ma=2592000; v="46,43"'; add_header Strict-Transport-Security "max-age=63072000; includeSubDomains; preload"; root /home/http3test/html; location / { root /home/http3test/html; index index.html index.htm index.php; } ###PHP-FPM location ~ \.php$ { root /home/http3test/html/; fastcgi_pass unix:/var/run/php-fpm.sock; fastcgi_param SCRIPT_FILENAME $document_root$fastcgi_script_name; include fastcgi_params; } } |
37. nginx 구문에러 확인 및 재시작
|
1 2 3 4 5 6 |
[root@localhost ~]# nginx -t nginx: the configuration file /usr/local/nginx/conf/nginx.conf syntax is ok nginx: configuration file /usr/local/nginx/conf/nginx.conf test is successful ### 재시작 [root@localhost ~]# systemctl restart nginx추 |
추가적으로 방화벽에서 TCP 80, 443 / UDP 443 포트를 허용해줘야 확인 가능합니다.
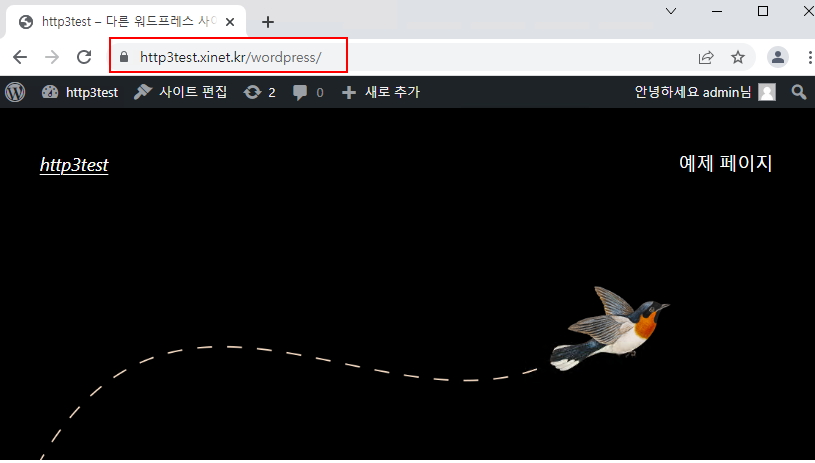
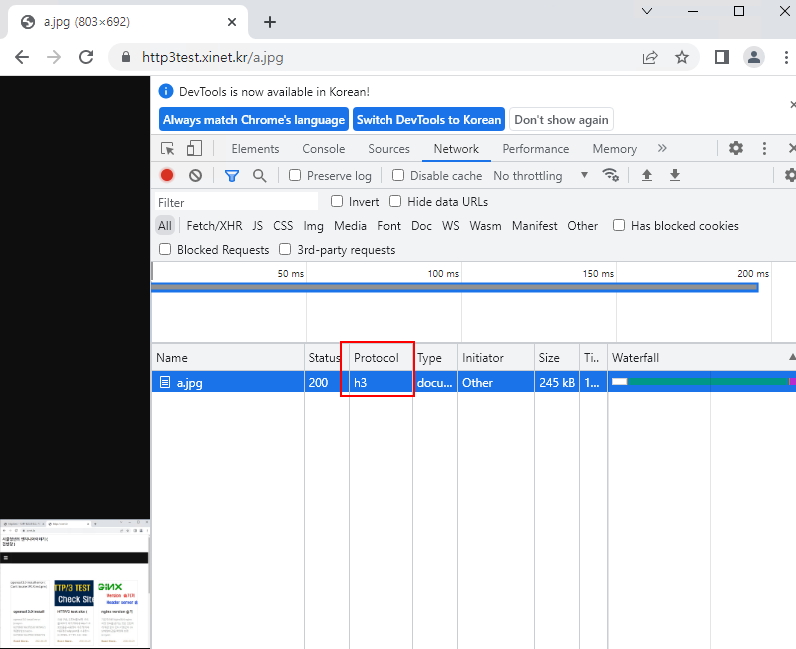
38. 웹페이지 확인
39, 인증서 확인 quic 지원
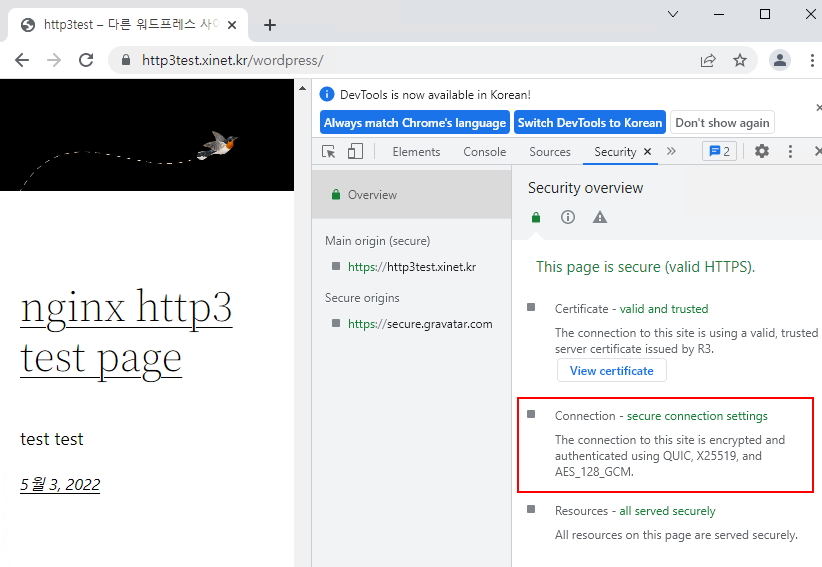
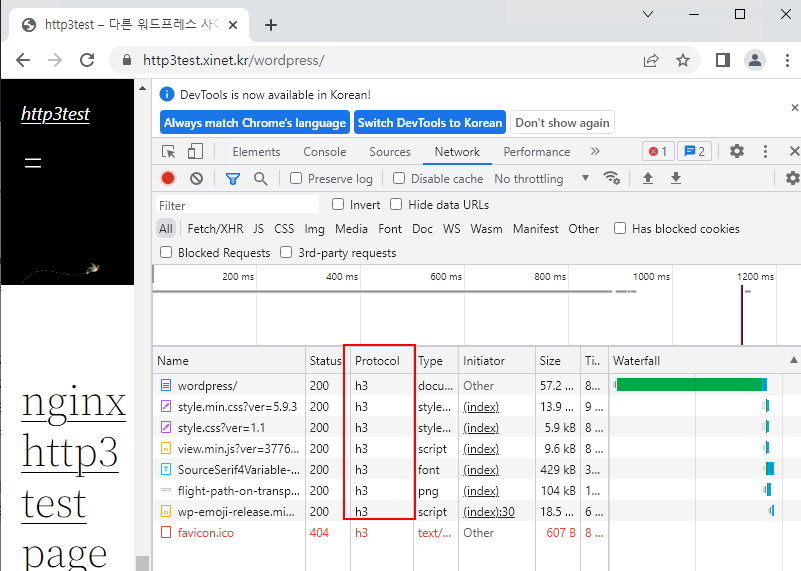
40. 프로토콜 h3 지원 확인
38. log 확인
39. SSL 사이트 점검
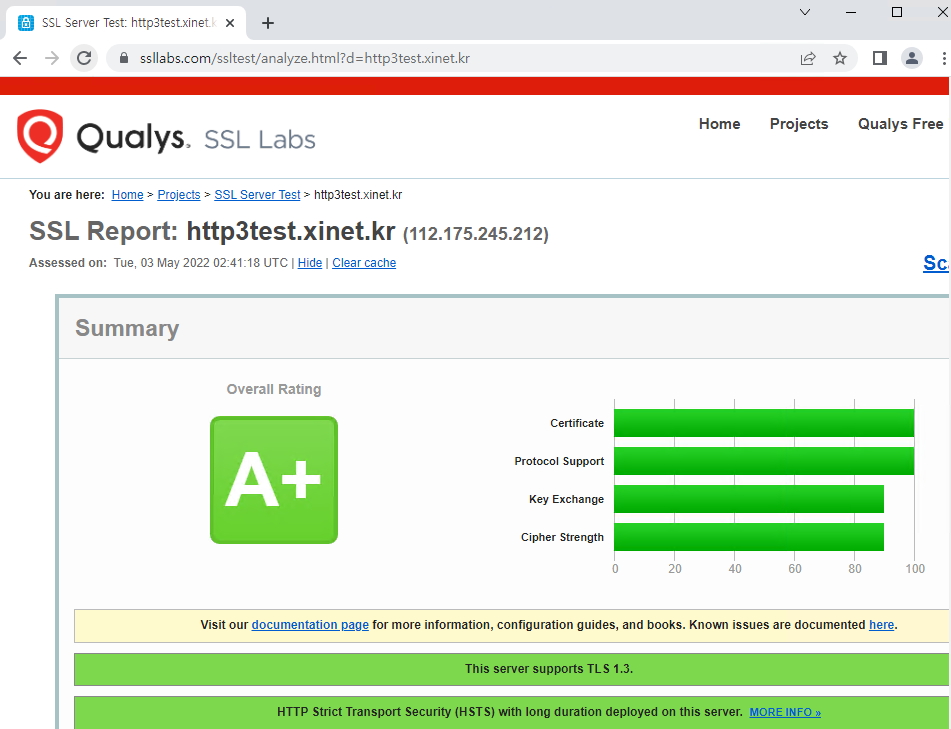
40. HTTP3 지원하는지 웹사이트에서 체크 웹사이트 체크 방법은 아래 정보에 있음
https://xinet.kr/?p=3488 /
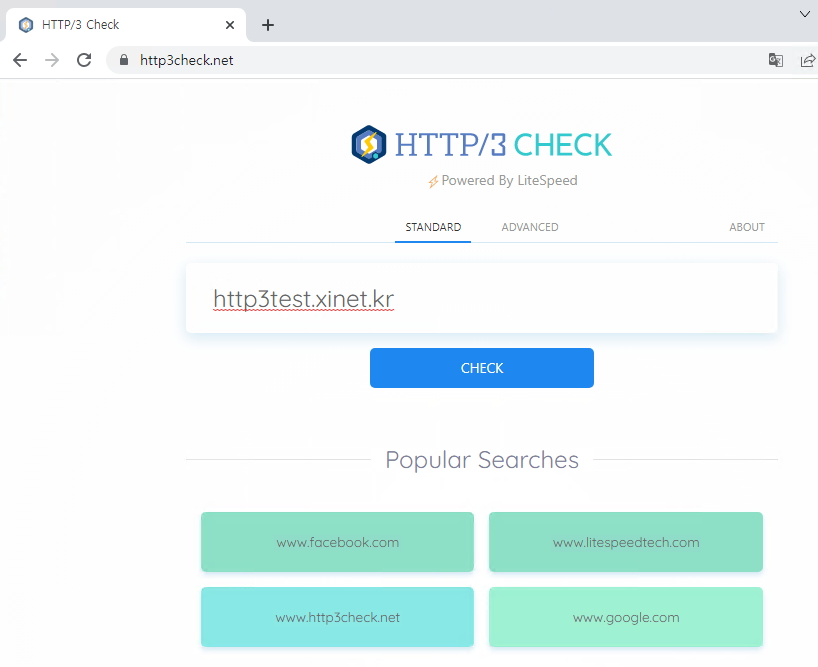
HTTP/3 test site ( http/3 check )
https://www.http3check.net/ 사이트점검
점검결과
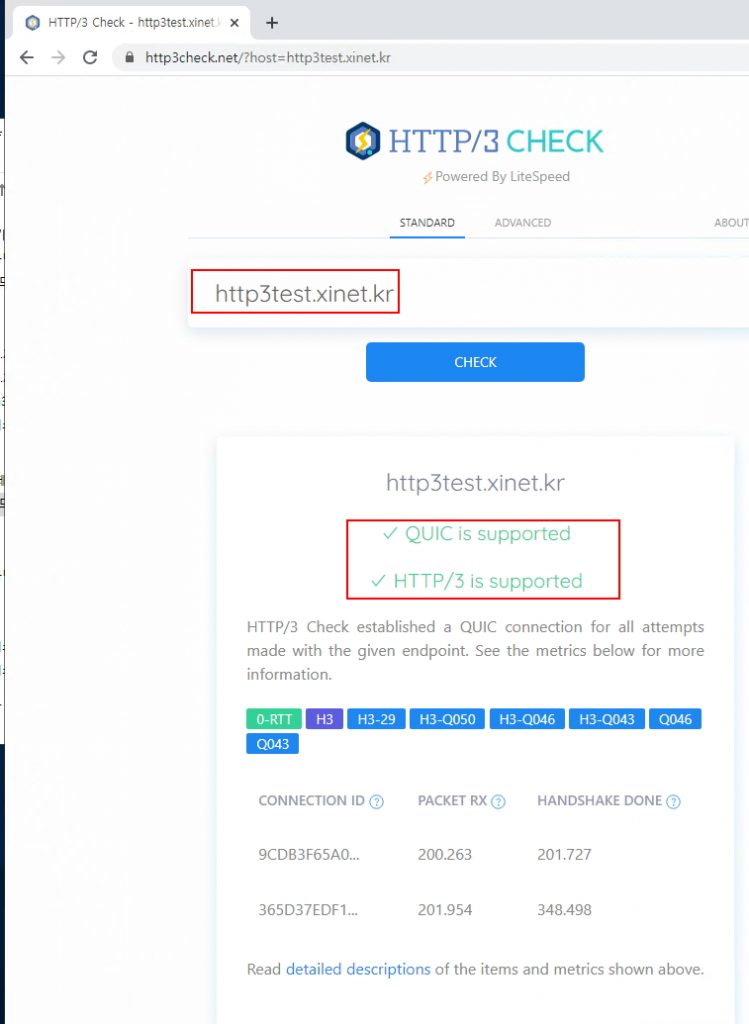
현재 https://xinet.kr 사이트는 http3 를 기본으로 지원하고 있습니다.
