O/S : CentOS 7.x
Powerdns : 4.5.x
Mariadb : 10.4.x
1. powerdns yum repo 추가 및 pdns install
|
1 2 3 4 5 6 7 8 9 |
[root@localhost ~]# yum install -y epel-release yum-plugin-priorities [root@localhost ~]# curl -o /etc/yum.repos.d/powerdns-auth-master.repo https://repo.powerdns.com/repo-files/centos-auth-master.repo [root@localhost ~]# yum install -y pdns pdns-backend-mysql.x86_64 [root@localhost ~]# cp -a /etc/pdns/pdns.conf /etc/pdns/pdns.conf.ori [root@localhost ~]# chown 644 /etc/pdns/pdns.conf |
2. pdns conf 수정 ( api-key값은 사용자 환경에 따라 다르게 변경해서 사용)
|
1 2 3 4 5 6 7 8 9 10 11 12 13 14 15 16 17 18 19 20 21 22 23 24 25 26 27 28 29 30 31 32 33 34 |
[root@localhost ~]# vi /etc/pdns/pdns.conf any-to-tcp=yes api=yes api-key=qwer1234##$$ daemon=yes default-ttl=60 guardian=yes local-address=0.0.0.0 local-port=53 query-local-address=127.0.0.1 setgid=pdns setuid=pdns version-string=knowndns webserver=yes webserver-address=0.0.0.0 webserver-allow-from=127.0.0.1 webserver-port=8081 launch=gmysql gmysql-dnssec gmysql-host=localhost gmysql-user=pdns gmysql-dbname=pdns gmysql-password=pdns12#$56 |
해당 옵션값들은 추후 다시 정리해서 올릴 예정
3. systemctl pdns enable
|
1 2 |
[root@localhost ~]# systemctl enable pdns Created symlink from /etc/systemd/system/multi-user.target.wants/pdns.service to /usr/lib/systemd/system/pdns.service. |
4. pdns port open tcp 53 / udp 53
|
1 2 3 4 5 6 |
[root@localhost ~]# firewall-cmd --zone=public --add-port=53/tcp --permanent success [root@localhost ~]# firewall-cmd --zone=public --add-port=53/udp --permanent success [root@localhost ~]# firewall-cmd --reload success |
5. dbms -> mariadb install
|
1 2 3 4 5 6 7 |
[root@localhost ~]# vi /etc/yum.repos.d/Mariadb.repo [mariadb] name = MariaDB baseurl = http://yum.mariadb.org/10.4/centos7-amd64 gpgkey=https://yum.mariadb.org/RPM-GPG-KEY-MariaDB gpgcheck=1 |
6. mariadb yum install
|
1 |
[root@localhost ~]# yum -y install MariaDB-server MariaDB-client MariaDB-devel MariaDB-compat MariaDB-common MariaDB-shared |
7. mariadb my.cnf
|
1 2 3 4 5 6 7 8 9 10 11 12 13 14 15 16 17 18 19 20 21 22 23 24 25 26 27 28 29 30 31 32 33 34 35 36 37 38 39 40 41 42 43 44 45 46 47 48 49 50 51 52 53 54 55 56 57 58 59 60 61 62 63 64 65 66 67 68 69 70 71 72 73 74 75 76 77 78 79 80 81 82 83 84 85 86 |
[root@localhost ~]# vi /etc/my.cnf.d/server.cnf [server] [mysqld] bind-address=0.0.0.0 skip-external-locking key_buffer_size = 384M max_allowed_packet = 512M table_open_cache = 2048 sort_buffer_size = 2M read_buffer_size = 2M read_rnd_buffer_size = 8M myisam_sort_buffer_size = 64M thread_cache_size = 8 #dns query skip-name-resolve #connection max_connections = 1000 max_connect_errors = 1000 wait_timeout= 60 ##timestamp explicit_defaults_for_timestamp sql_mode=NO_AUTO_CREATE_USER,NO_ENGINE_SUBSTITUTION symbolic-links=0 ###chracter character-set-client-handshake=FALSE init_connect = SET collation_connection = utf8_general_ci init_connect = SET NAMES utf8 character-set-server = utf8 collation-server = utf8_general_ci ### MyISAM Spectific options #default-storage-engine = myisam key_buffer_size = 32M bulk_insert_buffer_size = 64M myisam_sort_buffer_size = 128M myisam_max_sort_file_size = 10G myisam_repair_threads = 1 ### INNODB Spectific options default-storage-engine = InnoDB #skip-innodb #innodb_additional_mem_pool_size = 16M innodb_buffer_pool_size = 1024MB innodb_data_file_path = ibdata1:10M:autoextend innodb_write_io_threads = 8 innodb_read_io_threads = 8 innodb_thread_concurrency = 16 innodb_flush_log_at_trx_commit = 1 innodb_log_buffer_size = 8M innodb_log_file_size = 128M innodb_log_files_in_group = 3 innodb_max_dirty_pages_pct = 90 innodb_lock_wait_timeout = 120 [mysqldump] #default-character-set = utf8 max_allowed_packet = 512M [myisamchk] key_buffer_size = 512M sort_buffer_size = 512M read_buffer = 8M write_buffer = 8M # * Galera-related settings # [galera] # Mandatory settings #wsrep_on=ON #wsrep_provider= #wsrep_cluster_address= #binlog_format=row #default_storage_engine=InnoDB #innodb_autoinc_lock_mode=2 # Optional setting #wsrep_slave_threads=1 |
8. mariadb db install and system start , enable
|
1 2 3 4 5 6 7 |
[root@localhost ~]# mysql_install_db [root@localhost ~]# chown -R mysql:mysql /var/lib/mysql/ [root@localhost ~]# systemctl start mariadb [root@localhost ~]# systemctl enable mariadb |
|
1 2 3 4 5 6 7 8 9 10 11 12 13 14 15 16 17 18 19 20 21 22 23 24 25 26 27 28 29 |
[root@localhost ~]# mysql Welcome to the MariaDB monitor. Commands end with ; or \g. Your MariaDB connection id is 8 Server version: 10.4.17-MariaDB MariaDB Server Copyright (c) 2000, 2018, Oracle, MariaDB Corporation Ab and others. Type 'help;' or '\h' for help. Type '\c' to clear the current input statement. MariaDB [(none)]> \s -------------- mysql Ver 15.1 Distrib 10.4.17-MariaDB, for Linux (x86_64) using readline 5.1 Connection id: 8 Current database: Current user: root@localhost SSL: Not in use Current pager: stdout Using outfile: '' Using delimiter: ; Server: MariaDB Server version: 10.4.17-MariaDB MariaDB Server Protocol version: 10 Connection: Localhost via UNIX socket Server characterset: utf8 Db characterset: utf8 Client characterset: utf8 Conn. characterset: utf8 UNIX socket: /var/lib/mysql/mysql.sock |
9. mysql -> pdns database 사용자 추가 및 권한 설정
|
1 2 3 4 5 |
MariaDB [(none)]> create database pdns; Query OK, 1 row affected (0.001 sec) MariaDB [(none)]> grant all on pdns.* to pdns@localhost identified by 'pdns12#$56'; Query OK, 0 rows affected (0.004 sec) |
10. pdns table 수정 latin1 -> utf8 변경
|
1 2 3 4 5 6 7 8 9 10 11 12 13 14 15 16 17 18 |
## 데이터베이스 입력 [root@localhost ~]# rpm -ql pdns-backend-mysql /usr/lib64/pdns/libgmysqlbackend.so /usr/share/doc/pdns-backend-mysql-4.5.0 /usr/share/doc/pdns-backend-mysql-4.5.0/3.4.0_to_4.1.0_schema.mysql.sql /usr/share/doc/pdns-backend-mysql-4.5.0/4.1.0_to_4.2.0_schema.mysql.sql /usr/share/doc/pdns-backend-mysql-4.5.0/4.2.0_to_4.3.0_schema.mysql.sql /usr/share/doc/pdns-backend-mysql-4.5.0/dnssec-3.x_to_3.4.0_schema.mysql.sql /usr/share/doc/pdns-backend-mysql-4.5.0/enable-foreign-keys.mysql.sql /usr/share/doc/pdns-backend-mysql-4.5.0/nodnssec-3.x_to_3.4.0_schema.mysql.sql /usr/share/doc/pdns-backend-mysql-4.5.0/schema.mysql.sql [root@localhost ~]# cp -a /usr/share/doc/pdns-backend-mysql-4.5.0/schema.mysql.sql /root/ latin1 -> utf8 변경 [root@localhost ~]# perl -pi -e "s/latin1/utf8/g" schema.mysql.sql |
11. 데이터베이스 입력
|
1 2 |
[root@localhost ~]# mysql -u root -p pdns < schema.mysql.sql Enter password: |
12. pdns start
|
1 |
[root@localhost pdns]# systemctl start pdns |
13. powerdns-admin install ( python 3.6 설치 진행)
|
1 2 3 4 5 6 7 8 9 |
[root@localhost ~]# yum install -y https://repo.ius.io/ius-release-el7.rpm [root@localhost ~]# yum install -y python36u python36u-devel python36u-pip libevent [root@localhost ~]# pip3.6 install -U pip [root@localhost ~]# pip install -U virtualenv [root@localhost ~]# rm -f /usr/bin/python3 && ln -s /usr/bin/python3.6 /usr/bin/python3 |
14. node js install
|
1 2 3 4 5 6 7 8 9 |
[root@localhost ~]# curl -sL https://rpm.nodesource.com/setup_10.x | bash - [root@localhost ~]# curl -sL https://dl.yarnpkg.com/rpm/yarn.repo -o /etc/yum.repos.d/yarn.repo [root@localhost ~]# yum install -y yarn [root@localhost ~]# yum install -y python-virtualenv [root@localhost ~]# yum install -y gcc-c++ make git openldap-devel xmlsec1-devel xmlsec1-openssl libtool-ltdl-devel |
15. powerdns-admin download 및 virtualenv 설정
|
1 2 3 4 5 6 7 8 9 10 11 |
[root@localhost ~]# git clone https://github.com/ngoduykhanh/PowerDNS-Admin.git /opt/web/powerdns-admin [root@localhost ~]# cd /opt/web/powerdns-admin [root@localhost powerdns-admin]# virtualenv -p python3 flask [root@localhost powerdns-admin]# source ./flask/bin/activate (flask) [root@localhost powerdns-admin]# pip install python-dotenv (flask) [root@localhost powerdns-admin]# pip install -r requirements.txt |
16. default_config.py 내용 수정 (데이터베이스 정보 입력)
|
1 2 3 4 5 6 7 8 9 10 11 |
(flask) [root@localhost powerdns-admin]# cp -a powerdnsadmin/default_config.py powerdnsadmin/default_config.py.ori (flask) [root@localhost powerdns-admin]# vi powerdnsadmin/default_config.py ### DATABASE CONFIG 수정 SQLA_DB_USER = 'pdns' SQLA_DB_PASSWORD = 'pdns12#$56' SQLA_DB_HOST = 'localhost' SQLA_DB_NAME = 'pdns' |
17. build 작업 진행
|
1 2 3 4 5 6 7 8 9 |
(flask) [root@localhost powerdns-admin]# export FLASK_CONF=../configs/development.py (flask) [root@localhost powerdns-admin]# export FLASK_APP=powerdnsadmin/__init__.py (flask) [root@localhost powerdns-admin]# flask db upgrade (flask) [root@localhost powerdns-admin]# yarn install --pure-lockfile (flask) [root@localhost powerdns-admin]# flask assets build |
18 실행하기 앞서 방화벽 TCP 9191 포트 허용
|
1 2 3 |
(flask) [root@localhost powerdns-admin]# firewall-cmd --zone=public --add-port=9191/tcp --permanent (flask) [root@localhost powerdns-admin]# firewall-cmd --reload |
19. 실행파일 생성 바로 run.py 실행해도 되지만 백그라운드로 실행하기 위해서
|
1 2 3 4 5 6 7 8 9 10 11 |
(flask) [root@localhost powerdns-admin]# vi /usr/sbin/powerdns_admin_start.sh source /opt/web/powerdns-admin/flask/bin/activate export FLASK_CONF=/opt/web/powerdns-admin/configs/development.py export FLASK_APP=/opt/web/powerdns-admin/powerdnsadmin/__init__.py /opt/web/powerdns-admin/run.py /var/log/powerdns-admin-log & ### 권한수정 (flask) [root@localhost powerdns-admin]# chmod 700 /usr/sbin/powerdns_admin_start.sh |
20. 실행파일 실행 / 웹페이지에서 9191포트 확인하는 메세지 발생
|
1 2 3 4 5 6 7 8 9 10 |
/usr/sbin/powerdns_admin_start.sh (flask) [root@localhost powerdns-admin]# /usr/sbin/powerdns_admin_start.sh (flask) [root@localhost powerdns-admin]# * Serving Flask app "powerdnsadmin" (lazy loading) * Environment: production WARNING: This is a development server. Do not use it in a production deployment. Use a production WSGI server instead. * Debug mode: on [2021-02-17 15:23:35,248] [_internal.py:113] INFO - * Running on http://0.0.0.0:9191/ (Press CTRL+C to quit) [2021-02-17 15:23:35,251] [_internal.py:113] INFO - * Restarting with stat |
그럼 이제 웹페이지에서 확인해보자
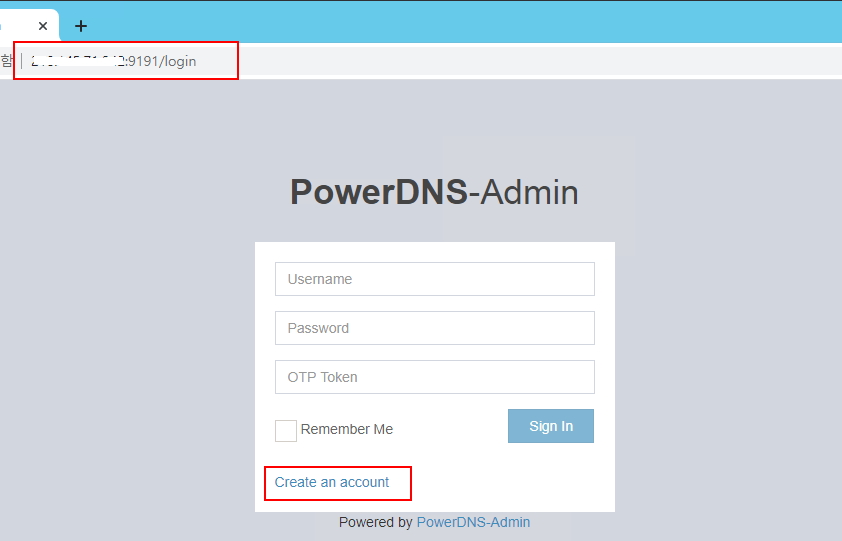
21. 처음 사용자를 만들기 위해서 create an account 버튼을 클릭한다
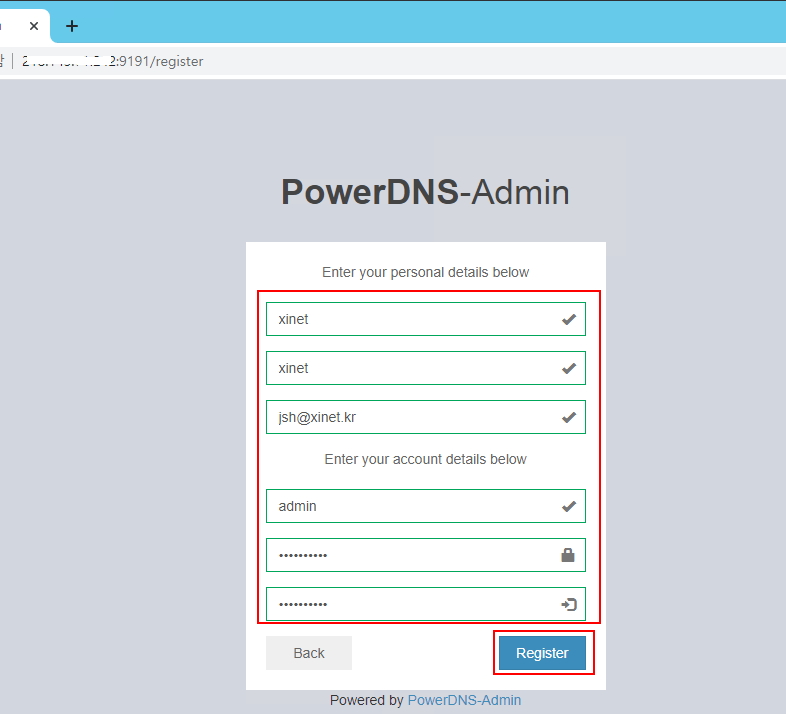
22. 사용자 정보를 (admin) 등록
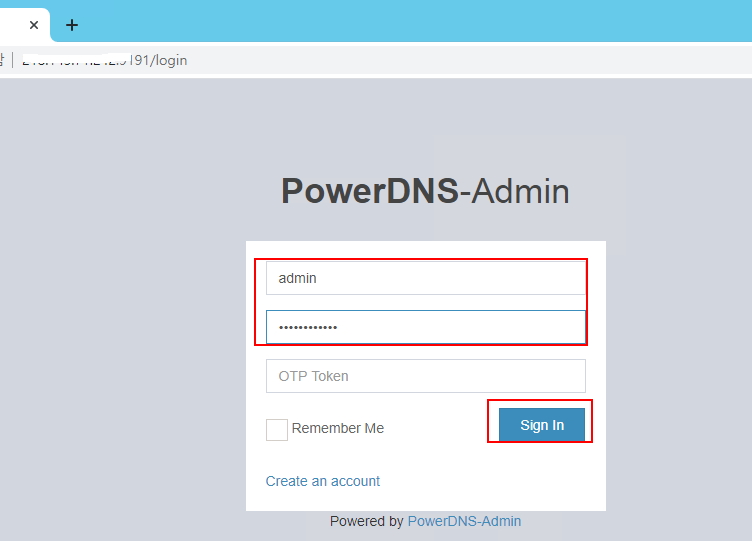
23. 사용자 정보 admin 접속정보를 입력하고 sing in 클릭
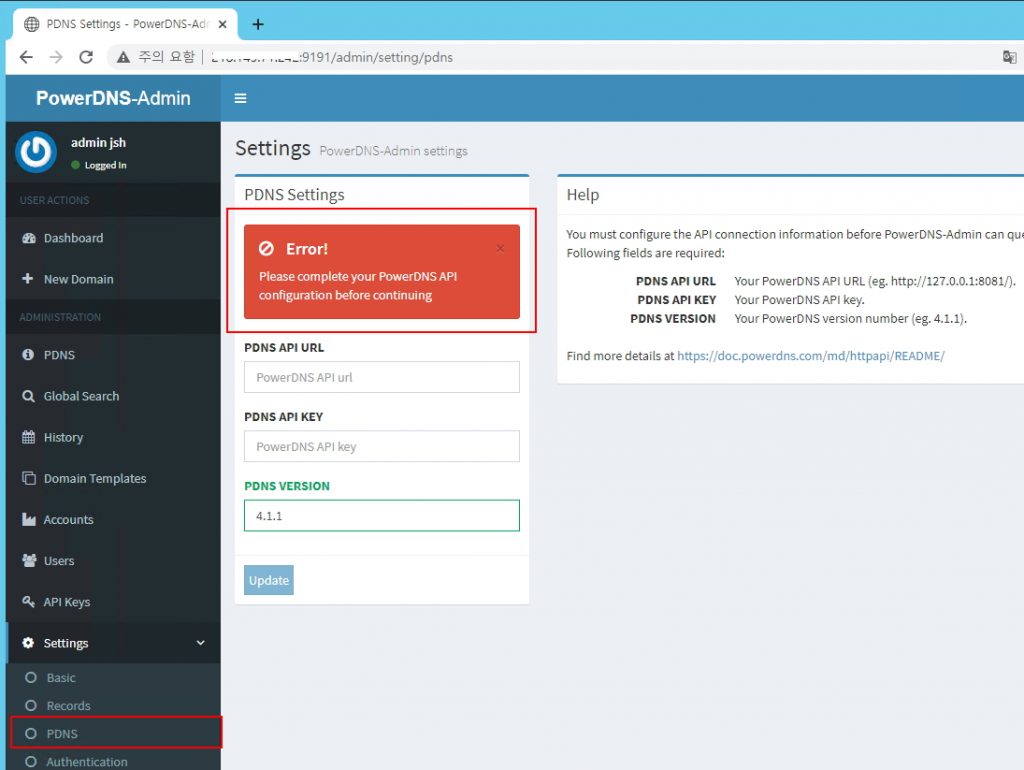
24. 처음 로그인하게 되면 기본 대시보드에서 error 메세지가 발생한다 pdns.conf 에서 api-key 값이 제대로 매칭이 되지 않아서이다
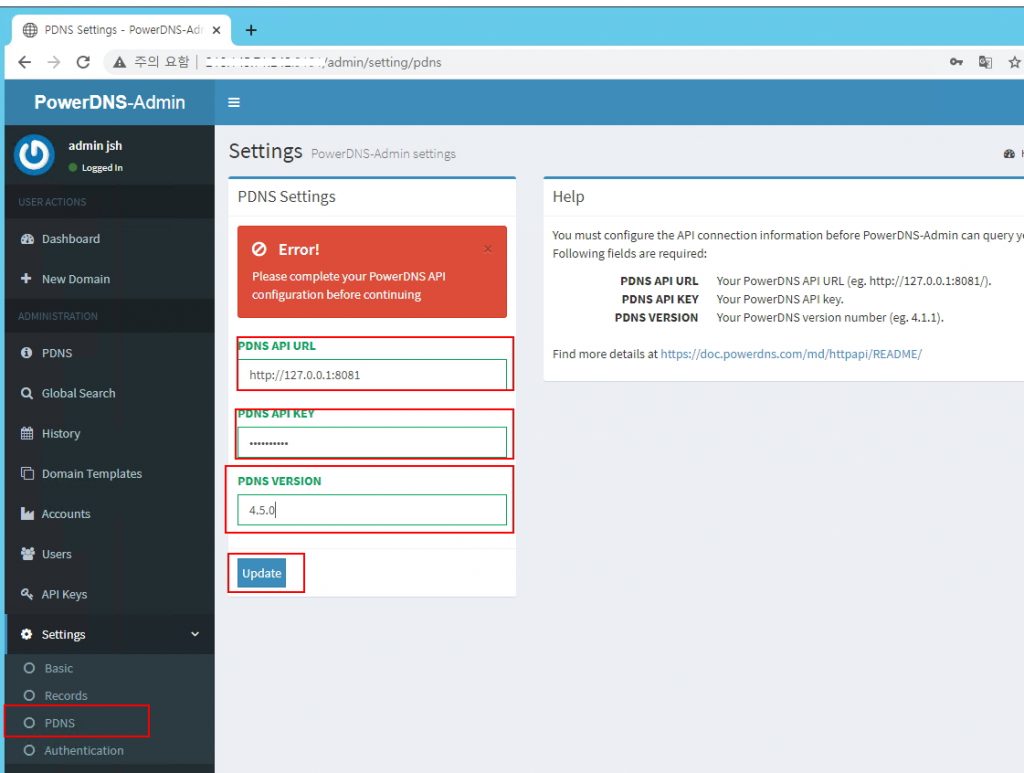
25. 좌측 메듀 PDNS 선택 후 pdns.conf 에서 설정한 key값 입력 ( qwer1234##$$ ) / api url 은 기본 http://127.0.0.1:8081
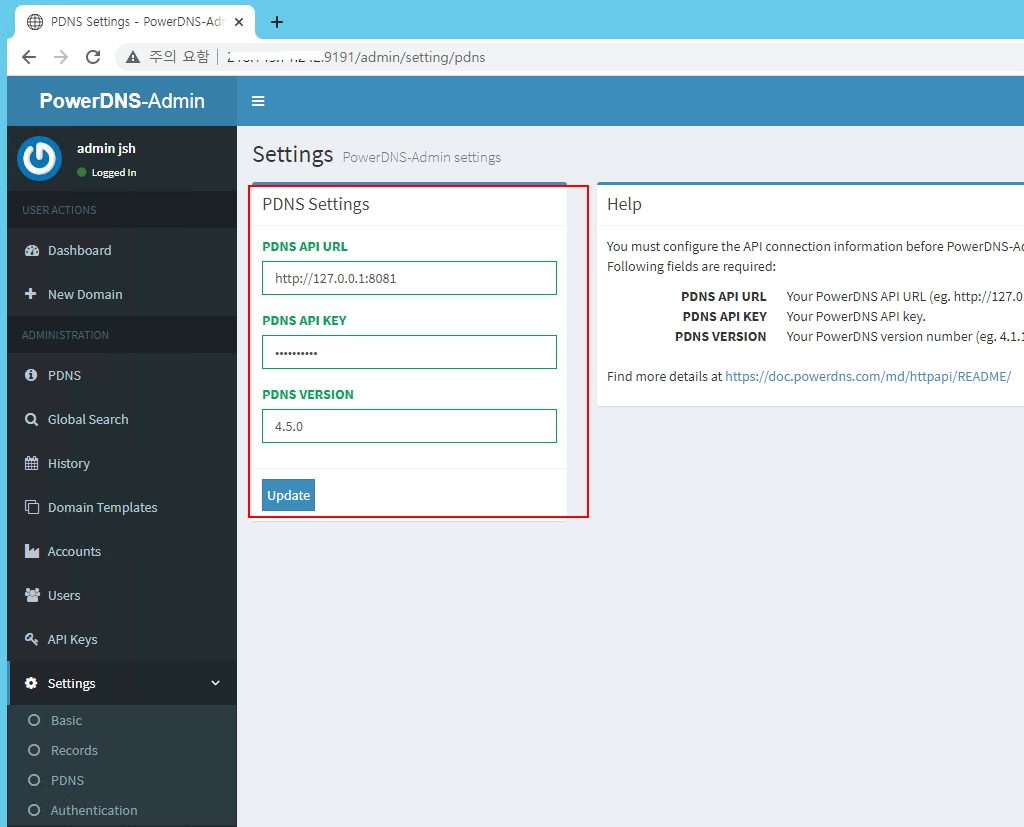
26. update를 클릭하면 정상적으로 api key값 메칭이 되었으면 error없이 화면이 표시된다
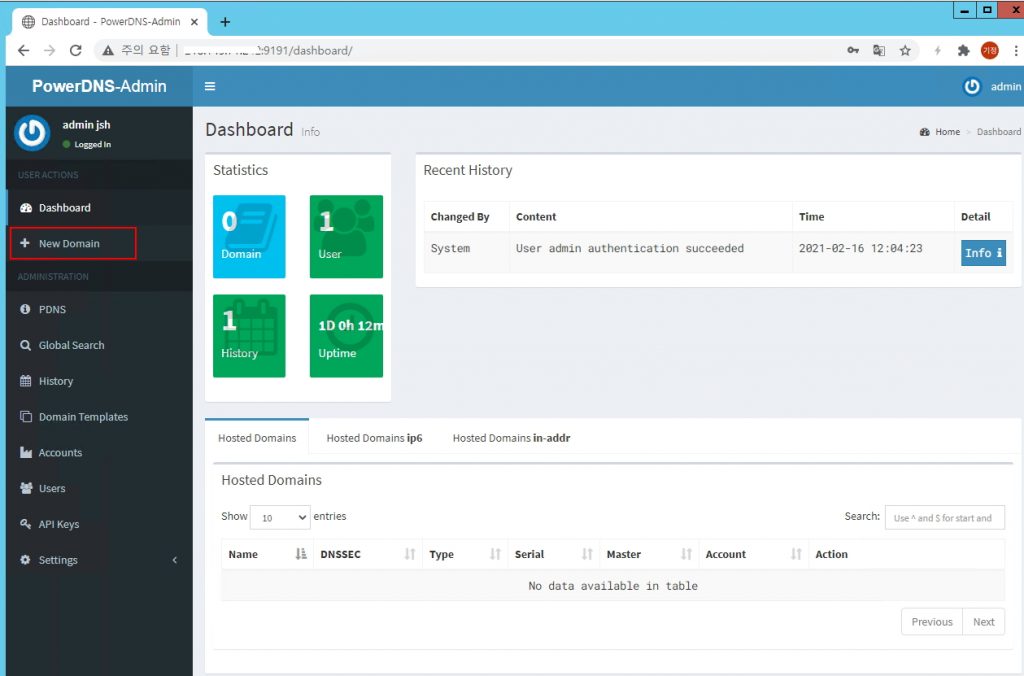
27. 도메인을 등록하기 위해서 좌측 메뉴 new domain 클릭
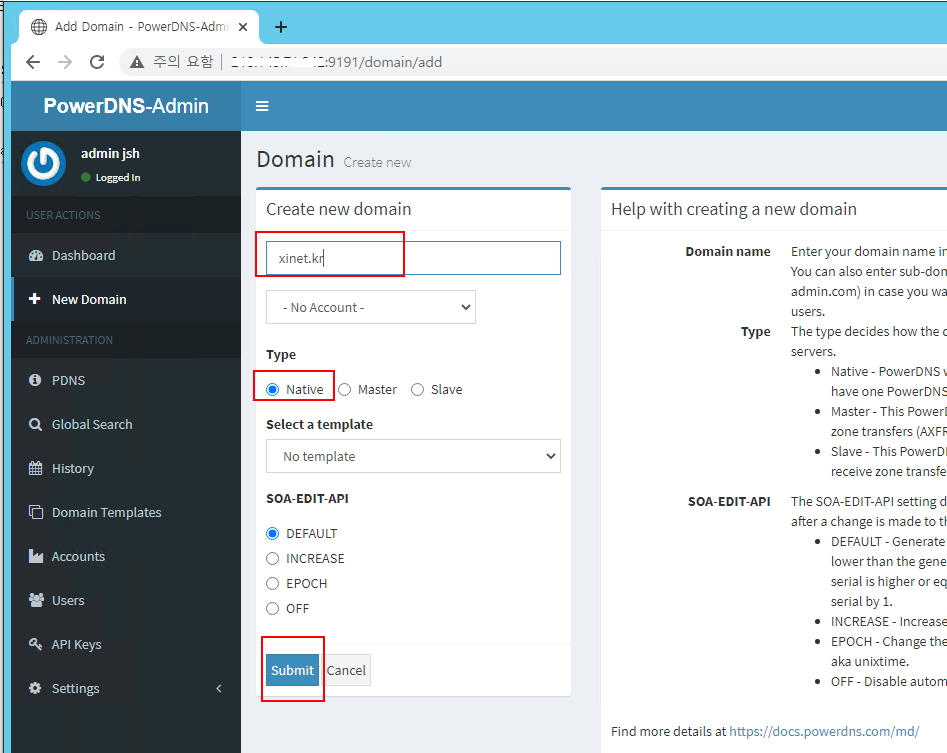
28. 사용할 도메인 xinet.kr 입력 후 submit 클릭
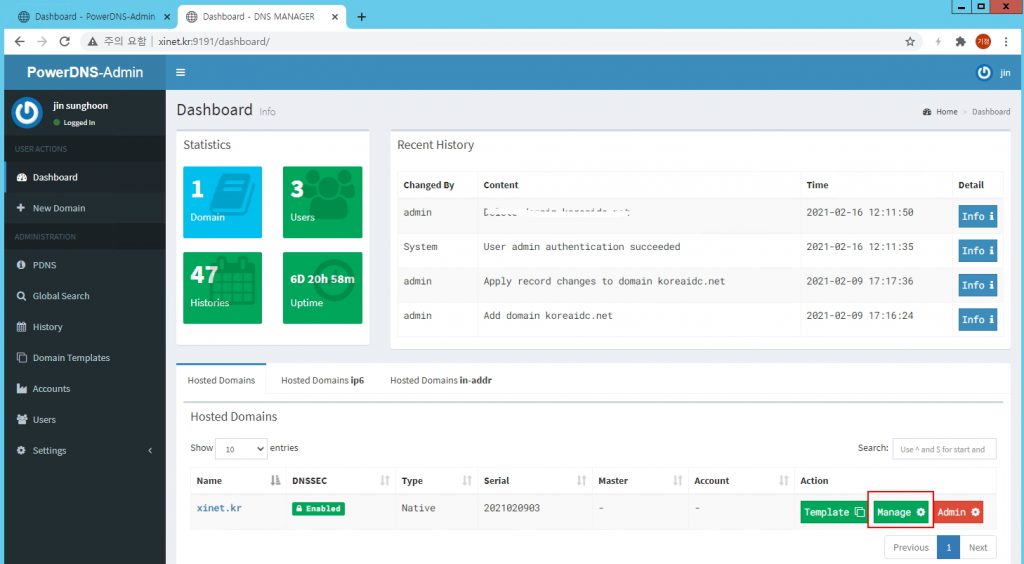
29. 도메인을 추가하게 되면 메인 대시보드에서 추가된 도메인을 확인 할수 있고 manager 버튼을 클릭해서 레코드값을 추가해주면 된다
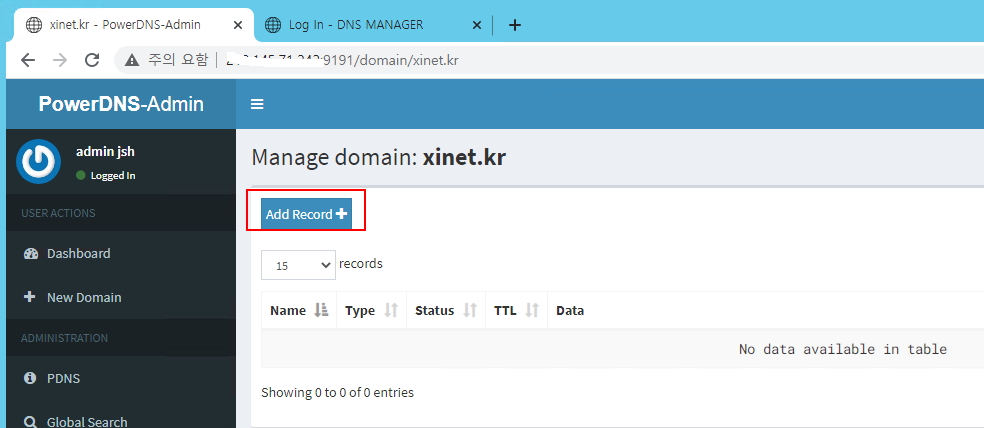
30. Add Record 클릭

31. A 레코드값을 입력한다
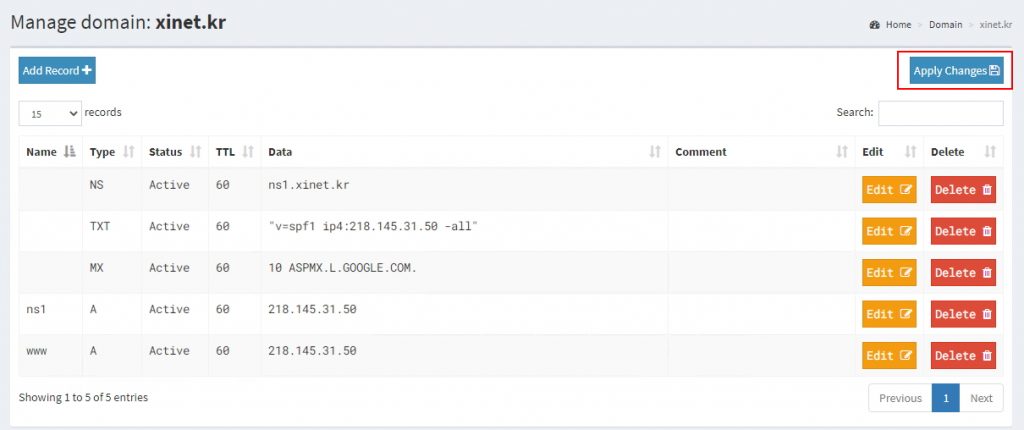
32. 전체 A 레코드값을 입력했으면 우측 상단 Apply changes 클릭을 하면 최종 dns를 추가해서 사용할수가 있다
기존 poweradmin 보다 더 깔끔하게 dns를 관리할수가 있다