nginx : 1.17.8 ( 1.13.0 이상부터 지원)
openssl : 1.1.1d (l 1.1.1 이상이어야 ( tls 1.3 지원한다)
nginx 1.17.8 install 및 openssl install -> https://xinet.kr/?p=2765 (페이지 참고)
nginx 환경설정 파일 경로 : /usr/local/nginx/conf
1. openssl 을 이용하여 key 파일과 csr 파일을 생성한다
|
1 2 3 4 5 6 7 8 9 10 11 12 13 14 15 16 17 18 19 20 21 22 23 24 25 26 27 28 29 30 31 32 33 |
[root@localhost conf]# mkdir -p /usr/local/nginx/conf/ssl [root@localhost conf]# cd /usr/local/nginx/conf/ssl [root@localhost ssl]# openssl genrsa -des3 -out nginxtest.xinet.kr.key 2048 Generating RSA private key, 2048 bit long modulus (2 primes) ..............+++++ ..............................................................................+++++ e is 65537 (0x010001) Enter pass phrase for nginxtest.xinet.kr.key: Verifying - Enter pass phrase for nginxtest.xinet.kr.key: [root@localhost conf]# openssl req -new -key nginxtest.xinet.kr.key -out nginxtest.xinet.kr.csr Enter pass phrase for nginxtest.xinet.kr.key: You are about to be asked to enter information that will be incorporated into your certificate request. What you are about to enter is what is called a Distinguished Name or a DN. There are quite a few fields but you can leave some blank For some fields there will be a default value, If you enter '.', the field will be left blank. ----- Country Name (2 letter code) [AU]:KR State or Province Name (full name) [Some-State]:Gyeonggi-do Locality Name (eg, city) []:Gwangmyeong-si Organization Name (eg, company) [Internet Widgits Pty Ltd]:xinet Organizational Unit Name (eg, section) []:se Common Name (e.g. server FQDN or YOUR name) []:nginxtest.xinet.kr Email Address []: Please enter the following 'extra' attributes to be sent with your certificate request A challenge password []: An optional company name []: |
2. 인증업체에 csr 파일을 보내 인증서 파일을 받는다
3. 인증서를 받게 되면 기본 도메인에 대한 인증서 그리고 chain 인증서 / root 인증서 3가지가 존재하게 된다
apache의 경우 chain 및 root 인증서를 경로 지정해서 등록 할 수 있지만 nginx는 3개의 인증서 파일을 1개의 파일로 통합하셔 사용하면 된다
nginxtest.xinet.kr.crt -> 도메인 인증서
DigiCertRoot2.crt.cer -> root 인증서
EncryptionEverywhereDVCA.crt -> Chain 인증서
|
1 2 3 4 5 6 7 |
[root@localhost ssl]# ll 합계 48 -rw-r--r--. 1 root root 1316 11월 8 2018 DigiCertRoot2.crt.cer -rw-r--r--. 1 root root 1706 11월 8 2018 EncryptionEverywhereDVCA.crt -rw-r--r-- 1 root root 1984 2월 14 16:04 nginxtest.xinet.kr.crt -rw-r--r-- 1 root root 1025 2월 14 15:49 nginxtest.xinet.kr.csr -rw------- 1 root root 1751 2월 14 15:48 nginxtest.xinet.kr.key |
1개의 통합 인증서로 합쳐서 사용
|
1 |
[root@localhost ssl]# cat nginxtest.xinet.kr.crt DigiCertRoot2.crt.cer EncryptionEverywhereDVCA.crt > nginxtest.xinet.kr.cer |
바로 nginx.conf에 이제 key 와 cer를 등록해주고 사용하면 되지만 key 값에 패스워드 지정되어 있어서 nginx 실행시
매번 패스워드를 입력해 줘야 한다 이부분을 패스워드는 입력되지 않게 수정해주면 된다
4. 인증서 key 파일 패스워드 패스
|
1 2 3 4 5 |
[root@localhost ssl]# cp nginxtest.xinet.kr.key nginxtest.xinet.kr.key.ssl [root@localhost ssl]# openssl rsa -in nginxtest.xinet.kr.key.ssl -out nginxtest.xinet.kr.key Enter pass phrase for nginxtest.xinet.kr.key.ssl: writing RSA key |
5. nginx.conf 파일에 가상호스트 ( http / https 등록)
|
1 2 3 4 5 6 7 8 9 10 11 12 13 14 15 16 17 18 19 20 21 22 23 24 25 26 27 28 29 30 31 32 33 34 35 36 37 38 39 40 41 42 43 44 45 46 47 48 49 50 51 52 53 54 |
[root@localhost html]# vi /usr/local/nginx/conf/vhosts/nginxtest.xinet.kr.conf server { root /home/nginxtest/html/; listen 80; server_name nginxtest.xinet.kr; #charset koi8-r; access_log logs/nginxtest.xinet.kr_access.log main; location / { root /home/nginxtest/html/; } #error_page 404 /404.html; error_page 500 502 503 504 /50x.html; location = /50x.html { root html; } #PHP-FPM location ~ \.php$ { root /home/nginxtest/html/; fastcgi_pass unix:/usr/local/php-fpm/var/run/php-fpm.sock; fastcgi_param SCRIPT_FILENAME $document_root$fastcgi_script_name; include fastcgi_params; } } # HTTPS server server { listen 443 ssl http2; server_name nginxtest.xinet.kr; access_log logs/nginxtest.xinet.kr_access.log main; ssl_certificate /usr/local/nginx/conf/ssl/nginxtest.xinet.kr.cer; ssl_certificate_key /usr/local/nginx/conf/ssl/nginxtest.xinet.kr.key; #ssl_protocols TLSv1 TLSv1.1 TLSv1.2 TLSv1.3; ssl_protocols TLSv1.2 TLSv1.3; ssl_prefer_server_ciphers on; ssl_ciphers ECDHE-ECDSA-AES128-GCM-SHA256:ECDHE-RSA-AES128-GCM-SHA256:ECDHE-ECDSA-CHACHA20-POLY1305:ECDHE-RSA-CHACHA20-POLY1 305:kEDH+AESGCM:ECDHE-ECDSA-AES128-SHA256:ECDHE-RSA-AES128-SHA256:ECDHE-ECDSA-AES128-SHA:ECDHE-RSA-AES128-SHA:ECDHE-ECDSA-DES-CBC3-S HA:AES128-GCM-SHA256:AES128-SHA256:AES128-SHA:SRP-RSA-AES-128-CBC-SHA:DES-CBC3-SHA:!aNULL:!eNULL:!EXPORT:!DES:!RC4:!MD5:!PSK:!aECDH: !EDH-DSS-DES-CBC3-SHA:!EDH-RSA-DES-CBC3-SHA:!KRB5-DES-CBC3-SHA:!DHE-RSA-AES256-GCM-SHA384:!DHE-RSA-AES128-GCM-SHA256; location / { root /home/nginxtest/html/; } location ~ \.php$ { root /home/nginxtest/html/; fastcgi_pass unix:/usr/local/php-fpm/var/run/php-fpm.sock; fastcgi_param SCRIPT_FILENAME $document_root$fastcgi_script_name; include fastcgi_params; } } |
6. nginx.conf 파일에서 해당 nginxtest.xinet.kr.conf 파일을 include 하고 오류 점검
|
1 2 3 |
[root@localhost html]# nginx -t nginx: the configuration file /usr/local/nginx/etc/nginx.conf syntax is ok nginx: configuration file /usr/local/nginx/etc/nginx.conf test is successful |
7. nginx 재시작
|
1 |
[root@localhost html]# systemctl restart nginx |
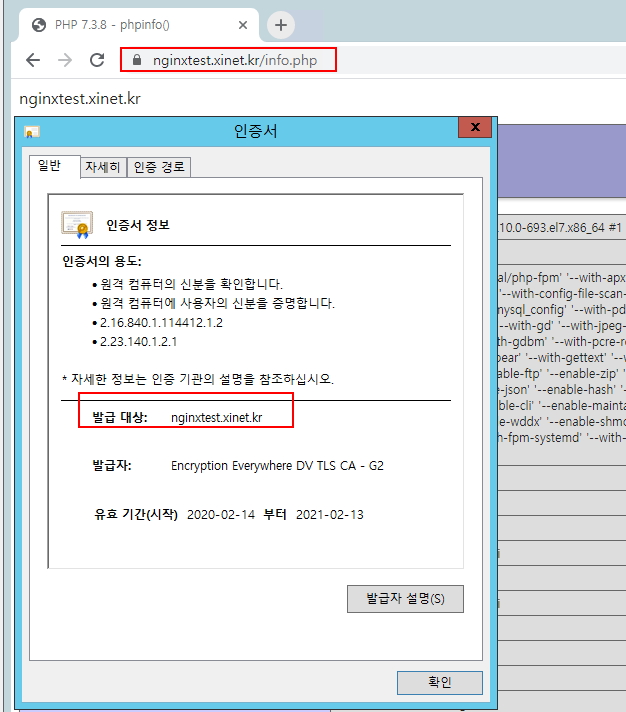
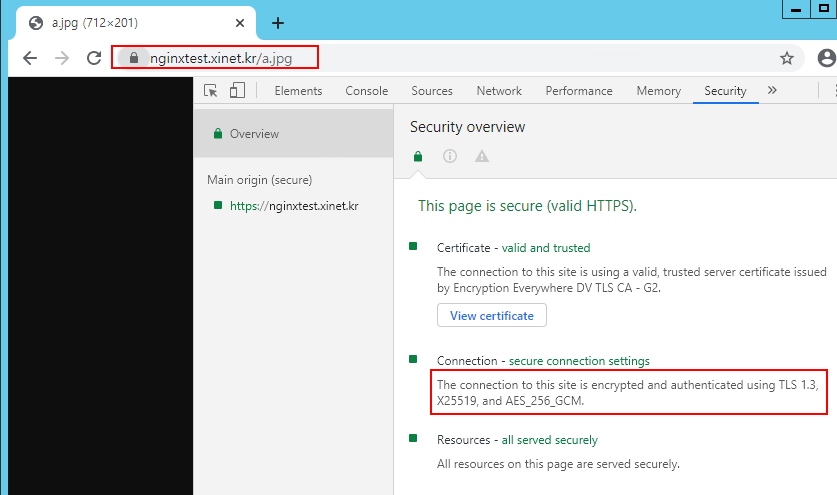
8. 웹사이트에서 인증서 확인 및 tls 1.3 확인

tls 1.3 확인

https://www.ssllabs.com/ssltest/index.html 사이트에서 체크 등급

