GeoIP.dat / GeoIPCity.dat / GeoIPASNum.dat 최신 파일로 업데이트 하기 / GeoLite2 이용
O/S : CentOS 6.x만약 아래 부분을 다 무시하고 최신 데이터를 다운 받아 보고 싶다면 아래 링크에서 다운 받으면 된다 ( 매달 6일 업데이트 )
https://xinet.kr/data/geoip/GeoIP.dat
https://xinet.kr/data/geoip/GeoIPASNum.dat
https://xinet.kr/data/geoip/GeoIPCity.dat
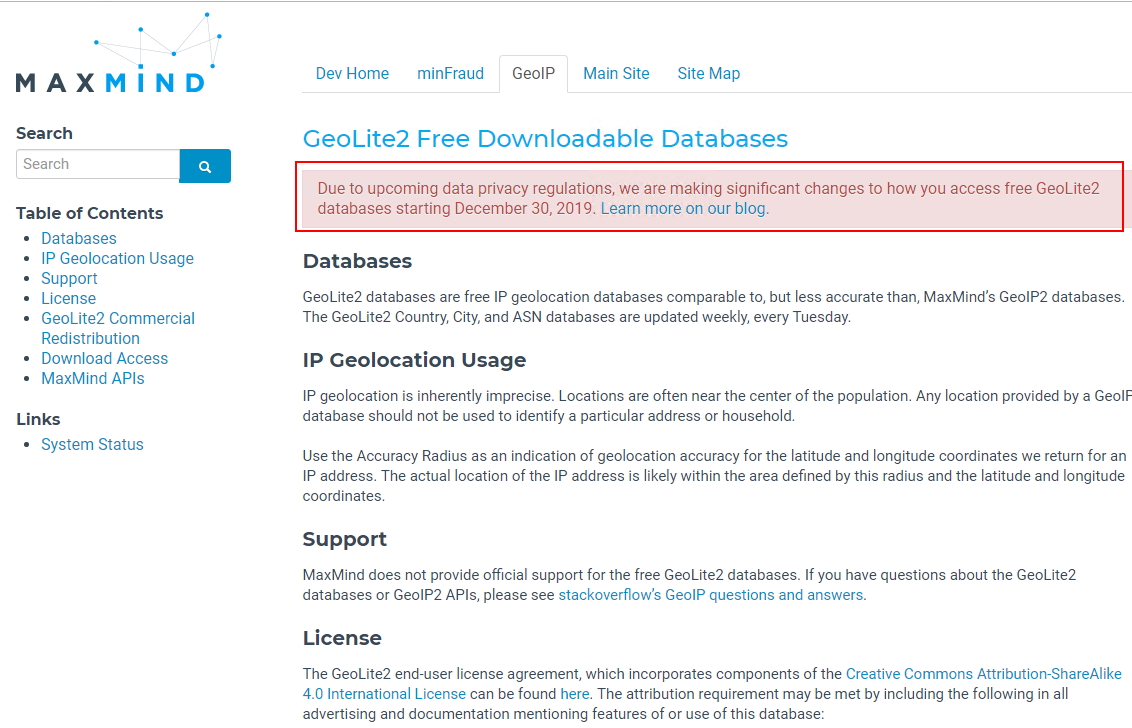
maxmind에서 기존에 Geolite2를 무료로 제공을 했는데 2019년 12월 30일부로 정책이 변경되어 아무나 다운로드 받는 방식이 아닌 회원 가입 후 라이센스를 발급 받아 다운로드 하는 방식으로 변경되었다.
아래 내용처럼 변경되었다는 것을 공시하고 있다.
Due to upcoming data privacy regulations, we are making significant changes to how you access free GeoLite2 databases starting December 30, 2019. Learn more on our blog.
블로그 주소 : https://blog.maxmind.com/2019/12/18/significant-changes-to-accessing-and-using-geolite2-databases/
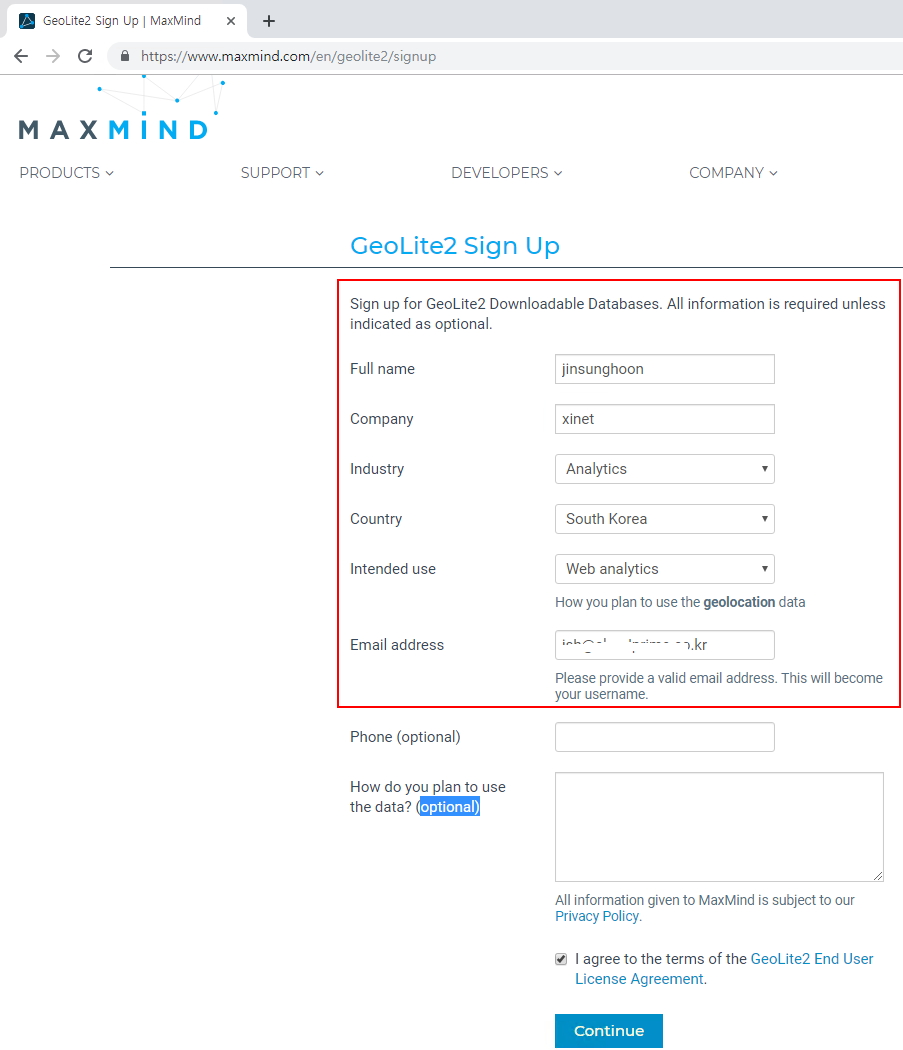
 1. 회원가입 해당 페이지로 들어가서 회원 가입을 진행한다
https://www.maxmind.com/en/geolite2/signup
 2. 회원 가입을 하면 등록된 이메일로 이메일이 하나 받아보는데 해당 파일의 password here 부분을 클릭을 한다 ( 패스워드 지정)
 3. set password 지정창이 나타나면 패스워들 지정한다 / 토큰번호는 자동으로 생성이 되며 별도 복사 할 필요가 없다.

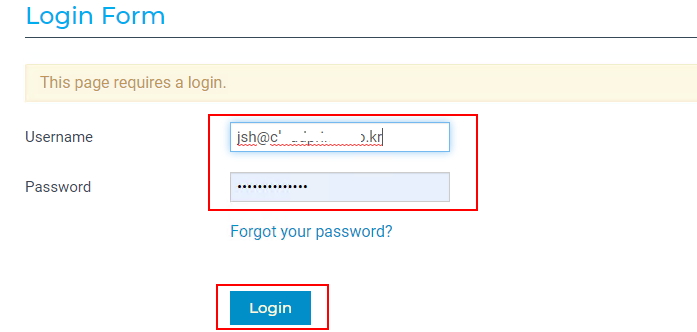
4. 패스워드를 지정하고 로그인 창 화면이 나타나면 username에는 등록된 이메일 주소 / 그리고 지정한 패스워드를 입력하면 된다.
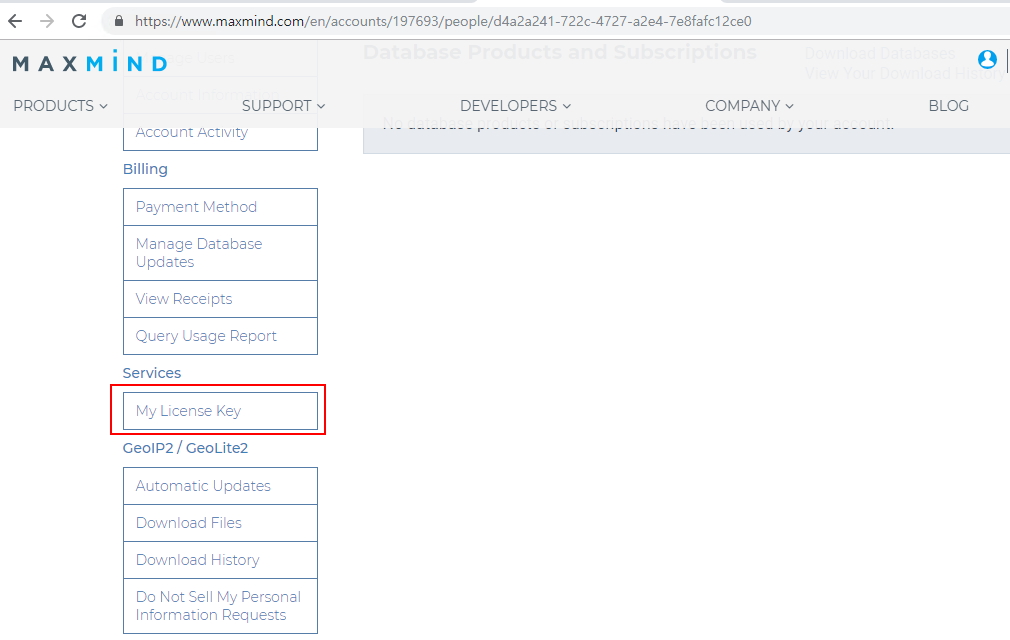
 5.maxmind.com 페이지 로그인 후 촤측 메뉴중에 My license Key 메뉴를 클릭한다.
6. Generate new license key 버튼을 클릭한다.
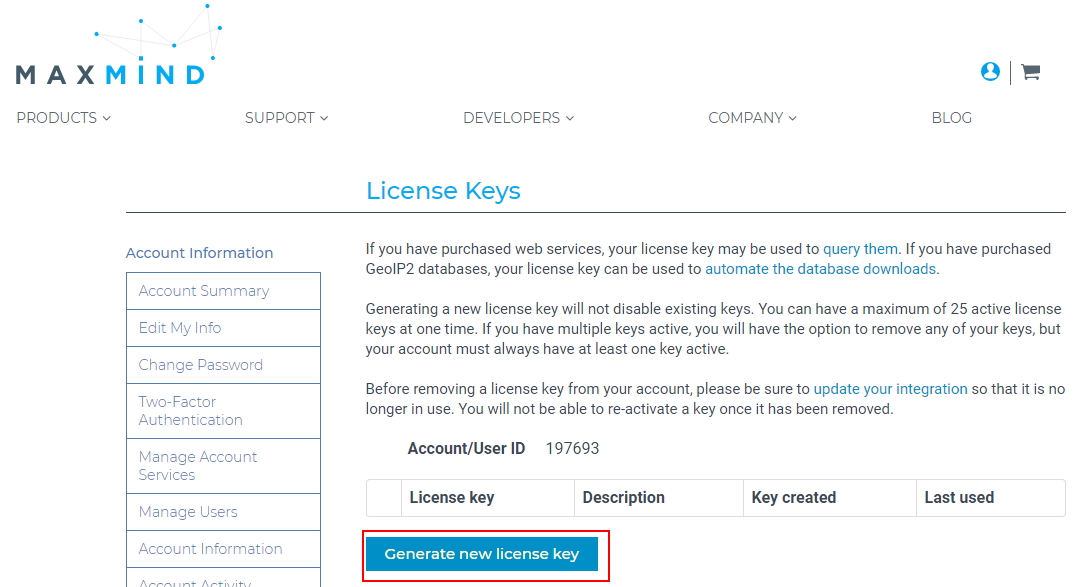
7. License key description 항목에 저당한 키값을 입력한다 / geoipupdate 부분을 활용할거냐 선택창이 나타나면 기본값으로 두고 하단 confirm 을 클릭
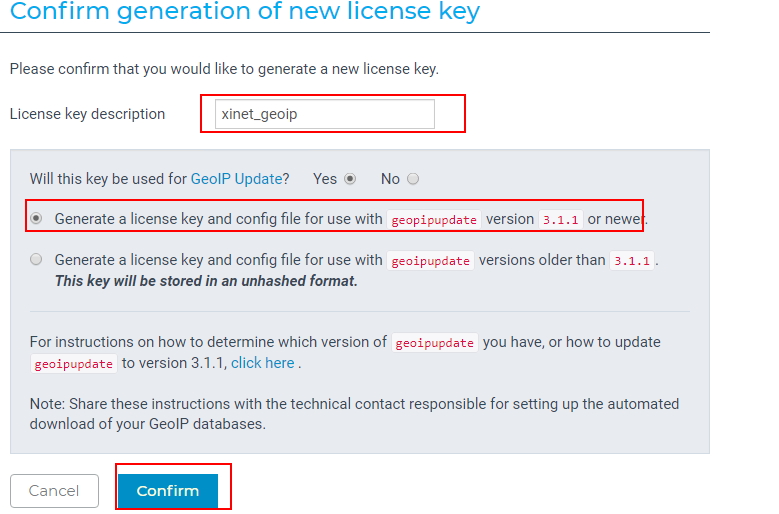
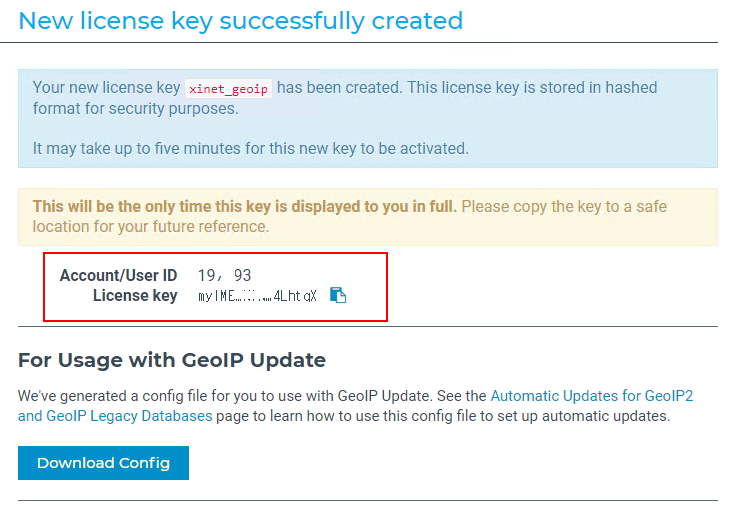
8. new license key 가 발급되었으며 account id 와 license key는 꼭 별도로 복사해서 보관을 해야한다. ( 해당 값을 가지고 추후 다운로드를 진행하게 된다)
 9. 좌측 메뉴중에 Download Files 항목을 클릭한다.
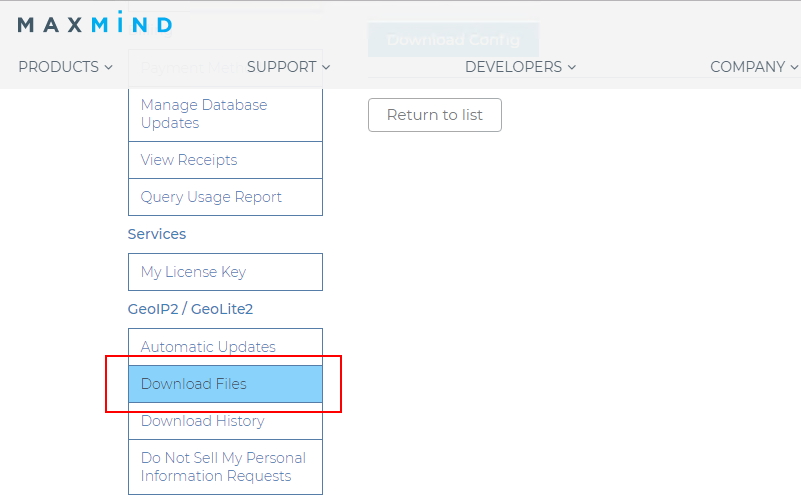
10. GeoLite2 데이터베이스를 제공하고 내가 필요한 파일은 csv으로 포맷된 형식의 파일을 이용하게 되므로 해당 파일을 다운로드 하면 된다
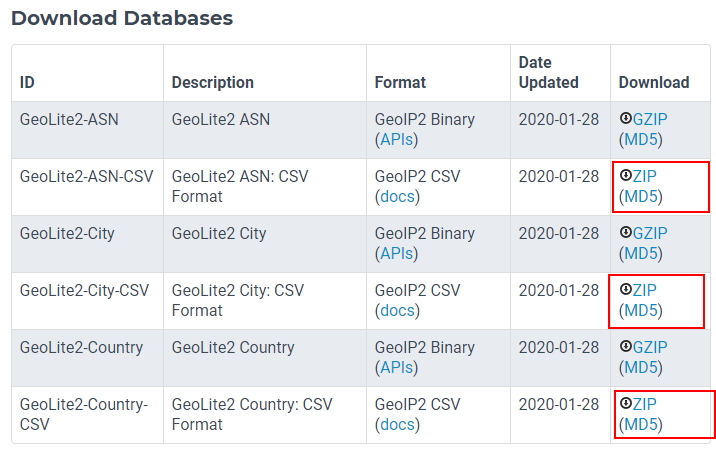
11. 근데 매번 데이터베이스 파일을 업데이트 할때마다 웹페이지 들어와서 다운로드 하고 그러면 수동으로 되기 때문에 자동으로 업데이트를 진행하기 위해서
링크를 이용해서 다운로드를 진행 할 수 있다. zip 마우스 오른쪽 버튼을 누르고 링크 주소 복사를 선택한다.
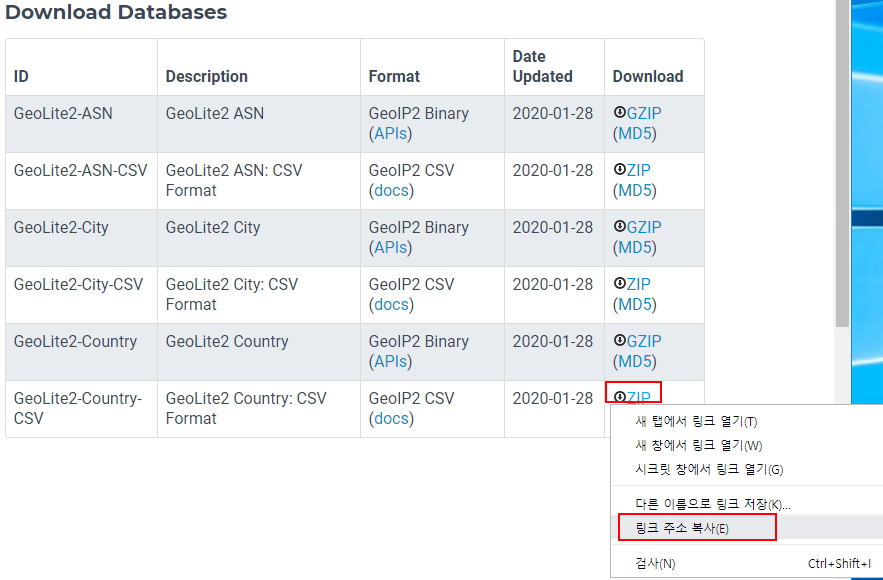 그럼 다음과 같은 링크 주소가 복사가 된다
|
1 |
https://download.maxmind.com/app/geoip_download_by_token?edition_id=GeoLite2-Country-CSV&date=20200128&token=v2.local.rls3nzzj8PyiOvYk-uecmzndPwa74rPEZSucM_z8UzRhzEhjHppvMfUcWX3ChFQUTv7mdc2-e5QJQyu01E86qg-F2xow6nhON9-vmJl0l3EHR5PxYtq생략---------pbb9j82urI3CSFJyJ&suffix=zip |
자동으로 파일을 다운로드 받기 위해서 ( wget , curl ) 을 위 링크주소에서 아래 부분을 수정하고 다운 받으면 된다
geoip_download_by_token —> geoip_download
token=XXXX —> license_key=YOUR_LICENSE_KEY
date= —> 삭제
그럼 wget으로 다운을 받아보자 이런식으로 변경을 해서 다운로드를 받으면 된다.
|
1 2 3 4 5 |
wget "https://download.maxmind.com/app/geoip_download?edition_id=GeoLite2-Country-CSV&license_key=라이센스번호&suffix=zip" -O GeoLite2-Country-CSV.zip wget "https://download.maxmind.com/app/geoip_download?edition_id=GeoLite2-City-CSV&license_key=라이센스번호&suffix=zip" -O GeoLite2-City-CSV.zip wget "https://download.maxmind.com/app/geoip_download?edition_id=GeoLite2-ASN-CSV&license_key=라이센스번호&suffix=zip" -O GeoLite2-ASN-CSV.zip |
그럼 이제 주로 사용하는 GeoIP.dat / GeoIPCity.dat / GeoIPASNum.dat 파일을 최신 데이터로 변경해 보자
( GeoIP.dat / GeoIPCity.dat / GeoIPASNum.dat update)
GeoIP.dat / GeoIPCity.dat / GeoIPASNum.dat 최신 파일로 업데이트 하기 / GeoLite2 이용
O/S : CentOS 6.x
CentOS 7.x 에서 업데이트 하려면 아래 링크에서 확인하시면 됩니다
GeoIP.dat GeoIPCity.dat 파일 업데이트 CentOS 7 (GeoLite2 이용한 geoip geoipcity 파일 최신 파일로 업데이트)
서버에서는 여러가지 어플리케이션을 운용하면서 GeoIP를 이용하는 케이스 많다 예를들어 apache에 국가코드
iptables 를 운용한 국가코드를 이용해서 차단
기존 yum을 통해서 설치를 하게 되면 데이터가 최신 데이터가 아니다 / 업데이트를 통해 진행했지만 현재 2019년 12월인데
자료는 2019년 8월의 데이터이다
|
1 2 3 4 5 6 7 8 9 10 11 12 13 14 |
[root@localhost ~]# ls -l /usr/share/GeoIP/ 합계 54760 -rw-r--r-- 1 root root 1242574 8월 8 21:04 GeoIP-initial.dat lrwxrwxrwx 1 root root 17 12월 2 16:32 GeoIP.dat -> GeoIP-initial.dat -rw-r--r-- 1 root root 4638365 8월 8 21:04 GeoIPASNum-initial.dat lrwxrwxrwx 1 root root 39 1 2월 2 16:32 GeoIPASNum.dat -> /usr/share/GeoIP/GeoIPASNum-initial.dat -rw-r--r-- 1 root root 5628114 8월 8 21:04 GeoIPASNumv6-initial.dat lrwxrwxrwx 1 root root 41 2월 2 16:32 GeoIPASNumv6.dat -> /usr/share/GeoIP/GeoIPASNumv6-initial.dat -rw-r--r-- 1 root root 20539238 8월 8 21:04 GeoIPCity-initial.dat lrwxrwxrwx 1 root root 38 12월 2 16:32 GeoIPCity.dat -> /usr/share/GeoIP/GeoIPCity-initial.dat -rw-r--r-- 1 root root 21684452 8월 8 21:04 GeoIPCityv6-initial.dat lrwxrwxrwx 1 root root 40 12월 2 16:32 GeoIPCityv6.dat -> /usr/share/GeoIP/GeoIPCityv6-initial.dat -rw-r--r-- 1 root root 2322773 8월 8 21:04 GeoIPv6-initial.dat lrwxrwxrwx 1 root root 19 12월 2 16:32 GeoIPv6.dat -> GeoIPv6-initial.dat |
그럼 주로 사용하는 GeoIP.dat / GeoIPCity.dat / GeoIPASNum.dat 파일을 최신 데이터로 변경해 보자
( GeoIP.dat / GeoIPCity.dat / GeoIPASNum.dat update)
1. 설치에 앞서 os 버전이 Cenots 6.x 버전이다 여기서 변환하는 python 이 최소 2.7 버전을 요구하기 때문에 python 2.7 버전을 먼저 설치 후 진행하자
|
1 2 |
[root@localhost ~]# python -V Python 2.6.6 |
2. yum으로 scl release 를 추가하고 python2.7 버전을 설치를 진행하자
|
1 2 3 4 5 6 7 8 9 10 11 12 13 14 15 16 17 18 19 20 21 |
[root@localhost ~]# yum install -y centos-release-scl [root@localhost ~]# yum list python27-python.x86_64 --showd Loaded plugins: fastestmirror, security Loading mirror speeds from cached hostfile * base: mirror.navercorp.com * centos-sclo-rh: mirror.navercorp.com * centos-sclo-sclo: mirror.navercorp.com * extras: mirror.navercorp.com * updates: mirror.navercorp.com Installed Packages python27-python.x86_64 2.7.16-6.el6 @centos-sclo-rh Available Packages python27-python.x86_64 2.7.8-3.el6 centos-sclo-rh python27-python.x86_64 2.7.8-16.el6 centos-sclo-rh python27-python.x86_64 2.7.8-18.el6 centos-sclo-rh python27-python.x86_64 2.7.13-3.el6 centos-sclo-rh python27-python.x86_64 2.7.16-4.el6 centos-sclo-rh python27-python.x86_64 2.7.16-6.el6 centos-sclo-rh [root@localhost ~]# yum install python27-python-2.7.16-6.el6 |
3. 이제 설치가 완료되었으면 .bash_profile에 추가해서 사용할수 있게 구성하자
|
1 2 3 4 5 6 |
[root@localhost ~]# vi /root/.bash_profile ### 추가 source /opt/rh/python27/enable 저장 후 로그아웃 후 다시 로그인 |
4. 이제 python 버전을 확인해보자
|
1 2 |
[root@localhost ~]# python -V Python 2.7.16 |
5. git에서 파일을 다운로드 한다 ( CSV 파일을 가지고 dat 파일을 변환하는 소스들이다)
|
1 |
[root@xinet ~]# git clone https://github.com/sherpya/geolite2legacy.git |
6. 파일을 다운로드 후 실제 GeoLite2 zip 파일을 다운로드 한다
|
1 2 3 4 5 6 7 |
[root@xinet ~]# cd geolite2legacy [root@xinet geolite2legacy]# wget "https://download.maxmind.com/app/geoip_download?edition_id=GeoLite2-Country-CSV&license_key=라이센스번호&suffix=zip" -O GeoLite2-Country-CSV.zip [root@xinet geolite2legacy]# wget "https://download.maxmind.com/app/geoip_download?edition_id=GeoLite2-City-CSV&license_key=라이센스번호&suffix=zip" -O GeoLite2-City-CSV.zip [root@xinet geolite2legacy]# wget "https://download.maxmind.com/app/geoip_download?edition_id=GeoLite2-ASN-CSV&license_key=라이센스번호&suffix=zip" -O GeoLite2-ASN-CSV.zip |
7. 파일 다운로드 후 geolite2legacy.py 명령어를 이용하여 dat 파일을 추출한다 / 하지만 에러가 발생한다 ipaddr 모듈이 없다고
|
1 2 3 4 5 |
[root@localhost geolite2legacy]# ./geolite2legacy.py -i GeoLite2-City-CSV.zip -f geoname2fips.csv -o GeoIPCity.dat Traceback (most recent call last): File "./geolite2legacy.py", line 32, in <module> import ipaddr ImportError: No module named ipaddr |
8. python2.7 에 ipaddr 모듈을 설치 해 주자
|
1 |
[root@localhost geolite2legacy]# pip2.7 install ipaddr |
9. ipaddr 모듈이 추가되었으면 이제 다시 파일을 실행하는데 이 파일 기본 실행 경로가 /usr/bin/python 에서 불러온다 이렇게 될경우 python 2.6 에서 동작되기 때문에 에러가 발생한다
geolite2legacy.py 파일을 vi 열어서 경로를 수정 해 준다
|
1 2 3 4 5 6 7 8 9 |
[root@localhost geolite2legacy]# vi geolite2legacy.py #!/usr/bin/python ---> 삭제 후 아래 내용 기입 #!/opt/rh/python27/root/usr/bin/python 저장 |
10. 이제 다시 변환을 시작해 보자
|
1 2 3 4 5 |
[root@xinet geolite2legacy]# ./geolite2legacy.py -i GeoLite2-City-CSV.zip -f geoname2fips.csv -o GeoIPCity.dat</span> [root@xinet geolite2legacy]# ./geolite2legacy.py -i GeoLite2-Country-CSV.zip -f geoname2fips.csv -o GeoIP.dat [root@xinet geolite2legacy]# ./geolite2legacy.py -i GeoLite2-ASN-CSV.zip -o GeoIPASNum.dat |
11.파일을 다 추출하였으면 기존 /usr/share/GeoIP 폴더에 있는 해당 파일들을 삭제 후 복사 해준다
|
1 2 3 4 5 6 7 |
[root@xinet geolite2legacy]# rm -f /usr/share/GeoIP/GeoIP.dat [root@xinet geolite2legacy]# rm -f /usr/share/GeoIP/GeoIPCity.dat [root@xinet geolite2legacy]# rm -f /usr/share/GeoIP/GeoIPASNum.dat [root@xinet geolite2legacy]# cp -a *.dat /usr/share/GeoIP/ |
12. 확인을 하게 되면 자료는 2019년 12월 4일로 변경된 것을 확인 할 수 있다
|
1 2 3 4 5 6 7 8 |
[root@xinet GeoIP]# ls -l /usr/share/GeoIP/GeoIP.dat -rw-r--r-- 1 root root 2083689 12월 4 17:31 /usr/share/GeoIP/GeoIP.dat [root@xinet GeoIP]# ls -l /usr/share/GeoIP/GeoIPCity.dat -rw-r--r-- 1 root root 23437885 12월 4 17:30 /usr/share/GeoIP/GeoIPCity.dat [root@xinet GeoIP]# ls -l /usr/share/GeoIP/GeoIPASNum.dat -rw-r--r-- 1 root root 5355492 12월 4 17:32 /usr/share/GeoIP/GeoIPASNum.dat |
13. 그럼 이제 해당 파일을 주기적으로 업데이트 될 수 있게 스크립트를 만들어 보자
|
1 2 3 4 5 6 7 8 9 10 11 12 13 14 15 16 17 18 19 20 21 22 23 24 25 26 27 28 29 30 31 32 33 34 35 36 37 |
[root@xinet ~]# mkdir /shell [root@xinet ~]# vi /shell/geoip_update.sh #!/bin/bash cd /root/geolite2legacy rm -f *.zip rm -f *.dat wget "https://download.maxmind.com/app/geoip_download?edition_id=GeoLite2-Country-CSV&license_key=라이센스번호&suffix=zip" -O GeoLite2-Country-CSV.zip sleep 1 wget "https://download.maxmind.com/app/geoip_download?edition_id=GeoLite2-City-CSV&license_key=라이센스번호&suffix=zip" -O GeoLite2-City-CSV.zip sleep 1 wget "https://download.maxmind.com/app/geoip_download?edition_id=GeoLite2-ASN-CSV&license_key=라이센스번호&suffix=zip" -O GeoLite2-ASN-CSV.zip sleep 1 ### change /root/geolite2legacy/geolite2legacy.py -i /root/geolite2legacy/GeoLite2-Country-CSV.zip -f /root/geolite2legacy/geoname2fips .csv -o /root/geolite2legacy/GeoIP.dat sleep 1 /root/geolite2legacy/geolite2legacy.py -i /root/geolite2legacy/GeoLite2-City-CSV.zip -f /root/geolite2legacy/geoname2fips.cs v -o /root/geolite2legacy/GeoIPCity.dat sleep 1 /root/geolite2legacy/geolite2legacy.py -i /root/geolite2legacy/GeoLite2-ASN-CSV.zip -o /root/geolite2legacy/GeoIPASNum.dat sleep 1 ### old dat file delete and copy rm -f /usr/share/GeoIP/GeoIP.dat rm -f /usr/share/GeoIP/GeoIPCity.dat rm -f /usr/share/GeoIP/GeoIPASNum.dat cp -a /root/geolite2legacy/*.dat /usr/share/GeoIP/ |
14. 퍼미션 수정 및 crontab 등록
|
1 2 3 4 5 6 7 8 9 10 11 |
[root@xinet ~]# chmod 700 /shell/geoip_update.sh [root@xinet ~]# crontab -e ### GeoIP Update 10 03 6 * * /shell/geoip_update.sh ### cron 재시작 [root@localhost geolite2legacy]# /etc/rc.d/init.d/crond restart |
매달 6일 오전 3시 10분에 되게 등록해 두었다.