웹로그 분석 시스템은 다양은 오픈소스가 존재 한다. webalizer / awstats / goaccess 등 여러가지 존재하는데
이중에서 awstats 를 설치 해보자
OS : CentOS 7.x
Web Server : apache 2.4
1. 다운로드 ( 다운로드는 공식 홈페이지에서 다운로드 가능 https://awstats.sourceforge.io/ ) 및 폴더 변경
|
1 2 3 4 5 |
[root@xinet ~]# wget https://prdownloads.sourceforge.net/awstats/awstats-7.7.tar.gz [root@xinet ~]# tar xvfz awstats-7.7.tar.gz [root@xinet ~]# mv awstats-7.7 /usr/local/awstats |
2. 사용자 환경 config 파일 생성
|
1 2 3 4 5 6 7 8 9 10 11 12 13 14 15 16 17 18 19 20 |
[root@xinet ~]# cd /usr/local/awstats/tools/ [root@xinet tools]# perl awstats_configure.pl ### 처음 설치하는 경우 config 파일 생성할거냐 물어보면 Y Do you want me to build a new AWStats config/profile file (required if first install) [y/N] ? Y 입력 ### 도메인 입력하랴면 자신의 도메인 입력 Your web site, virtual server or profile name: xinet.kr ### 기본 config 파일 저장 위치를 /etc/awstats 저장할거면 확인하면 엔터 Default: /etc/awstats Directory path to store config file(s) (Enter for default): > 엔터 ## 엔터 |
3. awstats 환경설정 파일 수정
|
1 2 3 4 5 6 7 8 9 10 |
[root@xinet tools]# vi /etc/awstats/awstats.xinet.kr.conf ### 아래내용으로 수정 LogFile="/usr/local/apache/logs/access_log" LogFormat=1 DirData="/usr/local/awstats" |
4. 이제 모든 설정이 완료되었으므로 로그 파일을 awstats 에 맞게 파싱을 해보자
|
1 2 3 4 5 6 7 8 9 10 11 12 13 14 |
[root@xinet ~]# /usr/local/awstats/wwwroot/cgi-bin/awstats.pl -config=xinet.kr -update Create/Update database for config "/etc/awstats/awstats.xinet.kr.conf" by AWStats version 7.7 (build 20180105) From data in log file "/usr/local/apache/logs/access_log"... Phase 1 : First bypass old records, searching new record... Direct access after last parsed record (after line 45451) Jumped lines in file: 45451 Found 45451 already parsed records. Parsed lines in file: 519 Found 0 dropped records, Found 0 comments, Found 0 blank records, Found 0 corrupted records, Found 0 old records, Found 519 new qualified records. |
5. 웹서버에 awstas alias 설정 ( apache 2.4 기준)
|
1 2 3 4 5 6 7 8 9 10 11 12 13 14 15 16 17 18 19 20 21 22 23 24 25 26 27 28 |
[root@xinet tools]# vi /usr/local/apache/conf/awstats.conf Alias /awstatsclasses "/usr/local/awstats/wwwroot/classes/" Alias /awstatscss "/usr/local/awstats/wwwroot/css/" Alias /awstatsicons "/usr/local/awstats/wwwroot/icon/" ScriptAlias /awstats/ "/usr/local/awstats/wwwroot/cgi-bin/" # # This is to permit URL access to scripts/files in AWStats directory. # <Directory "/usr/local/awstats/wwwroot"> Options None AllowOverride None <IfModule mod_authz_core.c> # Apache 2.4 ## 특정 아이피만 허용시 아래 주석처리 # Require ip 192.168.10.22 ### 모든접속자 허용 Require all granted </IfModule> <IfModule !mod_authz_core.c> # Apache 2.2 Order allow,deny Allow from 127.0.0.1 Allow from ::1 </IfModule> </Directory> |
위 Require all granted 는 모두 사용자에게 허용이고 그렇지 않고 특정 아이피만 접속하게 구성하려면 Reire ip 192.168.20.22 이렇게 주석해제 후 사용
6. 웹서버 httpd.conf 에서 include 및 Log 포맷은 combined 로 설정해야 한다
|
1 2 3 4 5 6 7 |
[root@xinet ~]# vi /usr/local/apache/conf/httpd.conf Include conf/awstats.conf ### LogFormat 형태 LogFormat "%h %l %u %t \"%r\" %>s %b \"%{Referer}i\" \"%{User-Agent}i\" %{GEOIP_COUNTRY_CODE}e" combined |
7. 웹서버 재시작
|
1 2 3 |
[root@xinet ~]# apachectl stop [root@xinet ~]# apachectl start |
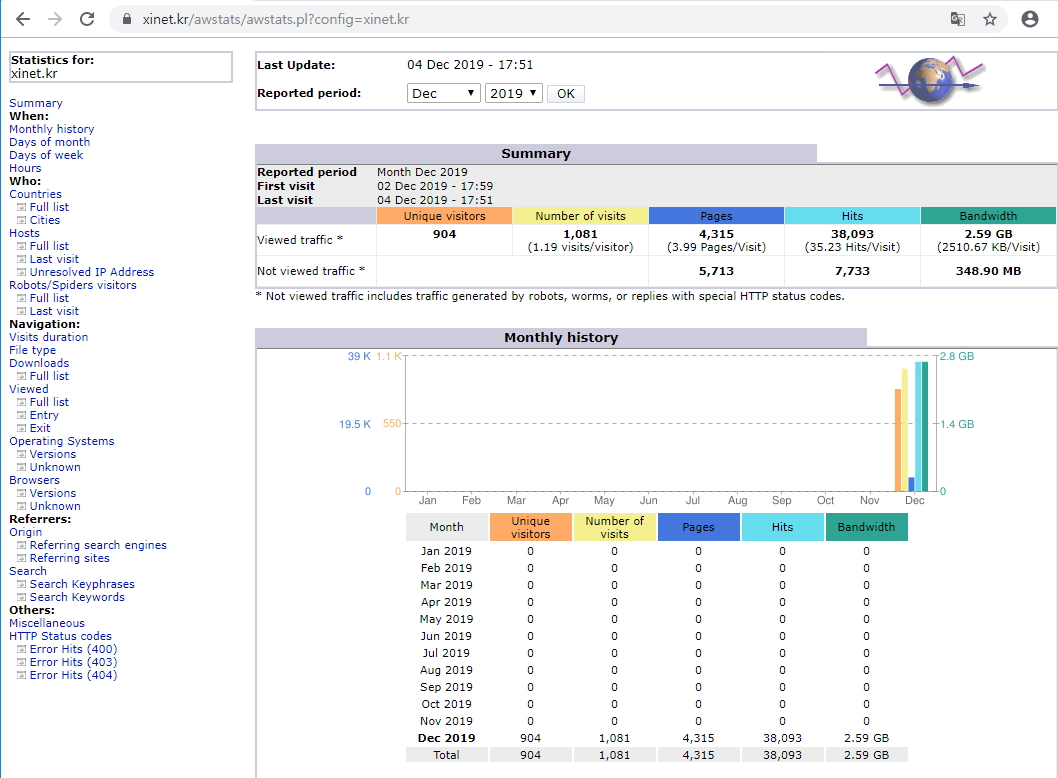
8. 웹 화면 출력
https://xinet.kr/awstats/awstats.pl?config=xinet.kr

9. 플러그인 사용 ( 만약 서버에 GeoIP 모듈이 설치되어 있다면 GeoIP 모듈과 graphgooglechartapi 사용)
설치되어 있지 않다면 간단하게 yum 으로 설치
|
1 2 3 |
[root@localhost ~]# yum -y install epel-release [root@localhost ~]# yum -y install GeoIP GeoIP-data perl-Geo-IP GeoIP-devel |
|
1 2 3 4 5 6 7 8 9 10 11 12 13 14 15 |
[root@xinet ~]# vi /etc/awstats/awstats.xinet.kr.conf ### 주석해제 LoadPlugin="graphgooglechartapi" ### 주석 해제 후 사용자 환경에 맞게 위치 변경 LoadPlugin="geoip GEOIP_STANDARD /usr/share/GeoIP/GeoIP.dat" LoadPlugin="geoip_city_maxmind GEOIP_STANDARD /usr/share/GeoIP/GeoIPCity.dat" ### 변경 했으므로 다시 업데이트 진행 /usr/local/awstats/wwwroot/cgi-bin/awstats.pl -config=xinet.kr -update |
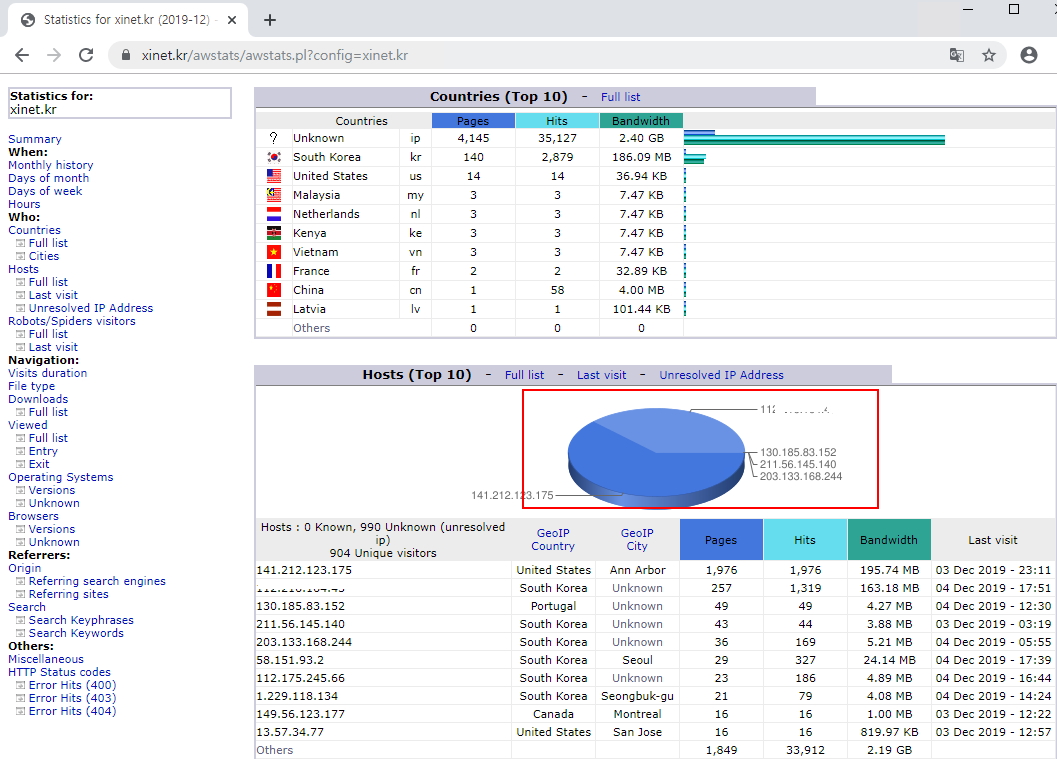
10. 웹화면에서 플러그인이 적용되면 달라지는 점 구글차트가 생성이 되고 도시별로 아이피 체크가 된다
 국가별 체크가 되며 상위 구글차트로 표시가 된다.
이제 그럼 주기적으로 웹 로그를 업데이트 하기 위해서 cron에 등록을 해준다
|
1 2 3 4 5 6 7 8 9 10 |
[root@xinet ~]# crontab -e ### awstats update */10 * * * * /usr/local/awstats/wwwroot/cgi-bin/awstats.pl -config=xinet.kr -update ### CRON 재시작 [root@xinet ~]# systemctl restart crond |