CentOS 7 / 64bit / pure-ftpd 설치 및 설정 / TSL 통신
1.다운로드 및 압축 해제 및 컴파일 진행
|
1 2 3 4 5 6 7 8 9 10 11 12 |
[root@xinet ~]# wget https://download.pureftpd.org/pub/pure-ftpd/releases/pure-ftpd-1.0.47.tar.gz [root@xinet ~]# tar xvfz pure-ftpd-1.0.47.tar.gz [root@xinet ~]# cd pure-ftpd-1.0.47 [root@xinet pure-ftpd-1.0.47]# ./configure --prefix=/usr/local/pureftp --with-altlog --with-language=english \ --with-rfc2640 --with-ftpwho --without-ldap --without-mysql --without-pgsql --with-tls [root@xinet pure-ftpd-1.0.47]# make [root@xinet pure-ftpd-1.0.47]# make install |
–prefix : 경로지정
–syslog : 출력 외에,특정 형식의 파일. 현재 CLF, 통계, W3C 및 xferlog 형식이 구현
–with-rfc2640 : charset 변환을 지원한다
–with-tls : TLS 지원을 활성화
2. fure-ftpd.conf 파일 생성
|
1 2 3 4 5 6 7 8 9 10 11 12 13 14 15 16 17 18 19 20 21 22 23 24 25 26 27 28 29 30 31 32 33 34 35 36 37 38 39 40 41 42 43 44 45 46 47 48 49 50 51 52 53 54 55 56 57 58 59 60 61 62 63 64 65 66 67 68 69 70 71 72 73 74 75 76 77 78 79 80 81 82 83 84 85 86 87 88 89 90 91 92 93 94 95 96 97 98 99 100 101 102 103 104 105 106 107 108 109 110 111 112 113 114 115 116 117 118 119 120 121 122 123 124 125 126 127 128 129 130 131 132 133 134 135 136 137 138 139 140 141 142 143 144 145 146 147 148 149 150 151 152 153 154 155 156 157 158 159 160 161 162 163 164 165 166 167 168 169 170 171 172 173 174 175 176 177 178 179 180 |
[root@xinet pureftp]# vi /usr/local/pureftp/etc/pure-ftpd.conf ############################################################ # # # Configuration file for pure-ftpd # # # ############################################################ ChrootEveryone yes BrokenClientsCompatibility no # ftpd가 독립형 지원으로 컴파일 된 경우, PIDFile /var/run/pure-ftpd.pid # FTP 허용포트 Bind ,21 IPV4Only yes # IPV6Only yes #컴파일 옵션을 지정했을경우 동작 with-rfc2640 FileSystemCharset utf8 ClientCharset utf8 #간단한 유닉스 (/etc/passwd) 인증을 원할 경우 이것을 주석처리 UnixAuthentication yes #PAM 인증을 사용하려면 다음 행의 주석 처리를 제거하십시오 ## PAMAuthentication yes #시스템로드가 지정된 값보다 크면 익명 사용자는 다운로드 할 수 없습니다. #MaxLoad 10 #passive 수동 연결 용 포트 범위 PassivePortRange 50000 50010 #최대동시 사용자 수 MaxClientsNumber 50 # 백그라운드로 프로세스로 실행 Daemonize yes # 동일한 IP주소를 가진 최대 동시 클라이언트 수 MaxClientsPerIP 10 # 모든 클라이언트 명령을 기록하려면 "yes". VerboseLog no # List dot-files even when the client doesn't send "-a". DisplayDotFiles yes #인증 된 사용자 허용 안 함 AnonymousOnly no #익명 연결을 허용하지 않습니다. 인증 된 사용자 만 수락하십시오 NoAnonymous yes #기본 기능은 "ftp"입니다. "none"은 로깅을 비활성화합니다 SyslogFacility ftp # Display fortune cookies # FortunesFile /usr/share/fortune/zippy # reverse host names, and don't care about DNS resolution being possibly slow. DontResolve yes #최대 유휴 시간 (분) (default = 15 minutes) MaxIdleTime 15 # files to be displayed. The second one is the max subdirectories depth. LimitRecursion 10000 8 #익명 사용자가 새 디렉토리를 만들 수 있습니까? AnonymousCanCreateDirs no # ForcePassiveIP 192.168.0.1 # Upload/download ratio for anonymous users. # AnonymousRatio 1 10 # Upload/download ratio for all users. # This directive supersedes the previous one. # UserRatio 1 10 #"ftp"시스템 사용자가 소유 한 파일의 다운로드를 허용하지 않습니다 AntiWarez yes # 익명 사용자의 최대 대역폭 KB/s # AnonymousBandwidth 8 #모든 * 사용자 (익명 포함)의 최대 대역폭 KB/s # UserBandwidth 8 # File creation mask. <umask for files>:<umask for dirs> . # 177:077 if you feel paranoid. Umask 133:022 #인증 된 사용자가 로그인하기위한 최소 UID. # 예를 들어 값 100은 사용자 ID가 아래 인 모든 사용자를 차단합니다. # 100에서 로그인하십시오. "root"가 로그인하려면 0을 사용하십시오. MinUID 500 #인증 된 사용자에 대해 FXP 전송 허용 AllowUserFXP no #익명 및 비 익명 사용자에 대해 익명 FXP 허용 AllowAnonymousFXP no # 사용자는 점 ( '.')으로 시작하는 파일을 삭제하거나 쓸 수 없습니다. # 그들이 소유하고 있어도. 그러나 TrustedGID가 활성화되어 있으면 해당 그룹 # 예외적으로 도트 파일에 액세스 할 수 있습니다. ProhibitDotFilesWrite no #도트로 시작하는 파일의 * 읽기 * 금지 (.history, .ssh...) ProhibitDotFilesRead no #파일을 덮어 쓰지 마십시오. 이름이 이미있는 파일이 업로드되면, # 자동으로 file.1, file.2, file.3,.. AutoRename no # 익명 사용자가 새 파일을 업로드하지 못하도록 방지 (no = upload is allowed) AnonymousCantUpload yes #이 특정 IP 주소에 대한 연결 만 허용됩니다. # TrustedIP 10.1.1.1 #로그 항목에 PID를 추가하려면 다음 줄의 주석 처리를 제거하십시오 # LogPID yes #Apache와 같은 형식으로 전송 된 전송을 사용하여 추가 로그 파일을 만듭니다 #fw.c9x.org - jedi [13/Apr/2017:19:36:39] "GET /ftp/linux.tar.bz2" 200 21809338 AltLog clf:/var/log/pureftpd.log #전송 된 형식이 최적화 된 형식으로 로그 파일을 추가로 만듭니다 #AltLog stats:/var/log/pureftpd.log # 표준 W3C에 로그인 한 전송으로 추가 로그 파일 만들기 (많은 HTTP 로그 분석기와 호환 가능) # AltLog w3c:/var/log/pureftpd.log #CHMOD 명령을 허용하지 않습니다 # NoChmod yes #사용자가 파일을 다시 시작 / 업로드 할 수는 있지만 파일을 삭제하지는 않습니다 # KeepAllFiles yes # 누락 된 경우 홈 디렉토리를 자동으로 작성합니다. # CreateHomeDir yes #가상 할당량을 활성화하십시오. # Quota 1000:10 # CallUploadScript yes #파티션의 전체 백분율이 더 많은 경우 새 업로드가 허용되지 않습니다. MaxDiskUsage 99 # 사용자가 파일 이름을 바꾸지 못하게하려면 'yes'로 설정하십시오. # NoRename yes CustomerProof yes # --with-peruserlimits로 컴파일되어 있을경우 동작 # 형식 : <사용자 당 최대 세션 수> : <최대 익명 세션 수> # 예를 들어 3:20은 인증 된 사용자가 최대 3 개의 활성을 가질 수 있음을 의미합니다. # 세션까지 허용되며 최대 20 개의 익명 세션이 허용됩니다. # PerUserLimits 3:20 # 파일이 업로드되고 이미 이전 버전의 파일이있는 경우 # 동일한 이름을 사용하면 이전 파일이 제거되거나 잘리지 않습니다. # 파일은 임시 이름으로 저장되며 일단 업로드가되면 # 완료되면 원자 적으로 이름이 변경됩니다. 예를 들어, 대형 PHP 스크립트가 업로드 될 때 웹 서버는 # 이전 버전을 계속 제공하고 나중에 전체 파일을 보자 마자 새 파일로 전환합니다. # NoTruncate yes # 옵션은 세 가지 값을 허용합니다 : # 0 : SSL / TLS 암호화 계층을 사용하지 않습니다 (기본값). # 1 : 일반 텍스트와 암호화 된 세션을 모두 허용합니다. # 2 : TLS 보안 메커니즘을 사용하지 않는 연결을 거부 #TLS 0 # TLSCipherSuite HIGH # Certificate file, for TLS #CertFile /usr/local/pureftp/etc/pure-ftpd.pem |
다음 링크에서 다운 받을수 있다 :
UTF8 파일 : http://xinet.kr/data/pureftpd/pure-ftpd.conf
EUC-KR 파일 : http://xinet.kr/data/pureftpd/pure-ftpd.conf.euc-kr ( 다운로드 후 파일 명 수정 pure-ftpd.conf )
3. 시작할수 있게 system 구성 ( /usr/sbin 에 파일 복사)
|
1 2 3 4 5 6 7 8 9 10 11 12 13 14 15 16 17 18 |
[root@xinet pure-ftpd-1.0.47]# cd /usr/sbin/ [root@xinet sbin]# wget http://xinet.kr/data/pureftpd/pure-config.pl [root@xinet sbin]# chmod 755 pure-config.pl [root@xinet sbin]# ln -s /usr/local/pureftp/sbin/pure-ftpd /usr/sbin/ [root@xinet pure-ftpd-1.0.47]# ln -s /usr/local/pureftp/sbin/pure-ftpwho /usr/sbin/ftpwho [root@xinet sbin]# cd /usr/lib/systemd/system/ [root@xinet system]# wget http://xinet.kr/data/pureftpd/pure-ftpd.service [root@xinet system]# systemctl daemon-reload [root@xinet system]# systemctl enable pure-ftpd |
4. pure-ftpd start / stop
|
1 2 3 4 5 |
### start [root@xinet pureftpd]# systemctl start pure-ftpd ### stop [root@xinet pureftpd]# systemctl soppure-ftpd |
ftp 업로드 및 한글 확인 및 로그
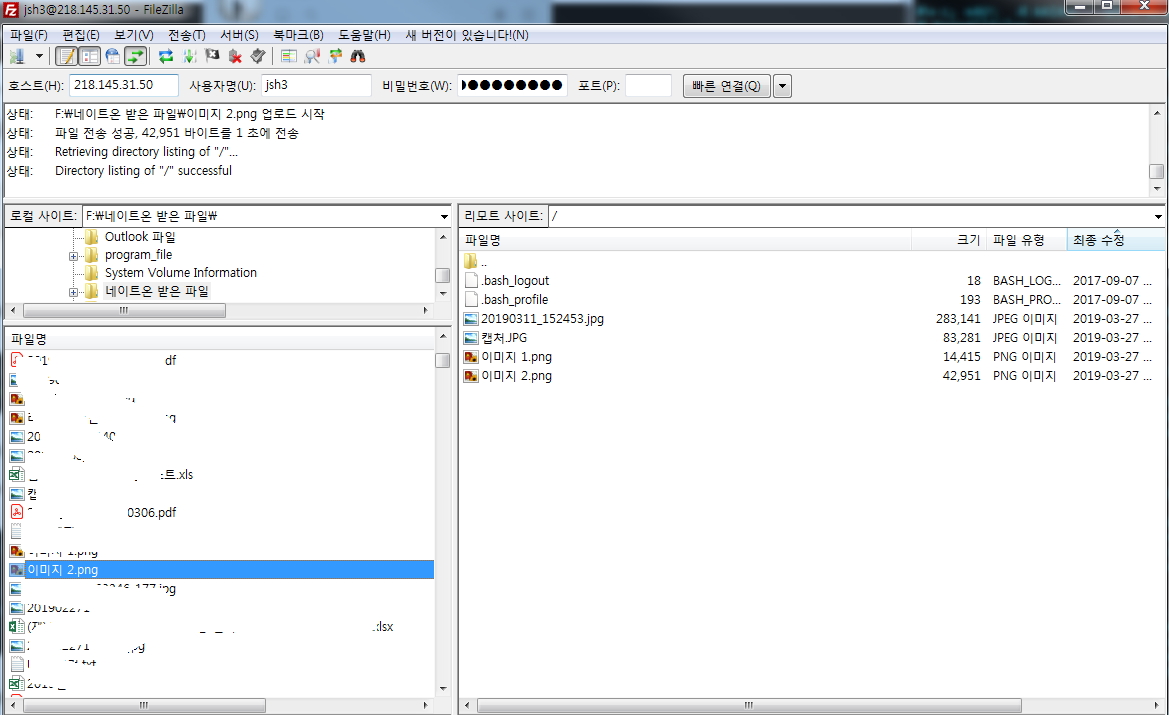
 FTP 일반모드로 접속을 해서 파일을 업로드 해면 정상적으로 업로드 된것을 확인 할 수 있다.
콘솔 상태에서는 정상적으로 한글 확인을 할수 있다
FTP LOG를 확인 할수 있다 PUT 은 업로드 GET 은 다운로드
5. 그럼 이제 웹서버에서 사용하는 인증서를 FTP에서도 사용을 해보자 방법은 간단하다 인증서를 통합해서 사용하면 된다.
( 웹서버 인증서를 이용하는 방법 / 무료 인증서를 이용하는 방법 / 자체 인증서를 이용하는 방법)
여기서는 웹서버 인증서를 만들어서 테스트 진행해보자
|
1 2 |
[root@xinet etc]# cat /usr/local/apache/conf/ssl/xinet.kr.key /usr/local/apache/conf/ssl/xinet.kr.crt /usr/local/apache/conf/ssl/DigiCertRoot2.crt.cer > /usr/local/pureftp/etc/pure-ftpd.pem |
첫번째 SSL 인증서의 KEY 파일
두번째 SSL 인증서의 CRT 파일
세번째 SSL 체인인증서 파일
만약 무료 인증서 letsencrypt 를 이용하고 있다면 다음과 같이 파일 생성
|
1 2 |
[root@xinet etc]# cat /etc/letsencrypt/live/xinet.kr/privkey.pem /etc/letsencrypt/live/xinet.kr/fullchain.pem > /usr/local/pureftp/etc/pure-ftpd.pem |
자체 인증서를 이용하는 방법
|
1 2 3 4 5 6 7 8 9 10 11 12 13 14 15 16 17 18 19 20 21 |
[root@ncloud sbin]# openssl req -x509 -nodes -newkey rsa:1024 -keyout /usr/local/pureftp/etc/pure- ftpd.pem -out /usr/local/pureftp/etc/pure-ftpd.pem Generating a 1024 bit RSA private key ..................................................................................++++++ ..................................++++++ writing new private key to '/usr/local/pureftp/etc/pure-ftpd.pem' ----- You are about to be asked to enter information that will be incorporated into your certificate request. What you are about to enter is what is called a Distinguished Name or a DN. There are quite a few fields but you can leave some blank For some fields there will be a default value, If you enter '.', the field will be left blank. ----- Country Name (2 letter code) [XX]:KR State or Province Name (full name) []:Gyeonggi-do Locality Name (eg, city) [Default City]:Gwangmyeong-si Organization Name (eg, company) [Default Company Ltd]:xinet Organizational Unit Name (eg, section) []:SE Common Name (eg, your name or your server's hostname) []:ftptls.xinet.kr Email Address []: |
6. 웹서버에서 사용하는 일반 인증서를 이용해서 TLS 통신을 구현해보자 구현하기 앞서 pure-ftpd.conf 에서 TLS 사용하는 부분으로 변경처리해줘야 한다
인증서 파일도 매칭 / pure-ftpd 재시작
|
1 2 3 4 5 6 7 8 9 10 11 12 13 14 15 16 17 18 19 20 |
[root@xinet pureftpd]# vi /usr/local/pureftp/etc/pure-ftpd.conf 하단 TLS 부분 수정 # 옵션은 세 가지 값을 허용합니다 : # 0 : SSL / TLS 암호화 계층을 사용하지 않습니다 (기본값). # 1 : 일반 텍스트와 암호화 된 세션을 모두 허용합니다. # 2 : TLS 보안 메커니즘을 사용하지 않는 연결을 거부 TLS 1 # Certificate file, for TLS CertFile /usr/local/pureftp/etc/pure-ftpd.pem ### pure-ftpd 재시작 [root@xinet pureftpd]# systemctl restart pure-ftpd |
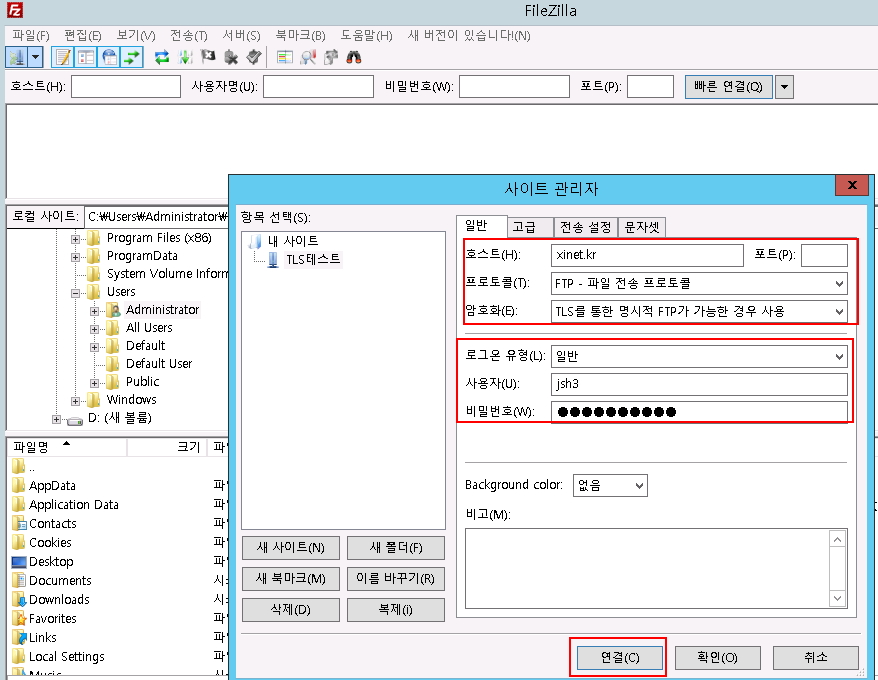
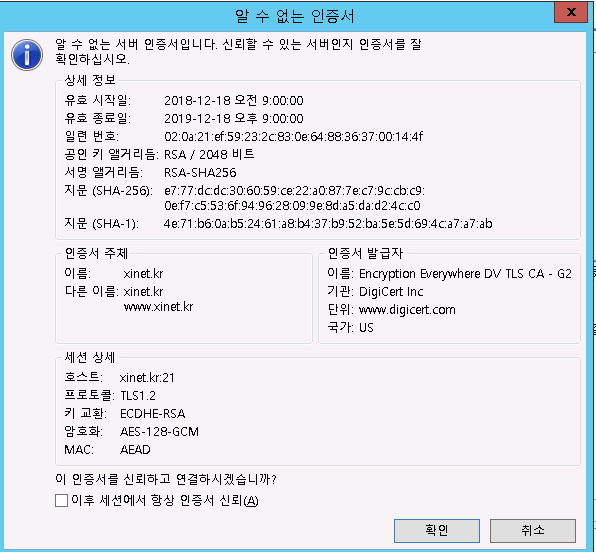
파일질라 TLS FTP 접속


