TOMCAT 8.5 에서 SSL 인증서를 사용하기 위한 방법 총괄 정리
TOMCAT에서 인증서를 사용하는 방법은 2가지가 존재한다.
JKS : Java Standard Keystore 포맷이며 JDK포함되어 있으며 keytool 명령어를 사용할 수 있다.
PKCS12 : 인터넷 표준 포맷이고 OPENSSL 를 사용하여 생성 할 수 있다.
여기서 다루는 방법은 3가지이다. ( 첫번째와 두번째 방법을 권장 / 표준이용)
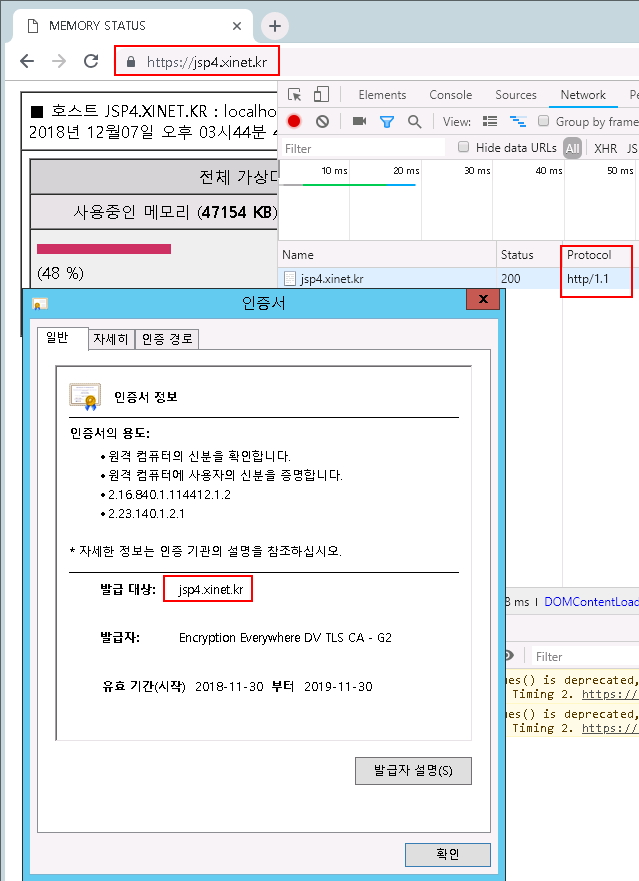
1. PEM (openssl) 인증서를 -> PKCS12 변환 -> JKS 변환해서 사용
2. PEM (openssl) 인증서를 그대로 사용 ( tomcat native 설치되어 있으면 HTTP/2 지원 미설치시 HTTP/1.1만 지원 ) 권장
* tomcat native 설치는 —> https://xinet.kr/?p=1669
3. keytool 이용하여 JKS 사용
첫번째 방법은 openssl 인증서를 만들고 PKCS12 변환 후 다시 JKS 변환해서 사용하는 방식 ( HTTP/1.1 지원 HTTP/2 미지원)
|
1 2 3 4 5 6 7 8 9 10 11 12 13 14 15 16 17 18 19 20 21 22 23 24 25 26 27 28 29 30 31 32 33 |
[root@localhost ~]# mkdir /usr/local/tomcat/conf/ssl [root@localhost ~]# cd /usr/local/tomcat/conf/ssl ### OPENSSL 이용하여 KEY 파일 생성 [root@localhost ssl]# openssl genrsa -des3 -out jsp4.xinet.kr.key 2048 Generating RSA private key, 2048 bit long modulus ..................................+++ ............................................................................................+++ e is 65537 (0x10001) Enter pass phrase for jsp4.xinet.kr: Verifying - Enter pass phrase for jsp4.xinet.kr: ### CSR 파일 생성 [root@localhost ssl]# openssl req -new -key jsp4.xinet.kr.key -out jsp4.xinet.kr.csr Enter pass phrase for jsp4.xinet.kr.key: You are about to be asked to enter information that will be incorporated into your certificate request. What you are about to enter is what is called a Distinguished Name or a DN. There are quite a few fields but you can leave some blank For some fields there will be a default value, If you enter '.', the field will be left blank. ----- Country Name (2 letter code) [XX]:KR State or Province Name (full name) []:Gyeonggi-do Locality Name (eg, city) [Default City]:Gwangmyeong-si Organization Name (eg, company) [Default Company Ltd]:xinet Organizational Unit Name (eg, section) []:SE Common Name (eg, your name or your server's hostname) []:jsp4.xinet.kr Email Address []: xinet@xinet.kr Please enter the following 'extra' attributes to be sent with your certificate request A challenge password []: |
CSR 파일이 생성되었으면 인증서 업체에 CSR 정보를 보내어 인증서 파일을 받으면 된다. 보통 인증서,체인인증서,ROOT인증서를 받는다
개인인증서 : jsp4.xinet.kr.crt
root 인증서 : DigiCertRoot2.crt.cer
체인 인증서 : EncryptionEverywhereDVCA.crt
해당 인증서의 파일이 3개가 존재한다면 key 파일과 인증서파일을 이용하여 통합 통합된 PEM 인증서를 PKCS12포맷으로 변환한다
개인키 → 메인인증서 → 체인인증서 → 루트인증서
|
1 2 3 4 5 6 7 8 |
###PEM 통합 [root@localhost ssl]# cat jsp4.xinet.kr.key jsp4.xinet.kr.crt EncryptionEverywhereDVCA.crt DigiCertRoot2.crt.cer > jsp4.xinet.kr.pem ### OEPNSSL 이용 변환 PEM -> PKCS12 [root@localhost ssl]# openssl pkcs12 -export -out jsp4.xinet.kr.pkcs12 -in jsp4.xinet.kr.pem Enter pass phrase for jsp4.xinet.kr.pem: ---> 처음 key 만들때 입력한 패스워드 Enter Export Password: ---> pkcs12 파일 패스워드 새로 입력 Verifying - Enter Export Password: |
KEYTOOL를 이용하여 PKCS12 -> JKS 포맷으로 변환
|
1 2 3 4 5 6 7 8 |
#keytool을 이용하여 PKCS12 -> JKS 포맷으로 변환 [root@localhost ssl]# keytool -importkeystore -srckeystore jsp4.xinet.kr.pkcs12 -srcstoretype pkcs12 -destkeystore jsp4.xinet.kr.jks -deststoretype jks 키 저장소 jsp4.xinet.kr.pkcs12을(를) jsp4.xinet.kr.jks(으)로 임포트하는 중... 대상 키 저장소 비밀번호 입력: 새 비밀번호 다시 입력: 123456 소스 키 저장소 비밀번호 입력: 123456 1 별칭에 대한 항목이 성공적으로 임포트되었습니다. 임포트 명령 완료: 성공적으로 임포트된 항목은 1개, 실패하거나 취소된 항목은 0개입니다. |
변환된 JKS 파일 keytool 로 인증서 확인
|
1 2 3 4 5 6 7 8 9 |
[root@localhost ssl]# keytool -list -keystore jsp4.xinet.kr.jks 키 저장소 비밀번호 입력: 123456 키 저장소 유형: jks 키 저장소 제공자: SUN 키 저장소에 1개의 항목이 포함되어 있습니다. 1, 2018. 11. 30, PrivateKeyEntry, 인증서 지문(SHA1): C5:8C:FC:2B:28:B2:85:C6:0A:D6:3C:19:34:29:91:81:FE:0A:12:80 |
tomcat 의 server.xml 파일을 열어서 SSL 설정을 하면 된다.
|
1 2 3 4 5 6 7 8 9 |
<!-- JKS SSL Password True / HTTP/1.1 / https-openssl-nio protocol --> <Connector port="443" protocol="org.apache.coyote.http11.Http11NioProtocol" maxHttpHeaderSize="8192" maxThreads="150" enableLookups="false" acceptCount="100" connectionTimeout="20000" disableUploadTimeout="true" SSLEnabled="true" scheme="https" secure="true" clientAuth="false" sslProtocol="TLS" keystoreFile="/usr/local/tomcat/conf/ssl/jsp4.xinet.kr.jks" keystorePass="123456" /> |
2. 두번째 방법은 openssl를 이용하여 만든 인증서를 변환하지 않고 그대로 사용하는것이다
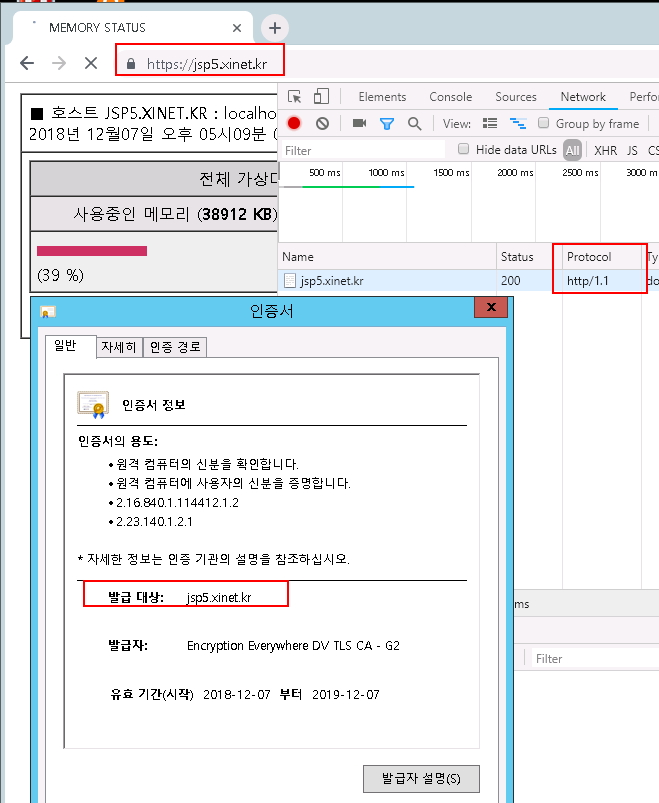
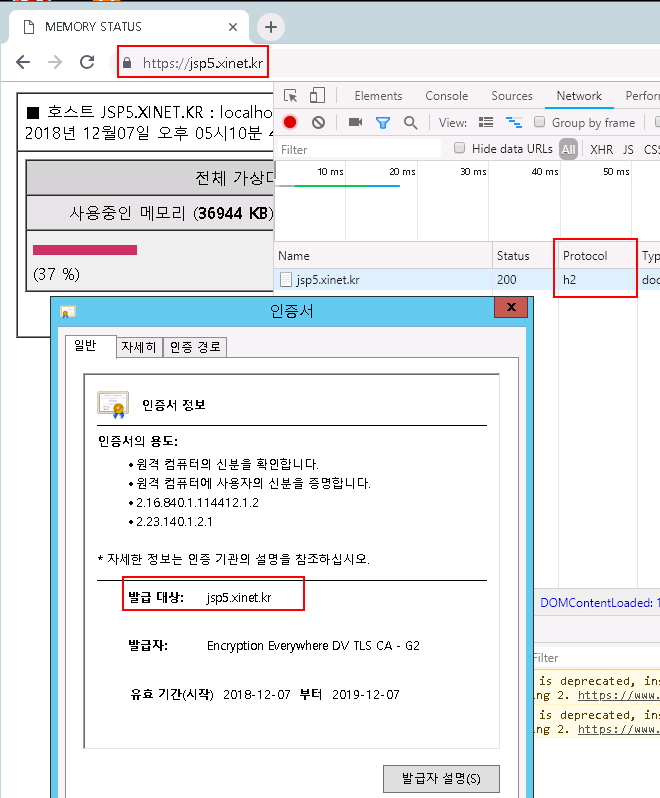
tomcat native 가 설치되어 있으면 HTTP/2를 지원해서 사용하고 아니면 HTTP/1.1 를 이용하면 된다.
tomcat native 설치는 —> 여기에서 확인
동일하게 openssl 을 이용하여 인증서를 만들고 개인인증서,체인인증서,root인증서를 업로드 한다.
tomcat native 가 미설치시에는 아래와 같이 구성 https-openssl-nio protocol 사용
|
1 2 3 4 5 6 7 8 9 10 11 12 13 |
<!-- PEM SSL Password True / HTTP/1.1 / https-openssl-nio protocol --> <Connector port="443" protocol="org.apache.coyote.http11.Http11NioProtocol" maxHttpHeaderSize="8192" maxThreads="150" enableLookups="false" acceptCount="100" connectionTimeout="20000" disableUploadTimeout="true" SSLEnabled="true" scheme="https" Protocol="TLS"> <SSLHostConfig> <Certificate certificateKeyFile="/usr/local/tomcat/conf/ssl/jsp5.xinet.kr.key" certificateFile="/usr/local/tomcat/conf/ssl/jsp5.xinet.kr.crt" certificateChainFile="/usr/local/tomcat/conf/ssl/EncryptionEverywhereDVCA.crt" certificateKeyPassword="123456" type="RSA" /> </SSLHostConfig> </Connector> |
tomcat native 가 설치되어 있을경우 아래와 같이 server.xml 를 사용 ( HTTP/2 지원 )
( 절대 Protocol=”TLS” 기입하지 말것)
|
1 2 3 4 5 6 7 8 9 10 11 12 13 14 |
<!-- PEM SSL Password True / HTTP/2 / Tomcat Native 설치되어 있어야 함 / 미설치지 동작안됨 --> <Connector port="443" protocol="org.apache.coyote.http11.Http11AprProtocol" maxHttpHeaderSize="8192" maxThreads="150" enableLookups="false" acceptCount="100" connectionTimeout="20000" disableUploadTimeout="true" SSLEnabled="true" scheme="https"> <UpgradeProtocol className="org.apache.coyote.http2.Http2Protocol" /> <SSLHostConfig> <Certificate certificateKeyFile="/usr/local/tomcat/conf/ssl/jsp5.xinet.kr.key" certificateFile="/usr/local/tomcat/conf/ssl/jsp5.xinet.kr.crt" certificateChainFile="/usr/local/tomcat/conf/ssl/EncryptionEverywhereDVCA.crt" certificateKeyPassword="123456" type="RSA" /> </SSLHostConfig> </Connector> |
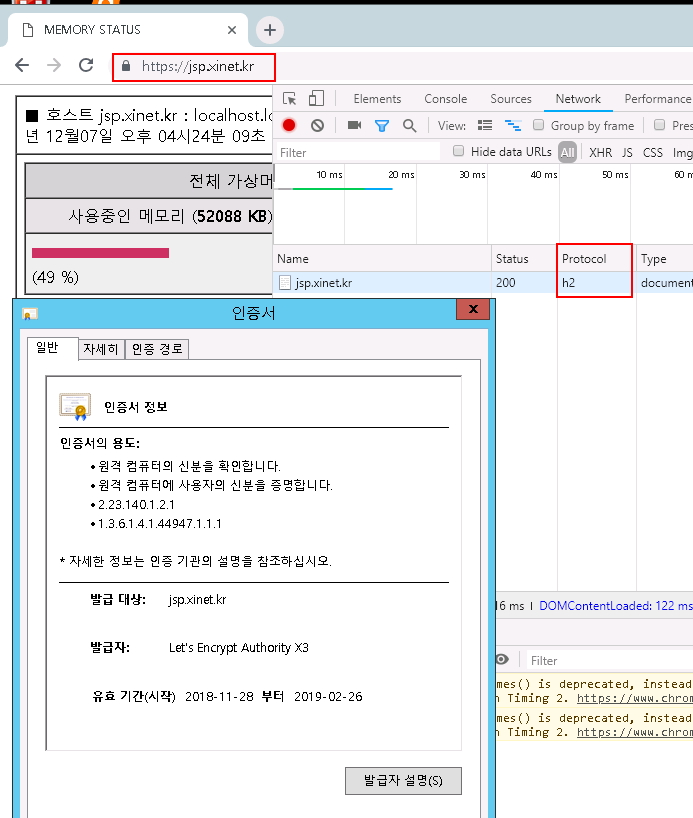
무료 인증서인 letsencrypt 를 이용하여 SSL를 구성할 수 있다. ( 사용할 도메인 : jsp.xinet.kr )
|
1 2 3 4 5 6 7 8 9 10 11 12 13 |
[root@localhost ~]# yum -y install git [root@localhost ~]# git clone https://github.com/certbot/certbot.git [root@localhost certbot-master]# ./certbot-auto certonly --webroot --webroot-path=/free/home/xinet/html/ -d jsp.xinet.kr --email jsh@xinet.kr [root@localhost certbot-master]# ll /etc/letsencrypt/live/jsp.xinet.kr/ 합계 4 -rw-r--r--. 1 root root 692 2018-11-28 17:37 README lrwxrwxrwx. 1 root root 36 2018-11-28 17:37 cert.pem -> ../../archive/jsp.xinet.kr/cert1.pem lrwxrwxrwx. 1 root root 37 2018-11-28 17:37 chain.pem -> ../../archive/jsp.xinet.kr/chain1.pem lrwxrwxrwx. 1 root root 41 2018-11-28 17:37 fullchain.pem -> ../../archive/jsp.xinet.kr/fullchain1.pem lrwxrwxrwx. 1 root root 39 2018-11-28 17:37 privkey.pem -> ../../archive/jsp.xinet.kr/privkey1.pem |
기본으로 사용시에는 https-openssl-nio protocol
|
1 2 3 4 5 6 7 8 9 10 11 12 13 |
<!-- PEM SSL Password NONE / HTTP/1 / https-openssl-nio protocol 사용 (tomcat native 상관없이 동작됨 --> <Connector port="450" protocol="org.apache.coyote.http11.Http11NioProtocol" maxHttpHeaderSize="8192" maxThreads="150" enableLookups="false" acceptCount="100" connectionTimeout="20000" disableUploadTimeout="true" SSLEnabled="true" scheme="https" Protocol="TLS"> <SSLHostConfig> <Certificate certificateKeyFile="/etc/letsencrypt/live/jsp.xinet.kr/privkey.pem" certificateFile="/etc/letsencrypt/live/jsp.xinet.kr/cert.pem" certificateChainFile="/etc/letsencrypt/live/jsp.xinet.kr/chain.pem" type="RSA" /> </SSLHostConfig> </Connector> |
tomcat native 가 설치되어 있을경우 아래와 같이 server.xml 를 사용 ( HTTP/2 지원 ) Protocol=”TLS” 절대기입하지 말것
|
1 2 3 4 5 6 7 8 9 10 11 12 13 14 15 |
<!-- 권장 (tomcat native 설치시 --> <!-- PEM SSL Password NONE / HTTP/2 / Tomcat Native 설치되어 있어야 함 / 미설치지 동작안됨 --> <Connector port="443" protocol="org.apache.coyote.http11.Http11AprProtocol" maxHttpHeaderSize="8192" maxThreads="150" enableLookups="false" acceptCount="100" connectionTimeout="20000" disableUploadTimeout="true" SSLEnabled="true" scheme="https"> <UpgradeProtocol className="org.apache.coyote.http2.Http2Protocol" /> <SSLHostConfig> <Certificate certificateKeyFile="/etc/letsencrypt/live/jsp.xinet.kr/privkey.pem" certificateFile="/etc/letsencrypt/live/jsp.xinet.kr/cert.pem" certificateChainFile="/etc/letsencrypt/live/jsp.xinet.kr/chain.pem" type="RSA" /> </SSLHostConfig> </Connector> |
3. keytool를 이용하여 jks 형태로 만들어서 사용할때는 아래와 같이 구성
|
1 2 3 4 5 6 7 8 9 10 11 12 13 14 15 16 17 18 19 20 21 22 |
[root@localhost ~]# cd /usr/local/tomcat/conf/ssl [root@localhost ssl]# keytool -genkey -keyalg RSA -sigalg SHA256withRSA -alias jsp2 -keysize 2048 -keystore jsp2.xinet.kr.jks 키 저장소 비밀번호 입력: 123456 새 비밀번호 다시 입력: 이름과 성을 입력하십시오. [Unknown]: jsp2.xinet.kr 조직 단위 이름을 입력하십시오. [Unknown]: se 조직 이름을 입력하십시오. [Unknown]: xinet 구/군/시 이름을 입력하십시오? [Unknown]: Gwangmyeong-si 시/도 이름을 입력하십시오. [Unknown]: Gyeonggi-do 이 조직의 두 자리 국가 코드를 입력하십시오. [Unknown]: KR CN=jsp2.xinet.kr, OU=se, O=xinet, L=Gwangmyeong-si, ST=Gyeonggi-do, C=KR이(가) 맞습니까? [아니오]: Y <jsp2>에 대한 키 비밀번호를 입력하십시오. (키 저장소 비밀번호와 동일한 경우 Enter 키를 누름): |
-keyalg : 키알고리즘으로 RSA 을 지정합니다
-sigalg : 서명알고리즘으로 SHA256 을 지정합니다.
-alias : 대체 이름으로 영문 단어를 지정하며, 특수문자등은 사용하지 않아야 합니다.
-keystore : 개인키 파일
### CSR 생성
|
1 2 3 |
[root@localhost ssl]# keytool -certreq -alias jsp2 -keyalg RSA -sigalg SHA256withRSA -file jsp2.xinet.kr.csr -keystore jsp2.xinet.kr.jks 키 저장소 비밀번호 입력:123456 |
-keyalg : 키알고리즘으로 RSA 을 지정합니다
-sigalg : 서명알고리즘으로 SHA256 을 지정합니다.
-alias : 대체 이름으로 영문 단어를 지정하며, 특수문자등은 사용하지 않아야 합니다.
-keystore : 개인키 파일
-file : CSR 저장할 파일
### 서버 인증서JKS 포맷 조합
|
1 2 3 4 |
keytool -import -trustcacerts -alias AddTrustExternalCARoot -file AddTrustExternalCARoot.crt -keystore jsp2.xinet.kr.jks keytool -import -trustcacerts -alias COMODORSAAddTrustCA -file COMODORSAAddTrustCA.crt -keystore jsp2.xinet.kr.jks keytool -import -trustcacerts -alias COMODORSACA -file COMODORSADomainValidationSecureServerCA.crt -keystore jsp2.xinet.kr.jks keytool -import -trustcacerts -alias jsp2 -file jsp2.xinet.kr.crt -keystore jsp2.xinet.kr.jks |
ROOT 인증서 -> 체인인증서 -> 개인인증서 순으로 jks으로 포맷 조합을 하면 된다.
tomcat server .xml 파일을 열어서
|
1 2 3 4 5 6 7 8 9 |
<!-- JKS SSL Password True / HTTP/1.1 / https-openssl-nio protocol --> <Connector port="450" protocol="org.apache.coyote.http11.Http11NioProtocol" maxHttpHeaderSize="8192" maxThreads="150" enableLookups="false" acceptCount="100" connectionTimeout="20000" disableUploadTimeout="true" SSLEnabled="true" scheme="https" secure="true" clientAuth="false" sslProtocol="TLS" keystoreFile="/usr/local/tomcat/conf/ssl/jsp2.xinet.kr.jks" keystorePass="123456" /> |
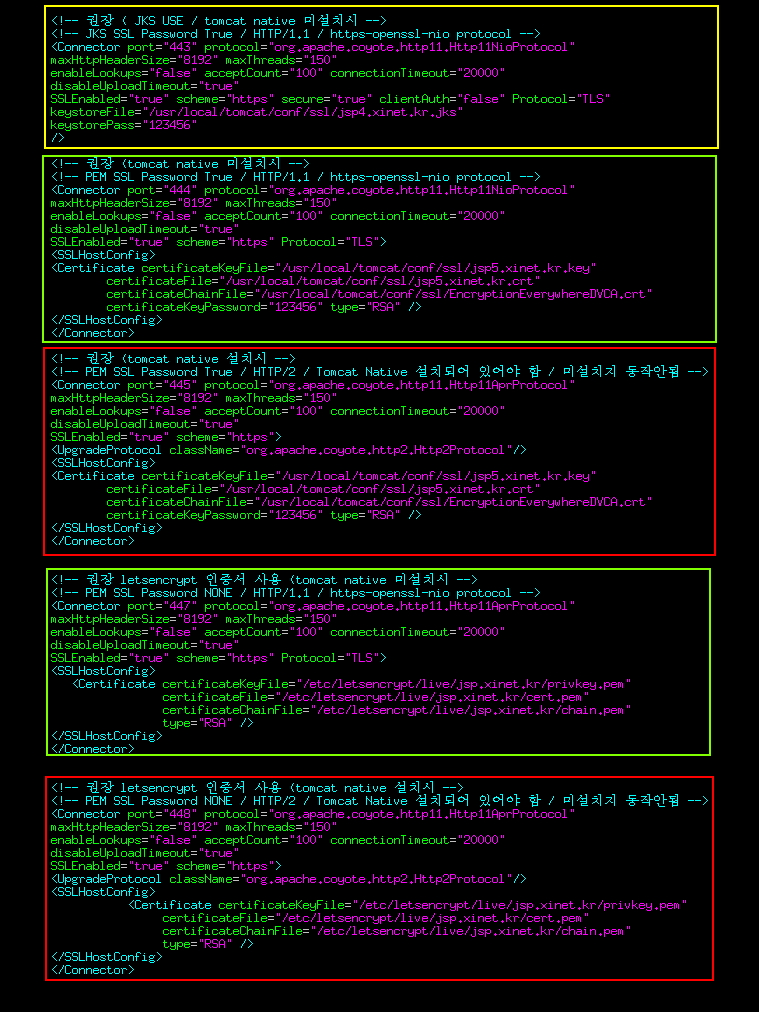
현재 tomcat 8.5에 적용된 server.xml 파일 스샷 사진 권장 부분에 맞는 부문만 골라서 사용해야 한다.보기 편하게 다 구성했지만
jks 형태로 구성시 노랑색 부분을 사용
tomcat native 미설치 운용시에는 녹색 부분을 참고 사용
tomcat native 설치시에는 빨간색 부분과 주황색 부분을 참고 사용 ( 인증서 별도 작업 및 letsencrypt ssl 이용)
주의할 사항은 tomcat native 를 사용할때는 Protocol=”TLS” 사용하지 말것 / JKS 형태에서는 사용
JKS 형태의 인증서를 사용할때는 protocol=”org.apache.coyote.http11.Http11NioProtocol” 사용
PEM 형태의 인증서를 사용할때 ( native 미설치시 ) protocol=”org.apache.coyote.http11.Http11NioProtocol” 사용
PEM 형태의 인증서를 사용할때 ( native 설치시 ) protocol=”org.apache.coyote.http11.Http11AprProtocol” 사용 및
http/2 지원을 위해 <UpgradeProtocol className=”org.apache.coyote.http2.Http2Protocol”/> 사용
|
1 2 3 4 5 6 7 8 9 10 11 12 13 14 15 16 17 18 19 20 21 22 23 24 25 26 27 28 29 30 31 32 33 34 35 36 37 38 39 40 41 42 43 44 45 46 47 48 49 50 51 52 53 54 55 56 57 58 59 60 61 62 63 64 65 66 67 68 69 70 71 |
<!-- 권장 ( JKS USE / tomcat native 미설치시 --> <!-- JKS SSL Password True / HTTP/1.1 / https-openssl-nio protocol --> <Connector port="443" protocol="org.apache.coyote.http11.Http11NioProtocol" maxHttpHeaderSize="8192" maxThreads="150" enableLookups="false" acceptCount="100" connectionTimeout="20000" disableUploadTimeout="true" SSLEnabled="true" scheme="https" secure="true" clientAuth="false" Protocol="TLS" keystoreFile="/usr/local/tomcat/conf/ssl/jsp4.xinet.kr.jks" keystorePass="123456" /> <!-- 권장 (tomcat native 미설치시 --> <!-- PEM SSL Password True / HTTP/1.1 / https-openssl-nio protocol --> <Connector port="444" protocol="org.apache.coyote.http11.Http11NioProtocol" maxHttpHeaderSize="8192" maxThreads="150" enableLookups="false" acceptCount="100" connectionTimeout="20000" disableUploadTimeout="true" SSLEnabled="true" scheme="https" Protocol="TLS"> <SSLHostConfig> <Certificate certificateKeyFile="/usr/local/tomcat/conf/ssl/jsp5.xinet.kr.key" certificateFile="/usr/local/tomcat/conf/ssl/jsp5.xinet.kr.crt" certificateChainFile="/usr/local/tomcat/conf/ssl/EncryptionEverywhereDVCA.crt" certificateKeyPassword="123456" type="RSA" /> </SSLHostConfig> </Connector> <!-- 권장 (tomcat native 설치시 --> <!-- PEM SSL Password True / HTTP/2 / Tomcat Native 설치되어 있어야 함 / 미설치지 동작안됨 --> <Connector port="445" protocol="org.apache.coyote.http11.Http11AprProtocol" maxHttpHeaderSize="8192" maxThreads="150" enableLookups="false" acceptCount="100" connectionTimeout="20000" disableUploadTimeout="true" SSLEnabled="true" scheme="https"> <UpgradeProtocol className="org.apache.coyote.http2.Http2Protocol"/> <SSLHostConfig> <Certificate certificateKeyFile="/usr/local/tomcat/conf/ssl/jsp5.xinet.kr.key" certificateFile="/usr/local/tomcat/conf/ssl/jsp5.xinet.kr.crt" certificateChainFile="/usr/local/tomcat/conf/ssl/EncryptionEverywhereDVCA.crt" certificateKeyPassword="123456" type="RSA" /> </SSLHostConfig> </Connector> <!-- 권장 letsencrypt 인증서 사용 (tomcat native 미설치시 --> <!-- PEM SSL Password NONE / HTTP/1.1 / https-openssl-nio protocol --> <Connector port="447" protocol="org.apache.coyote.http11.Http11AprProtocol" maxHttpHeaderSize="8192" maxThreads="150" enableLookups="false" acceptCount="100" connectionTimeout="20000" disableUploadTimeout="true" SSLEnabled="true" scheme="https" Protocol="TLS"> <SSLHostConfig> <Certificate certificateKeyFile="/etc/letsencrypt/live/jsp.xinet.kr/privkey.pem" certificateFile="/etc/letsencrypt/live/jsp.xinet.kr/cert.pem" certificateChainFile="/etc/letsencrypt/live/jsp.xinet.kr/chain.pem" type="RSA" /> </SSLHostConfig> </Connector> <!-- 권장 letsencrypt 인증서 사용 (tomcat native 설치시 --> <!-- PEM SSL Password NONE / HTTP/2 / Tomcat Native 설치되어 있어야 함 / 미설치지 동작안됨 --> <Connector port="448" protocol="org.apache.coyote.http11.Http11AprProtocol" maxHttpHeaderSize="8192" maxThreads="150" enableLookups="false" acceptCount="100" connectionTimeout="20000" disableUploadTimeout="true" SSLEnabled="true" scheme="https"> <UpgradeProtocol className="org.apache.coyote.http2.Http2Protocol"/> <SSLHostConfig> <Certificate certificateKeyFile="/etc/letsencrypt/live/jsp.xinet.kr/privkey.pem" certificateFile="/etc/letsencrypt/live/jsp.xinet.kr/cert.pem" certificateChainFile="/etc/letsencrypt/live/jsp.xinet.kr/chain.pem" type="RSA" /> </SSLHostConfig> </Connector> |
