OS : CENTOS 7.x
Apache : 2.4.29 PHP 7.2.3 MariaDB 10.1.31 설치
LAPM ( LINUX APACHE PHPE MYSQL 최신 버전 설치 )
여기 게시글에서는 LAPM 설치 (APM) 최신버전을 설치하고 wordpress 버전도 설치 무료 인증서를 이용한 https 통신 테스트
그리고 HTTP/2 지원을 위한 통신 테스트까지 일괄 진행한다.
1. 기본 라이브러리 설치
|
1 2 3 4 5 6 7 8 |
[root@localhost ~]# yum -y install net-tools setuptool wget vim-enhanced lrzsz xinetd gcc gcc-c++ ncurses ncurses-devel cmake [root@localhost ~]# yum -y install cmake openssl openssl-devel \ libtermcap libtermcap-devel gdbm-devel \ zlib* libxml* freetype* libpng* libjpeg* gd gd-dev libmcrypt libmcrypt-devel \ mhash mhash-devel apr apr-* libxml2 iconv unixODBC readline-devel \ qpixman qpixman-devel netpbm* libxslt* gmp gmp-devel \ bzip2-devel openssl-devel pcre-devel curl curl-devel |
yum epel-release / APM 최신버전이 존재하는 ius yum.repo 추가
|
1 2 3 4 5 |
[root@localhost ~]# yum -y install epel-release [root@localhost ~]# wget https://centos7.iuscommunity.org/ius-release.rpm [root@localhost ~]# rpm -Uvh ius-release.rpm |
2. Apache 2.4.29 버전 설치
|
1 |
[root@localhost ~]# yum --enablerepo=ius -y install httpd24u httpd24u-tools httpd24u-mod_ssl |
아파치 2.4.29 버전에서 HTTP2 지원을 하려면 기본 설치된 prefork 에서는 동작이 되지 않는다 worker 또는 event 모드로 운용을 해야 하므로 수정을 진행
|
1 2 3 4 |
[root@localhost ~]# vi /etc/httpd/conf.modules.d/00-mpm.conf #LoadModule mpm_prefork_module modules/mod_mpm_prefork.so LoadModule mpm_worker_module modules/mod_mpm_worker.so |
기본 환경설정 수정
|
1 2 3 4 5 6 7 8 9 10 11 |
[root@localhost httpd]# vi /etc/httpd/conf.d/userdir.conf <IfModule mod_userdir.c> UserDir html </IfModule> <Directory "/home/*/html"> AllowOverride FileInfo AuthConfig Limit Options Require method GET POST Options MultiViews SymLinksIfOwnerMatch IncludesNoExec </Directory> |
3. 웹서비스 시작
|
1 2 3 4 5 6 7 8 |
[root@localhost ~]# systemctl start httpd [root@localhost ~]# ps -ef | grep httpd root 2544 1 2 17:43 ? 00:00:00 /usr/sbin/httpd -DFOREGROUND apache 2545 2544 0 17:43 ? 00:00:00 /usr/sbin/httpd -DFOREGROUND apache 2546 2544 0 17:43 ? 00:00:00 /usr/sbin/httpd -DFOREGROUND apache 2547 2544 0 17:43 ? 00:00:00 /usr/sbin/httpd -DFOREGROUND apache 2550 2544 0 17:43 ? 00:00:00 /usr/sbin/httpd -DFOREGROUND |
4. Mariadb 10.1.31 버전 설치 먼저 yum list에서 버전을 확인하고설치
|
1 2 3 4 5 6 7 8 9 10 11 12 13 |
[root@localhost ~]# yum --enablerepo=ius list | grep mariadb mariadb.x86_64 1:5.5.56-2.el7 base mariadb-bench.x86_64 1:5.5.56-2.el7 base mariadb-devel.i686 1:5.5.56-2.el7 base ---- 생략 mariadb101u-embedded-devel.x86_64 1:10.1.31-1.ius.centos7 ius mariadb101u-errmsg.x86_64 1:10.1.31-1.ius.centos7 ius mariadb101u-libs.x86_64 1:10.1.31-1.ius.centos7 ius mariadb101u-oqgraph-engine.x86_64 1:10.1.31-1.ius.centos7 ius mariadb101u-server.x86_64 1:10.1.31-1.ius.centos7 ius mariadb101u-server-galera.x86_64 1:10.1.31-1.ius.centos7 ius mariadb101u-server-utils.x86_64 1:10.1.31-1.ius.centos7 ius mariadb101u-test.x86_64 1:10.1.31-1.ius.centos7 ius |
|
1 2 |
[root@localhost ~]# yum --enablerepo=ius -y install mariadb101u mariadb101u-config \ mariadb101u-libs mariadb101u-errmsg mariadb101u-common mariadb101u-server |
db 기본 환경설정 / character-set 변경
|
1 2 3 |
[root@localhost ~]# vi /etc/my.cnf.d/client.cnf default-character-set = utf8 |
5. 서비스 시작 및 sql 접속 확인
|
1 2 3 4 5 6 7 8 9 10 11 12 13 14 15 16 17 18 19 20 21 22 23 24 25 26 27 28 29 30 31 |
[root@localhost ~]# systemctl start mariadb [root@localhost ~]# ps -ef | grep mysql mysql 1841 1 0 17:22 ? 00:00:00 /usr/libexec/mysqld --basedir=/usr [root@localhost ~]# mysql Welcome to the MariaDB monitor. Commands end with ; or \g. Your MariaDB connection id is 2 Server version: 10.1.31-MariaDB MariaDB Server Copyright (c) 2000, 2018, Oracle, MariaDB Corporation Ab and others. Type 'help;' or '\h' for help. Type '\c' to clear the current input statement. MariaDB [(none)]> \s -------------- mysql Ver 15.1 Distrib 10.1.31-MariaDB, for Linux (x86_64) using readline 5.1 Connection id: 2 Current database: Current user: root@localhost SSL: Not in use Current pager: stdout Using outfile: '' Using delimiter: ; Server: MariaDB Server version: 10.1.31-MariaDB MariaDB Server Protocol version: 10 Connection: Localhost via UNIX socket Server characterset: latin1 Db characterset: latin1 Client characterset: utf8 Conn. characterset: utf8 UNIX socket: /var/lib/mysql/mysql.sock Uptime: 5 sec |
들어가서 확인을 해보면 server characteset 기본 latin1 으로 되어 있다 이것을 utf8로 변경하자 서비스를 재시작 해보자
|
1 2 3 4 5 6 7 8 9 10 11 12 13 14 15 16 17 18 19 20 21 22 23 24 |
[root@localhost ~]# vi /etc/my.cnf.d/mariadb-server.cnf [server] ###chracter utf8 character-set-client-handshake=FALSE init_connect = SET collation_connection = utf8_general_ci init_connect = SET NAMES utf8 character-set-server = utf8 collation-server = utf8_general_ci [root@localhost ~]# systemctl restart mariadb [root@localhost ~]# mysql MariaDB [(none)]> \s -------------- Server: MariaDB Server version: 10.1.31-MariaDB MariaDB Server Protocol version: 10 Connection: Localhost via UNIX socket Server characterset: utf8 Db characterset: utf8 Client characterset: utf8 Conn. characterset: utf8 UNIX socket: /var/lib/mysql/mysql.sock |
기본적으로 데이터베이스를 설치하면 기본으로 적용된 엔진이 innodb가 기본값으로 되어 있다
|
1 2 3 4 5 6 7 8 9 10 11 12 13 14 15 |
MariaDB [(none)]> SHOW ENGINES\G *************************** 4. row *************************** Engine: MyISAM Support: YES Comment: MyISAM storage engine Transactions: NO XA: NO Savepoints: NO *************************** 8. row *************************** Engine: InnoDB Support: DEFAULT Comment: Percona-XtraDB, Supports transactions, row-level locking, foreign keys and encryption for tables Transactions: YES XA: YES Savepoints: YES |
만약 innodb를 사용하지 않고 myisam 을 기본으로 구성하고 싶다면 my.cnf를 수정하면 된다 ( default-storage-engine = myisam )
|
1 2 3 4 5 6 7 8 9 10 11 12 13 14 15 16 17 18 19 20 21 22 23 24 25 26 |
[root@localhost ~]# vi /etc/my.cnf.d/mariadb-server.cnf default-storage-engine = myisam skip-innodb 서비스 재시작 [root@localhost ~]# systemctl restart mariadb 서비스 접속 [root@localhost ~]# mysql MariaDB [(none)]> SHOW ENGINES\G *************************** 4. row *************************** Engine: MyISAM Support: DEFAULT Comment: MyISAM storage engine Transactions: NO XA: NO Savepoints: NO *************************** 8. row *************************** Engine: InnoDB Support: NO Comment: Percona-XtraDB, Supports transactions, row-level locking, foreign keys and encryption for tables Transactions: NULL XA: NULL Savepoints: NULL |
6. PHP 7.2.3 버전 설치 ( 해당 버전에서는 mcrypt 는 설치가 불가능하다 )
openssl 또는 libsodium 사용을 권장 먼저 버전을 확인해보자
|
1 |
[root@localhost ~]# yum --enablerepo=ius list | grep php |
많은 정보가 출력되는데 이 와중에 php72u 버전을 설치하면 7.2버전이다
한가지 중요한것은 httpd 2.4.29 버전에서 prefork 동작시 HTTP2 가 지원을 하지 못한다
HTTP2 지원을 위해서 EVENT 모드나 MPM 모드로 운용하기 위해서는 php72u-fpm-httpd 필요하다
|
1 2 3 4 5 |
[root@localhost ~]# yum --enablerepo=ius -y install php72u-xml* php72u-common php72u-cli \ php72u-devel php72u-process php72u-gd php72u-dba php72u-pdo php72u-bcmath \ php72u-mbstring php72u-pdo-dblib php72u-odbc php72u-pecl-imagick \ php72u-pecl-imagick-devel php72u-pgsql php72u-opcache php72u-intl php72u-json \ php72u-ldap php72u-mysqlnd php72u-gmp php72u-fpm-httpd |
웹서버를 이용하기 위해서는 php.ini 내용을 수정해 주자
|
1 2 3 4 5 6 |
[root@localhost ~]# vi /etc/php.ini short_open_tag = On date.timezone = "Asia/Seoul" error_reporting = "E_ALL & ~E_NOTICE & ~E_DEPRECATED & ~E_USER_DEPRECATED" upload_max_filesize = 12M |
기본 홈 디렉토리에 index.php 파일을 만들업 보자
|
1 2 3 4 5 |
[root@localhost ~]# vi /var/www/html/index.php <? phpinfo(); ?> |
이제 php-fpm 을 시작하고 웹서비스에서 확인
|
1 |
[root@localhost ~]# systemctl start php-fpm |
웹사이트에서 php 확인

그럼 이제 테스트로 워드프레스를 설치해보자 추후 SSL 테스트를 진행하기 위해서 가상의 도메인 ssltest.xinet.kr
|
1 2 3 4 5 6 7 |
[root@localhost ~]# useradd ssltest [root@localhost ~]# chmod 711 /home/ssltest/ [root@localhost ~]# mkdir /home/ssltest/html [root@localhost ~]# cd /home/ssltest/html [root@localhost html]# wget https://ko.wordpress.org/wordpress-4.9.4-ko_KR.tar.gz [root@localhost html]# tar xvfz wordpress-4.9.4-ko_KR.tar.gz [root@localhost html]# chmod 707 wordpress |
데이터베이스 생성
|
1 2 3 4 5 6 7 8 9 10 |
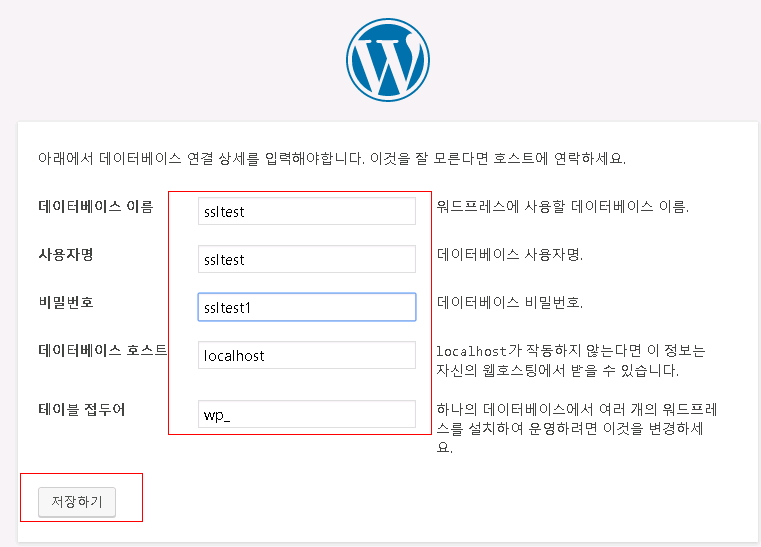
[root@localhost html]# mysql MariaDB [(none)]> create database ssltest; Query OK, 1 row affected (0.00 sec) MariaDB [(none)]> grant all on ssltest.* to ssltest@localhost identified by 'ssltest1'; Query OK, 0 rows affected (0.00 sec) MariaDB [(none)]> flush privileges; Query OK, 0 rows affected (0.00 sec) |
가상호스트 설정 및 웹서버 재시작
|
1 2 3 4 5 6 7 8 9 10 |
[root@localhost html]# vi /etc/httpd/conf.d/virtual.conf <VirtualHost *:80> DocumentRoot /home/ssltest/html ServerName ssltest.xinet.kr CustomLog logs/access_log vcommon </VirtualHost> #웹서버 재시작 [root@localhost ]# systemctl restart httpd |
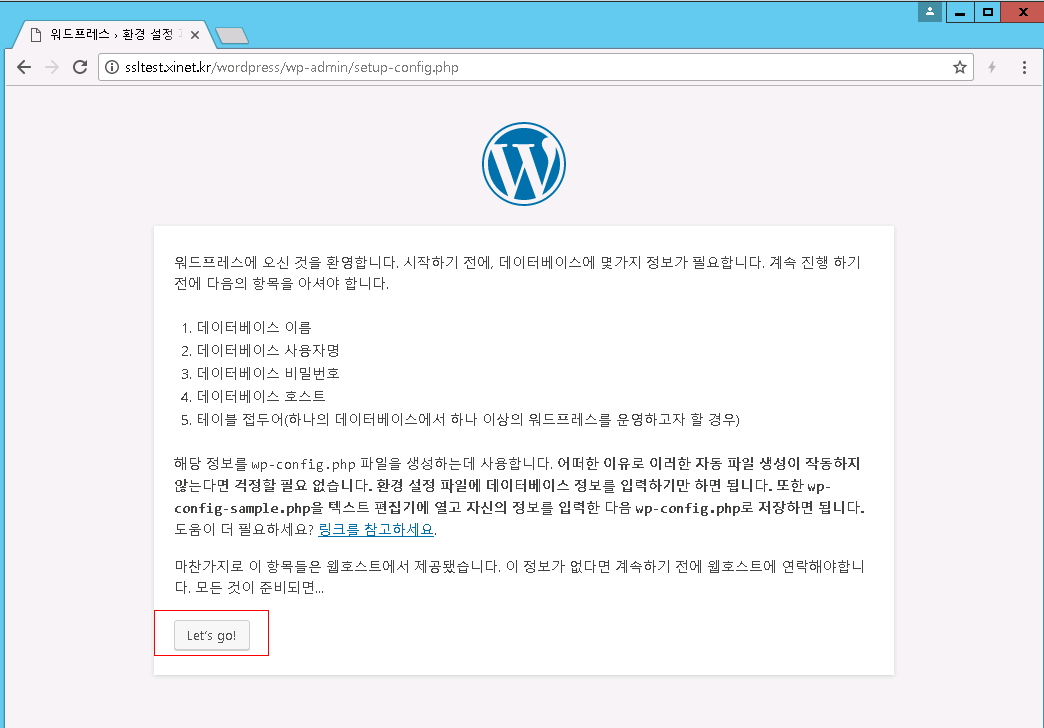
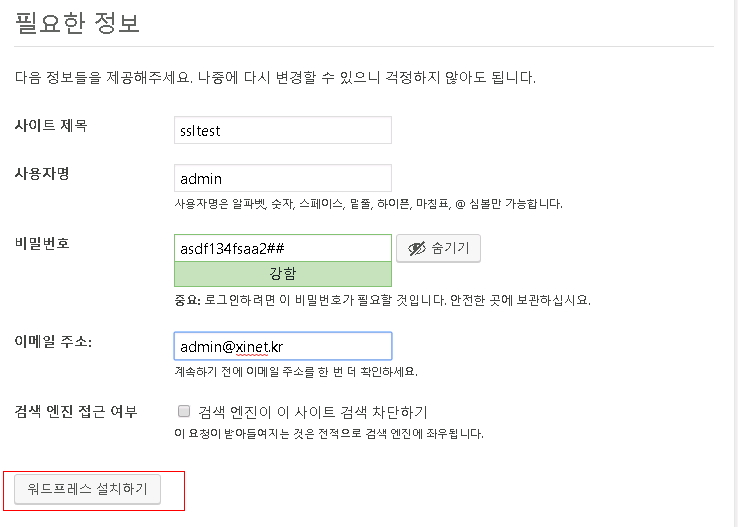
워드프레스 설치 화면

이제 설치가 완료 되었으며 HTTPS 통신과 HTTP/2 통신 테스트를 위해서 무료 인증서를 설치 진행해 보자 letsencrypt 설치
|
1 2 3 4 5 6 7 8 9 10 11 12 |
[root@localhost ~]# git clone https://github.com/letsencrypt/letsencrypt [root@localhost ~]# cd letsencrypt/ [root@localhost letsencrypt]# ./certbot-auto certonly --webroot --webroot-path=/home/ssltest/html -d ssltest.xinet.kr [root@localhost letsencrypt]# ll /etc/letsencrypt/live/ssltest.xinet.kr/ -rw-r--r-- 1 root root 543 3??15 18:15 README lrwxrwxrwx 1 root root 40 3??15 18:15 cert.pem -> ../../archive/ssltest.xinet.kr/cert1.pem lrwxrwxrwx 1 root root 41 3??15 18:15 chain.pem -> ../../archive/ssltest.xinet.kr/chain1.pem lrwxrwxrwx 1 root root 45 3??15 18:15 fullchain.pem -> ../../archive/ssltest.xinet.kr/fullchain1.pem lrwxrwxrwx 1 root root 43 3??15 18:15 privkey.pem -> ../../archive/ssltest.xinet.kr/privkey1.pem |
웹서버에 ssl 을 적용해보자 httpd.conf 파일과 ssl.conf 파일에 내용을 수정해준다
|
1 2 3 4 5 6 7 |
[root@localhost letsencrypt]# vi /etc/httpd/conf/httpd.conf ## 아래내용 수정 ServerName ssltest.xinet.kr:80 ## http/2 적용 Protocols h2 http/1.1 Protocols h2c http/1.1 |
SSL 환경 설정 파일도 내용을 아래와 같이 모두 수정해준다
|
1 2 3 4 5 6 7 8 9 10 11 12 13 14 15 16 17 18 19 20 21 22 23 24 25 26 27 28 29 30 31 32 33 34 35 36 37 38 39 40 41 42 43 44 45 |
[root@localhost letsencrypt]# vi /etc/httpd/conf.d/ssl.conf Listen 443 https SSLProtocol ALL -SSLv2 -SSLv3 SSLCipherSuite "ECDHE-ECDSA-AES128-GCM-SHA256 \ ECDHE-ECDSA-AES256-GCM-SHA384 \ ECDHE-ECDSA-AES128-SHA \ ECDHE-ECDSA-AES256-SHA \ ECDHE-ECDSA-AES128-SHA256 \ ECDHE-ECDSA-AES256-SHA384 \ ECDHE-RSA-AES128-GCM-SHA256 \ ECDHE-RSA-AES256-GCM-SHA384 \ ECDHE-RSA-AES128-SHA \ ECDHE-RSA-AES256-SHA \ ECDHE-RSA-AES128-SHA256 \ ECDHE-RSA-AES256-SHA384 \ DHE-RSA-AES128-GCM-SHA256 \ DHE-RSA-AES256-GCM-SHA384 \ DHE-RSA-AES128-SHA \ DHE-RSA-AES256-SHA \ DHE-RSA-AES128-SHA256 \ DHE-RSA-AES256-SHA256 \ EDH-RSA-DES-CBC3-SHA" SSLHonorCipherOrder on AddType application/x-x509-ca-cert .crt AddType application/x-pkcs7-crl .crl SSLPassPhraseDialog builtin SSLSessionCache "shmcb:/usr/local/apache/logs/ssl_scache(512000)" SSLSessionCacheTimeout 300 SSLCompression off SSLSessionTickets off SSLUseStapling on SSLStaplingResponderTimeout 5 SSLStaplingReturnResponderErrors off SSLStaplingCache "shmcb:/usr/local/apache/logs/ocsp(128000)" <VirtualHost *:443> DocumentRoot "/home/ssltest/html" ServerName ssltest.xinet.kr SSLEngine on SSLCertificateFile /etc/letsencrypt/live/ssltest.xinet.kr/cert.pem SSLCertificateKeyFile /etc/letsencrypt/live/ssltest.xinet.kr/privkey.pem SSLCertificateChainFile /etc/letsencrypt/live/ssltest.xinet.kr/chain.pem SSLCACertificateFile /etc/letsencrypt/live/ssltest.xinet.kr/fullchain.pem </VirtualHost> |
웹서버 오타나 문제 있는지 체크 후 이상 없으면 웹서버 재 가동
|
1 2 3 4 |
[root@localhost letsencrypt]# httpd -t Syntax OK [root@localhost letsencrypt]# systemctl restart httpd |
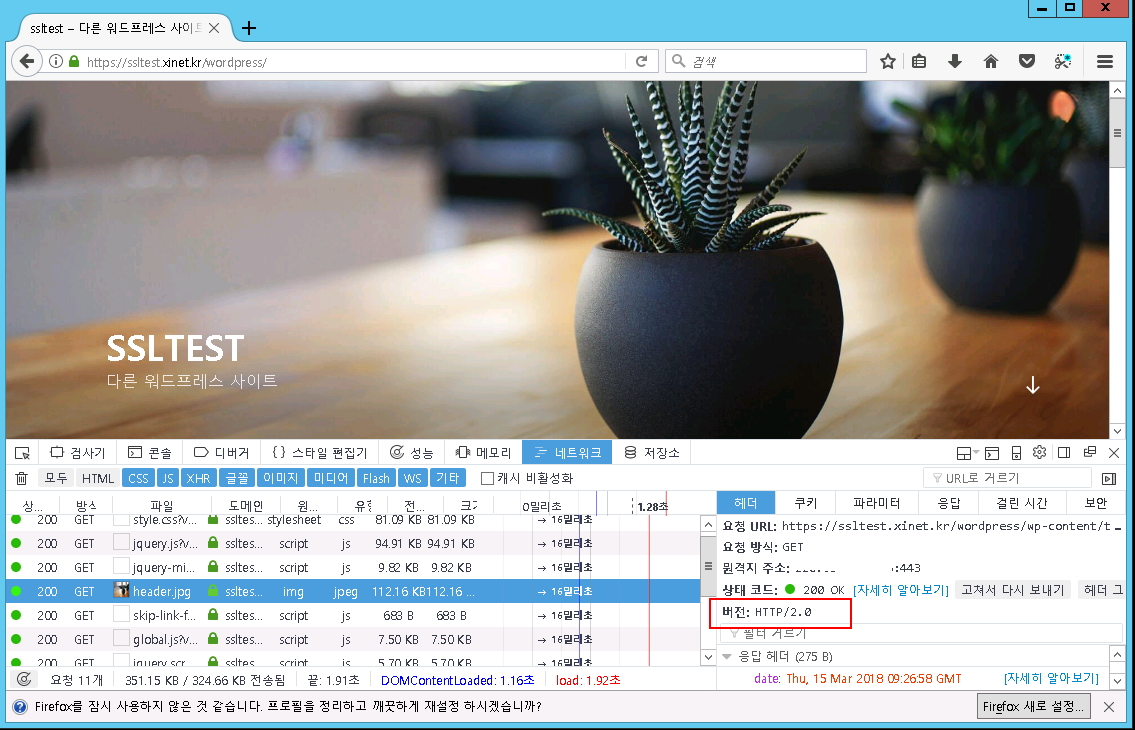
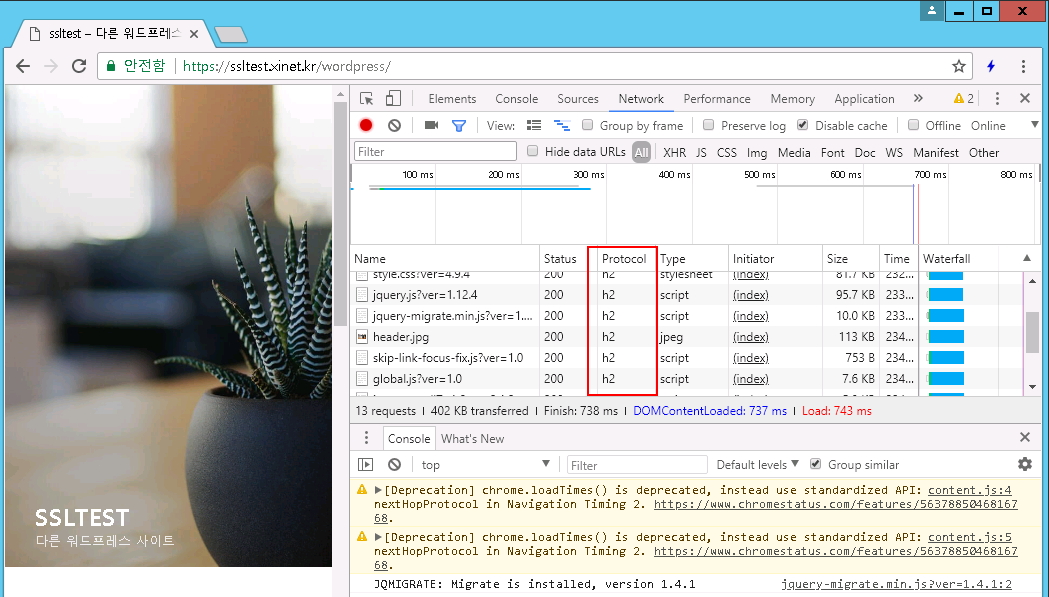
웹주소창에 https://ssltest.xinet.kr/wordpress/ 사이트를 뛰우고 파이어폭스 및 구글에서 H2로 통신되는지 체크를 해보자